background image


505R-20011128 

33 

STAR 505R


ID TECK 


ACCESS CONTROLLER


14.2.4  Setting Holiday Index 


14.2.5  Setting Mode Index 


MODE    INDEX 


HOL      INDEX 

00


HOLIDAY    INDEX 


MODE    INDEX 

00 

You choose which Holiday time schedule(date registration set) is to be 

used. The default index is “00”. Choose the schedule you programmed(01-

10). If necessary, press <ENT> key. 

Enter Index number(00~10) and press <ESC> key to finish selecting. You 

will then automatically be returned to the setup menu. 

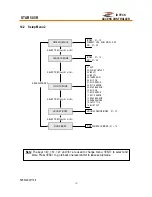
The function to apply the Time schedule to operating mode, which must 

be applied. The default index is “00”. If necessary, press <ENT> key. 


Enter Index number(0~10) and finish. During the period of time the 

applied T/S indicates, your controller will operate in RF only mode and for 

the rest of the time, in RF card + four digit password mode. Press <ESC> 
key to end the selecting, then the first figure of the menu is displayed on the 

LCD. 

Summary of Contents for Star 505R

Page 1: ...505R 20011128 1 STAR 505R ID TECK ACCESS CONTROLLER USER S MANUAL STAR 505R Access Controller ID TECK Co Ltd ...

Page 2: ...l Description 6 6 Identifying Supplied Parts 6 7 Installation of the Product 7 8 Color Coded Wiring Table 8 9 System Wiring for Typical Application 9 10 Wiring for Network 11 11 Functions 11 12 Operation 13 13 Basic settings 14 14 Setting Changes 19 15 Operating status indications 43 16 FCC Registration Information 44 17 Warranty and Service 45 18 Template 46 ...

Page 3: ...hort circuit parts possibly resulting in fire or electric shock Never spill liquid of any kind on the product 7 Never disassemble this product by yourself take the unit to a qualified service center whenever service or repair is required Opening or removing the covers may expose you to dangerous voltages or other risks Also incorrect reassembly can cause electric shock when the unit is subsequentl...

Page 4: ...ng values such as ID numbers inputs outputs real time clock time schedules and event transaction reports can be uploaded and or downloaded to and from the host computer The compact and contemporary unit is easily installed and programming requires no significant knowledge of access control or time attendance The Three LED indicator lights inform you of the systems operating status at real time and...

Page 5: ...tput 4 Inputs max rating at DC12V 20mA 2 Relay outputs DC12V 24V 2A max 2 TTL outputs DC5V 20mA Communication One RS 232 port and one RS 422 port 4800 9600 default 19200 bps Baud Rate Address selectable up to 32ea Keypad 16 Numeric Keypad back lighting LCD 1x LCD module 2Lines x 16ch 65 6 x 13 8mm view area LED 3 LEDs red green and yellow Operating environment range 35 C to 65 C 10 to 90 Humidity ...

Page 6: ... CONTROLLER 5 Front Panel Description 6 Identifying Supplied Parts Please unpack and check the contents of the box Card Read Status LED 16 Numeric Keypad Function Key LCD System Operation Status LED Main Unit 1 Wall Mount 1 O Ring 5 Manual 1 ...

Page 7: ...o the wall CAUTIONS Before mounting the STAR 505R unit to the Wall Mount bracket operational test of the unit should be completed as the locking pins will lock the unit to the Wall Mount Removing the unit from the Wall Mount bracket after they have been installed together may cause damages to the bracket and render its effectiveness 7 3 Insert 5 O rings to the wall mount as indicated then route th...

Page 8: ...with White stripe Alarm RELAY NO NO 2 Purple wire TTL Output1 TTL1 Orange wire with White stripe TTL Output2 TTL2 Brown wire with White stripe INPUT Exit Button EXIT Orange wire Door Sensor CONTACT Yellow wire with Red stripe Aux Input 1 IN 1 Green wire Aux Input 2 IN 2 Green wire with White stripe WIEGAND INPUT OUTPUT Wiegand Data 0 DATA0 Pink wire Wiegand Data 1 DATA1 Cyan wire RS232 INTERFACE R...

Page 9: ...ct wire of Door Lock to Door RELAY NC Blue White stripe wire of main unit Connect wire of Door Lock to Power GND wire of main unit 9 2 2 Connection of POWER FAIL SECURE Door Lock Connect Door RELAY COM Grey Red stripe wire to DC 12V be sure that the existing power supply has enough capacity to support this accessory or upgrade to a sufficient one Connect wire of Door Lock to Door RELAY NO White Re...

Page 10: ... support this accessory or upgrade to a sufficient one Connect wire of Reader to Power GND wire Connect Wiegand output DATA0 wire of the additional Reader to DATA0 Pink wire Connect Wiegand output DATA1 wire of the additional Reader to DATA1 Cyan wire 9 8 RS 232 Communication Port Connection 9 pin connector COM Port female is required to connect serial communication RS 232 between Main Unit and Pe...

Page 11: ...ts own memory and sent to the host computer The access controller is a true standalone device that in the event of a malfunction will not affect other units even if used in conjunction with one another 11 2 Operation with Host Computer All event data can be managed via the host computer The data transmitted from the controller can be displayed and stored on the host PC 11 3 Keypad In the event tha...

Page 12: ...med individually to address work shifts weekends and holidays All scheduling can be programmed through the keypad and LCD or via the software program on the host computer Also you can set periods of time about output following input and only output the former correspond to Input the latter correspond to Output So you can set Input and Output according to each T S All these can be defined through t...

Page 13: ...red Card or PIN 12 3 Exit Open the Door To request for exit from the inside an Exit Button or Exit Reader can be used to open the door 12 4 Action And Alarm Caused by Unregistered Card or PIN When an unregistered card or PIN is read and access is denied the Alarm can be activated for 3 seconds along with a buzzer sound Unregistered Card or PIN If you do not want to activate the Alarm in case of un...

Page 14: ... ID YES ENTER SETUP MENU END SETTING REGISTERED ID CHECK REGISTERED ID FLAGS RIGHT OUTPUT CONTROL OF EACH STATUS NO YES YES NO YES NO SETTING IN SETUP MODE Outputs are programmable see setup menu F2 section P W T S Door Duress mode APB etc NO DURESS P W YES DURESS FLAG SET Initialize END Turn OFF Power Turn off Power System initialization completion If you turn on the system power after connecting...

Page 15: ...he system power after connecting 3 wires pink cyan and black GND you can enter into system initialize mode Disconnect the 3 wires pink cyan black 13 3 Enter into setup menu To set or to change the STAR 505R access controller s operation enter the eight digit Master number factory setting 00000000 or CARD Note You can change the Master ID see 14 1 8 INITIAL DISPLAY MODEL NAME CURRENT TIME ID INPUT ...

Page 16: ...CD when finished Initial display after time setting Year Month Day Hour Min Sec Day Initial display STAR 505R F1 MM DD hh mm ss Master ID 00000000 Select Time Setting menu Setup menu F1 TIME SETTING MM DD hh mm ss YYYYMMDDhhmmssW 200107050918305 ENT TIME SETTING 07 05 09 18 30 ESC STAR 505R F1 07 05 09 18 30 After change Master Initial Master ENT Day code 1 Sun 2 Mon 3 Tue 4 Wed 5 Thu 6 Fri 7 Sat ...

Page 17: ...Registration by RF Cards RF mode or RF PW mode 2 Registration by Key_pad PIN mode Initial display STAR 505R F1 MM DD hh mm ss Master ID 00000000 Select ID Registration menu Setup menu F3 ID REGISTRATION ENT Input PW TS RD ENT Success Scanning Approach card reader1 25500100 PW1234 TS00 RD3 Completion Success Input PW TS RD ENT Input Registration key 4 6digit ENT 999999 PW1234 TS00 RD3 ID ______ PW_...

Page 18: ... here If there is no need to apply the Time Schedule anytime accessible with that card enter 00 for the value 3 The RD is for selecting accessible reader for the card Usually 3 both readers is used when using both entry and exit readers If 1 is entered for the value only reader 1 will recognize the card and reader 2 will deny access indicating ACCESS DOOR ERR on the LCD this is also the choice whe...

Page 19: ...IZE 10 CARD ID CLEAR 11 TIME SCHE CLEAR 12 RF_PIN_INPUT 13 EVENT MEMORY 14 DURESS MODE SET SETUP F1 MODE SETUP F2 MODE 1 TIME SCHEDULE 2 HOLIDAY SETTING 3 IN OUT DEFINE 4 HOLIDAY INDEX 5 MODE INDEX 1 ID REGISTRATION 2 ID DELETE 3 ID LIST 4 REG ID COUNT 5 ID COUNT SETUP F3 MODE 1 VERSION 2 SRAM TEST 3 OUTPUT TEST 4 LCD TEST 5 KEYPAD TEST 6 READER TEST 7 INPUT TEST 8 COMM TEST SETUP F3 MODE To set o...

Page 20: ...ELECTION RF P W PassWord RF Only SEARCHING KEY key 4 or 6 PIN 15 digit key in 2 digit key in Note There are four main setup menus You need to press F1 key for setup menu F1 F2 key for setup menu F2 F3 key for setup menu F3 and F4 key for setup menu F4 The keys 4 6 2 and 8 are used to change submenus or to select values ENT to select and set ESC to go to upper step or to leave setup mode When selec...

Page 21: ...DISABLE SEARCHING KEY key 4 or 6 EVENT MEMORY NOT USE USE SEARCHING KEY key 4 or 6 SEARCHING KEY key 4 or 6 SEARCHING KEY key 4 or 6 SEARCHING KEY SYSTEM INITIALIZE YES NO CARD ID CLEAR YES NO SEARCHING KEY key 4 or 6 SEARCHING KEY key 4 or 6 EVENT CLEAR NO MASTER ID CHANGE SEARCHING KEY key 4 or 6 CARD KEY SEARCHING KEY key 4 or 6 YES YES ...

Page 22: ...inish selecting by pressing ENT key For the next setting use 4 and 6 keys Note RF only The door is accessible with the card alone RF PW To access the door the card and the password is needed PIN The door is accessible with the Identity Number 4 6 digit by the keypad READER1 MODE RF ONLY READER1 MODE RF PW READER1 MODE RF ONLY READER1 MODE PIN This menu is to select reader2 operating mode You can c...

Page 23: ... the input information is out of range an error message appears on the LCD and the current time value is to be kept Day code 1 Sun 2 Mon 3 Tue 4 Wed 5 Thu 6 Fri 7 Sat For example 200106071330253 for Tuesday June 7 2001 01 30 25PM You can select whether the Anti Pass Back APB is used or not The lower line on the LCD indicates the current mode To change mode press ENT key TIME SETTING MM DD hh mm ss...

Page 24: ... on the LCD is the current communication ID Device No Press ENT key again to set a new communication ID When the cursor is blinking enter a new ID two digit number then the setting is completed For the next setting use 4 and 6 keys Possible ID is between 00 31 inclusive The number on the LCD is the current communication speed in Baud rate Press ENT key to adjust the speed Available speeds are 4800...

Page 25: ...ontroller by RF cards or through the keypad For RF cards Press 1 key the keypad 2 key or you can quit the registration by pressing ESC key Enter a new Master password four digit and finish changing by pressing ENT key The figure indicates that changing Master ID is finished successfully and soon will return to the first figure of this menu For the next setting use 4 and 6 keys Scanning MASTER ID C...

Page 26: ...If you want to do so press ENT key When this figure appears on the LCD press 1 key to clear and 0 key to cancel the operation then the LCD automatically returns to the start menu CAUTION This function will remove ALL registered ID cards Used to erase ALL the time schedules If you want to do so press ENT key CAUTION This function will erase ALL programmed time schedules When this figure appears on ...

Page 27: ...whether the Duress mode is used or not The lower line on the LCD indicates the current mode To change mode press ENT key DURESS MODE SET NOT USE DURESS MODE SET USE DURESS P W 00 DURESS P W 00 DURESS MODE SET NOT USE DEFAULT USE DURESS P W IF DURESS MODE USED SELECT KEY 4 or 6 keys ENT DISPLAY CURRENT P W ENTER NEW P W 2 digit ENT ENT ESC If you select USE then system displays the current DURESS P...

Page 28: ... CONTACT 03 INPUT 1 04 INPUT 2 05 TAMPER S W 06 R1 ID OK 07 R1 ID ERROR 08 R1 T S ERROR 09 R1 APB ERROR 10 R2 ID OK 11 R2 ID ERROR 12 R2 T S ERROR 13 R2 APB ERROR 14 DURESS MODE 15 OUTPUT T S 16 IN OUTPUT INDEX 01 10 NO 01 32 INDEX 01 10 WEEKLY HOL SUN MON SAT NO 01 05 HOLIDAY DEFINE INDEX 01 10 TIME SCHEDULE INDEX 01 10 Note The keys 4 6 2 and 8 are used to change menu ENT to select and store Pre...

Page 29: ...4 2 2 page 30 and five shifts can be defined for each day To set time schedules press ENT key from this menu Press 2 key or 8 key to adjust the Time Schedule T S number 1 10 and the day of the week Mon Sun and HOL Define which shift of the day 1 5 using the 4 key and 6 key HOL refers to specific holidays you will register see 14 2 2 page 30 Press ENT key and the cursor will blink then enter the be...

Page 30: ...r up to 10 years Press ENT to register the days HOLIDAY T S HOL T S 01 01 00 00 month date 1 Holiday Time schedule Date registration set number 01 10 10 years 2 Index for the days 01 32 32 days With 2 key and 8 key select the date registration set number 1 10 and with 4 key and 6 key select the index for the days 1 32 Then press ENT key and the cursor will blink then enter the date in the form of ...

Page 31: ... table 1 below To set the values press ENT key Select input sources by changing index No with the keys 4 and 6 and press ENT key and you ll see a cursor blinking at the first digit from the left of the five couples of digit which corresponds to relay1 relay2 TTL1 TTL2 and buzzer respectively Then enter the delay times refer to the table below one by one Now an inputs outputs definition has complet...

Page 32: ...3 00 00 00 14 Duress Mode 03 00 03 03 03 15 Output T S 00 00 00 00 00 Input1 Input2 Input3 Input4 Input5 16 Input Output T S 00 00 00 00 00 Note 1 The relation between index number and input is shown in the table above 2 The inputs of index No 3 4 are signals from extra equipments such as PIR sensor Fire sensor and etc connected to the controller The index No 5 corresponds to the tamper switch inp...

Page 33: ...Index number 00 10 and press ESC key to finish selecting You will then automatically be returned to the setup menu The function to apply the Time schedule to operating mode which must be applied The default index is 00 If necessary press ENT key Enter Index number 0 10 and finish During the period of time the applied T S indicates your controller will operate in RF only mode and for the rest of th...

Page 34: ...y 4 or 6 SEARCHING KEY ENTER ID DISPLAY REGISTERED ID DISPLAY REGISTRATION ID COUNT DISPLAY POSSIBLE REGISTRATION ID COUNT KEY PIN mode CARD RF only or RF PW mode KEY CARD ID EVENT 500 7 250 1 000 7 000 1 500 6 750 2 000 6 500 2 500 6 250 3 000 6 000 9 000 3 000 9 500 2 750 10 000 2 500 Note On setup menu F3 there are functions to register additional IDs to delete registered IDs and to display the...

Page 35: ...erring to the following information Then the registration of the card is finished and the reader will be waiting for another card displaying the second menu of the menu Press ESC key to end registering IDs then the first figure of the menu will appear 1 PW password the password used in RF password mode 2 TS Time schedule 00 Anytime accessible 01 10 Accessible according to each T S index 3 RD Reade...

Page 36: ...ete Then the following message will show on the LCD You can quit the deletion by pressing ESC key The display shows on the LCD for a second indicating that the deletion is finished successfully and then waiting for a next RF card ID number ID DELETE 1 Card 2 Key Scanning ID Number is deleted in the controller by RF cards or through the keypad For RF cards Press 1 key the keypad 2 key or you can qu...

Page 37: ...pplied T S and the reader code are displayed on the LCD and you can scroll to the next ID using the 4 and 6 keys Press ESC key when you finished to return to the setup menu ID LIST TOP ID LIST BOTTOM This message will appear momentarily when scrolling back to the top of the list using the 4 key After a few seconds the ID for the first user reappears This message will appear momentarily when scroll...

Page 38: ...ation which must be a multiple of 500 EVENT MEMORY NOT EMPTY ID TOTAL COUNT Wrong You ll see this message when the event memory have been used and it s not empty You can try again after uploading the data to the host or deleting them using the setup mode F1 14 1 7 event clear This message will show when the entered number is less than the total number of the registered IDs If you want to delete so...

Page 39: ...EY key 4 or 6 SELECT KEY key 4 or 6 SELECT KEY key 4 or 6 SEARCHING KEY SRAM TEST OUTPUT TEST LCD TEST KEYPAD TEST READER TEST READER TEST INPUT TEST INPUT TEST COMM TEST COMMUNICATION TEST RS 232 SELECT KEY key 4 or 6 SELECT KEY key 4 or 6 SELECT KEY key 4 or 6 Note On setup menu F4 there are self diagnosis functions to test the performances of the STAR 505R To test press ENT key ...

Page 40: ...TTL1 output This test is applicable to TTL2 output This test is applicable to Buzzer output RAM test pass Press any key Memory fail 0 RAM testing SRAM TEST To test the memory press ENT key This message would indicate the SRAM has problems In this event contact technical support Press any key to return to the setup menu Use 4 key and 6 key for testing other performances This message appears when th...

Page 41: ...und as it works Third the LCD changes its figure ON OFF ON OFF Fourth the buzzer beeps twice Note The LCD provides no message to indicate if the test has finished successfully This figure means that the test has finished Press any key to return to the setup menu Use 4 or 6 key to scroll to perform other tests To test the performance of the LCD press ENT key As the test proceeds several characters ...

Page 42: ...s Note 1 Input 1 4 0 ON 1 OFF 2 Input 5 0 OFF 1 ON Scanning Reader 1 00312345 Card No Reader No COMM test pass Press any key TX data 0 COMM fail COMM TEST INPUT TEST INPUT TEST 11111 INPUT 1 As the test proceeds you can see the characters being transmitted and received This message indicates that the communication test has succeeded This message indicates there is a problem with the communication ...

Page 43: ...nted to the unit SCHEDULE ERROR Displayed when a Time Schedule error occurs APB ERROR Displayed when an anti pass back error occurs PASSWORD ERROR Displayed when an invalid password is entered ACCESS DOOR ERR Displayed when a registered card or PIN that is supposed to access the other reader is presented to the reader This may occur if 1 or 2 is entered for the RD value when the card was being reg...

Page 44: ...Class A Digital Device pursuant to Part 15 of the FCC Rules These limits are designed to this equipment generates uses and can radiate radio frequency energy and if not installed and used in accordance with the instructions may cause harmful interference to radio communications However there is no guarantee that interference will not occur in a particular installation If this equipment does cause ...

Page 45: ...Contact Technical Support In the United states RF LOGICS Inc Service Center 3026 Scott Blvd SANTA CLARA CA95054 Tel 408 980 0001 Fax 408 980 8060 E mail rflogics rflogics com Web site www rflogics com Outside of the United states ID TECK CO LTD Service Center 5F Ace Techno Tower Bldg 684 1 Deungchon dong Kangsuh gu SEOUL 157 030 KOREA Tel 82 2 659 0055 Fax 82 2 659 0086 E mail webmaster idteck com...

Page 46: ...505R 20011128 46 STAR 505R ID TECK ACCESS CONTROLLER MEMO ...

Page 47: ...505R 20011128 47 STAR 505R ID TECK ACCESS CONTROLLER 18 TEMPLATE ...

Page 48: ...505R 20011128 48 STAR 505R ID TECK ACCESS CONTROLLER ID TECK Co Ltd ...

Reviews: