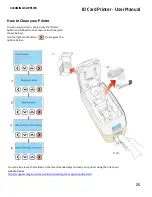
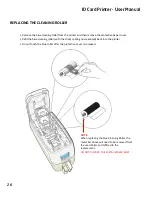
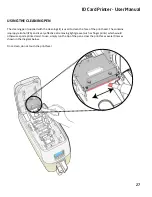
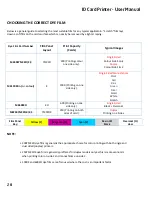
background image


• Enable or Disable the WiFi dongle

• Set sta�c addresses

• Connect to hidden networks

• Obtain the MAC address

The “Advanced” dialog will allow you to perform the following:


ID Card Printer - User Manual 

18

ADVANCED

Summary of Contents for ID Maker Apex

Page 1: ......

Page 2: ...Accessing the Driver Se ngs 20 Printer Front Display Menu Op ons 22 Addi onal Useful Informa on 24 Maintaining Your Printer is Important 24 Caring for Your Printer 24 Cleaning Supplies 24 How to Clean Your Printer 25 Replacing the Cleaning Roller 26 Using the Cleaning Pen 27 Choosing the Correct Dye Film 28 Choosing the Correct Cards 29 Card Size 29 Card Thickness 29 Card Requirements Necessary Fo...

Page 3: ...Upgrading to Duo Opera on 30 General Data Protec on Regula on GDPR 30 Printer Error Codes 31 FCC Declara on 48 CE Declaraton 48 ...

Page 4: ...n for this printer the building installa on must be protected by a 16 amp circuit breaker Bei Anschluß des Druckers an die Stromversorgung muß sichergestellt werden daß die Geräudeinstalla on mit einem 16 A Überstromschalter adgesichert ist CAUTION Unapproved changes or modifica on to the equipment could void the users authority to operate the printer and affect any related warranty claim To prevent...

Page 5: ... your ID Card Printer This guide will help you make your prin ng experience more enjoyable and cost effec ve Please ensure you have the following items outlined in the Quickstart Guide below before you begin the installaion ID Card Printer User Manual 5 ...

Page 6: ...pening the printer s lid Cable access at the rear WiFi on this device operates at a frequency of 2 4 GHz Do not locate the pirnter in close proximity to devices which could interferece with WiFi opera ons and connec vity eg microwave ovens direct satellite services power sources 2 4Ghz phones wireless or RF video See Below ID Card Printer User Manual 6 PRINTER AND DYE FILM ENVIRONMENTAL REQUIREMEN...

Page 7: ...acker 70 card capacity Blue Cleaning Roller Front Card Flipper DC Power Ethernet USB WiFi only Reer Card Hopper 100 card capacity PRINTER KEY COMPONENTS PRINTER FRONT VIEW REAR CONNECTOR PANEL DETAIL PRINTER REAR VIEW WiFi Dongle Insert the WiFi dongle plug into the corresponding socket on the rear panel of the printer ...

Page 8: ...r s lid is closed with the printer powered on and the dye film fi ed the printer will begin to ini alise As part of this process the rpinter will read an iden fica on tag in the film which contains informa on about the film type and capacity INSTALLING THE DYE FILM ID Card Printer User Manual 8 ...

Page 9: ...l 9 Connect power supply lead as shown below but do not connect the USB lead at the stage the USB is connected a er the driver and successfully been installed CONNECTING THE POWER SUPPLY DO NOT CONNECT THE USB LEAD AT THIS STAGE ...

Page 10: ...The Driver installa on so ware will guide you through the installa on process To set up WiFi the printer must be installed via USB first This website provides complete End User support covering Unboxing and se ng up your printer Upda ng the printer s firmware Card Design so ware The op on to Register your printer ID Card Printer User Manual 10 ...

Page 11: ...ID Card Printer User Manual 11 Click on setup exe icon Select the relevant language Wait for the installer to ini alize INSTALLER GUIDE ...

Page 12: ...ID Card Printer User Manual 12 Select the port type for installa on Click install ...

Page 13: ... Select USB WiFi and click next Agree to license agreement USB INSTALLATION ID Card Printer User Manual 13 ...

Page 14: ...B ID Card Printer User Manual 14 NOTE If Cancel is clicked you will be asked to confirm this The installer will then end The installa on will be completed but the printer will not be connected This will happen when the printer is physically connected via the USB NOTE Wi Fi connec vity is not an available op on for this printer Wait for the installa on progress bar to finish ...

Page 15: ... Select Ethernet and model Enter the IP address of the printer this can be obtained using the printer s front panel menu ETHERNET INSTALLATION 15 ID Card Printer User Manual ...

Page 16: ... Wait for the installa on progress bar to finish Agree to the license agreement 16 ID Card Printer User Manual ...

Page 17: ...al A er comple on of the installa on you will be prompted with the following dialog to signal the installa on is complete CONGRATULATIONS The driver installa on is now complete You can now print from your chosen applicaiton 17 ...

Page 18: ...Enable or Disable the WiFi dongle Set sta c addresses Connect to hidden networks Obtain the MAC address The Advanced dialog will allow you to perform the following ID Card Printer User Manual 18 ADVANCED ...

Page 19: ...ID Card Printer User Manual No WiFi dongle installed in the printer Incorrect password unable to connect ERRORS 19 ...

Page 20: ...n the Start menu icon bo om le of PC screen and select the Search op on Search for Control Panel and select the Devices and Printers op on you may need to set your View By op on to Small Icons depending on your PC setup In the Devices and Printers window right click on the printer thumbnail and select Prin ng Preferences ACCESSING THE DRIVER SETTINGS ID Card Printer User Manual 20 ...

Page 21: ...anipula on op ons including color correc on print head power density and color adjustment Color profiles also supported ADVANCED Re writeable card support including the op on for user definded areas on card SAVE Specfic user se ngs can be saved and restored at a later date Factory restore op on available HELP WITH DRIVER SETTINGS The Printer Driver contains a built in help file in HTML format this file...

Page 22: ...t Cleaning card now Hand feed mode ON OFF Print test Print test Are you sure No Yes NOTE Using the Keys Standby me can be selected for the following periods minutes 15 60 600 or OFF Clean Rollers Hand feed mode Print test Mag test More Standby me Network info Dye film info Cards printed Serial number So ware info Hardware info Reboot printer Standby me OFF ON OK Network info 192 XXX XX XXX Dye film ...

Page 23: ...number 12345678 Hardware info Hardware info Issue number So ware info So ware info Firmware version A B C D NOTE To accept a menu op on or return to a previous menu press the displayed OK or Back op ons respec vely 600 Printer Front Panel Layout Back OK Printer Main Display Menu Naviga on Bu ons Menu Select Bu on ID Card Printer User Manual 23 ...

Page 24: ...less likely to require factory maintenance and or repair In normal environments regular maintenance should improve the longevity of the print head itself Remember foreignpar cles can lodge under the head and cause permanent damage Increased reliability when magne c encoding ensuring the encoded data can be read accurately reliably and con nously Cleaning Kit Item Cleaning Rollers Item CARING FOR Y...

Page 25: ...our printer using the link to our website below h ps support magicard com solu ons cleaning the magicard 600 video To clean your printer simply press the Menu bu on and follow the on screen instruc ons also shown below Use the right most bu on to progress the op ons below 3 4 2 1 ID Card Printer User Manual 25 ...

Page 26: ... DO NOT DISCARD THIS METAL ROLLER BAR ID Card Printer User Manual 26 Remove the blue cleaning roller from the pirnter and then remove the protec ve paper cover Refit the blue cleaning roller with the s cky coa ng now exposed back into the printer Do not touch the blue roller a er the protec ve cover is removed REPLACING THE CLEANING ROLLER ...

Page 27: ...l alcohol IPA and is very effec ve at removing light grease such as finger prints which would otherwise spoil a printed card to use simply run the p of the pen across the print face several mes as shown in the diagram below Once clean do not touch the print face USING THE CLEANING PEN 27 ID Card Printer User Manual ...

Page 28: ...lm Panel Key Yellow Y Magenta M Cyan C Resin K black Overcoat O clear Below is a general guide to selec ng the most suitable film for any typical applicatoin Scratch film lays down a so film on the cards surface which can easily be removed by a light scraping 300YMCKO dye film is generally the appropriate choice for color prin ng with both single and dual sided duplex printers 250YMCKOK dye film is gen...

Page 29: ... CR80 M3610 054 Self adhesive blank white cards CR80 USA M9006 796 HoloPatch blank white cards with gold seal CR80 M9006 797 HoloPatch blank white cards with gold seal and magne c stripe CR80 E9323 Blank rewritable cards front PVC back 54 0 mm 2 125 inches 642 pixels 85 60 mm 3 375 inches 1013 pixels ID Card Printer User Manual Not all white PVC cards are the same For best image quality always use...

Page 30: ...types of self adhesive cards Thorough inves ga on and tes ng has shown that poor quality or incorrect card types will cause Poor image quality Card feed failures Cu ng or snapping dye film Cards jamming during prin ng We recommend only using self adhesive cards supplied by your ID card supplier USING SELF ADHESIVE CARDS Printers can be supplied in two variants UNO single sided or DUO double sided S...

Page 31: ...eed a card from the hopper it took too long for the front sensor to block 3 HAND FEED ERROR 3 0 While hand feeding a card it Check Hand Feed mode took too long for the front sensor to block 3 1 While hand feeding a card it took too long for the hopper sensor to detect a card 4 CARD JAM 4 0 While moving the card forwards Open the printer s Lid and to the front sensor in remove the jammed card prepa...

Page 32: ...per to the standby position it took too long for the mid sensor to block 4 7 While feeding a card from the hopper and having seen the card reach the rear sensor it took too long for the mid sensor to block 4 8 While feeding a card from the hopper and having seen the card reach the mid sensor it took too long to clear the rear sensor by rewinding the feed motor 4 9 While moving the card forwards to...

Page 33: ...having seen the card reach that sensor it took too long to unblock 4 17 While moving the card into position for a printing or encoding operation it took too long for the reference edge of the card to move in front of the sensor used for positioning In the case of extended mono prints this means the mid sensor took too long to block In other cases this means it took too long for the rear sensor to ...

Page 34: ...edge of the card reach the front sensor it took too long for the front sensor to unblock 4 21 While moving the card from the flipper to the standby position and having seen the card reach the mid sensor it took too long for the mid sensor to unblock 4 22 While trying to feed a card from the hopper and having seen the card reach the front sensor it took too long for the front sensor to unblock 4 23...

Page 35: ...t dye panel it too long for the next panel boundary to be detected 5 2 It took too many attempts for the printer to find a particular panel of dye film possibly because the dye sensor needs calibration 5 3 A valid dye film RFID tag was found but no physical ribbon could be detected while trying to take up the film slack 5 4 A valid dye film RFID tag was found but there were no shots remaining 5 5 ...

Page 36: ...ye film had an Try a new dye film invalid RFID tag Either the tag was not programmed correctly or there is a problem with the RFID tag reader 6 1 A dye film ribbon was detected but a valid dye film RFID tag could not be found This printer is not configured to permit tagless film 6 2 The fitted dye film does not have the right region code for this printer Try another roll of film 6 3 The fitted dye...

Page 37: ... printer detected film was loaded when trying to carry out the cleaning routine 8 CAM ERROR 8 0 While moving the printhead cam to the closed position it took too long to detect the trailing edge of the cam pulley flag 8 1 While initialising the cam it took too long to detect the leading edge of the cam pulley flag 8 2 While initialising the cam and having detected the leading edge of the cam pulle...

Page 38: ...ard backwards to feed into the flipper and having seen the card arrive at the mid sensor it took too long for the mid sensor to unblock 10 INVALID FILE 10 0 The printer received a print job The side number specified for one of the sides of the image data was invalid This probably means the print job file was corrupt 10 1 The printer received a print job The format specified for the image payload w...

Page 39: ...the tracks was too great for the provided payload size This probably means that the print job file was corrupt 10 5 The printer received a print job containing magnetic track data The bit density specified for one of the tracks was out of range This probably means that the print job file was corrupt 10 6 The printer received a print job The panel ID specified for one of the panels was invalid This...

Page 40: ...ans the print job file was corrupt 10 11 The printer received a print job The number of copies specified was less than 1 This means that the print job file is corrupt 10 12 The printer received a print job containing magnetic track data The number of encoding attempts requested was less than one 10 13 The printer received a print job containing magnetic track data The number of verification attemp...

Page 41: ...file was corrupt 10 17 The printer received a print job An area or hole setting for one of the panels had an out of range value This probably means the print job file was corrupt 11 UPGRADE REQUIRED 11 00 The fitted dye film has a data format which the printer could not understand The printer software needs to be upgraded in order to support this type of dye film 12 SENSOR ERROR 12 0 While hand fe...

Page 42: ...nt one 13 INTERNAL ERROR 13 1 The printhead took too long to reach a temperature suitable for printing There may be a fault with the printhead temperature sensor 13 2 The mag PCB MCU reported that an error occurred while trying to carry out an operation or interpret a command 13 3 The mag driver reported that an error occurred while trying to carry out an operation 13 4 Communication with the prin...

Page 43: ...0 While attempting to validate a Holokote file the printer found that the file was not in the right format Either it is not the right type of file or the data has been corrupted 16 WRONG HOLOKOTE 16 0 While attempting to validate a Holokote file the printer found that the file was not licensed for this printer It is possible that the file was intended for a different printer 17 UPGRADE INVALID 17 ...

Page 44: ...possible that the file was intended for a different printer 19 SOFTWARE INVALID 19 0 While performing a system software update the incoming update data was found to have an invalid signature 19 1 While performing a system software update the incoming update data was not in the correct format 20 SD WRITE FAILURE 20 0 While performing a system software update an error occurred while trying to write ...

Page 45: ... functioning incorrectly 20 5 While attempting to format the SD card at the start of a soak routine the formatting process failed 21 INSTALL FAILURE 21 0 While performing a system software update an error was reported by the software update script 22 NO DUPLEX 22 0 The printer received a double sided print job but does not have duplex printing enabled 23 NO MAG HEAD 23 0 The printer received a pri...

Page 46: ... moving the card Note that this is the flipper motor which drives the card not the rotation motor 26 4 The print engine MCU reported a flip position motor fault while rotating the flipper Note that this is the flipper motor which drives the card not the rotation motor 26 5 The print engine MCU reported a flip rotation motor fault Note that this is the flipper motor which rotates the flipper not th...

Page 47: ...e fitted 29 SD CARD MISSING 29 0 The internal SD card could not be detected 30 MAG VERIFY FAIL 30 0 While attempting to verify mag data after an encoding operation the printer found that the data read back from the mag stripe did not match the data written 31 COLOUR DISABLED 31 0 The printer received a color print job but does not have color printing enabled ...

Page 48: ...esiden al installa on This equipment generates uses and can radiate radio frequency energy and if not installed and used in accordance with the instruc ons may cause harmful interference to radio communica ons Opera on of this equipment in a residen al area may cause interference to radio and television recep on in which case the user will be required to correct the interference at their own expen...

Reviews: