background image

5. Wiring

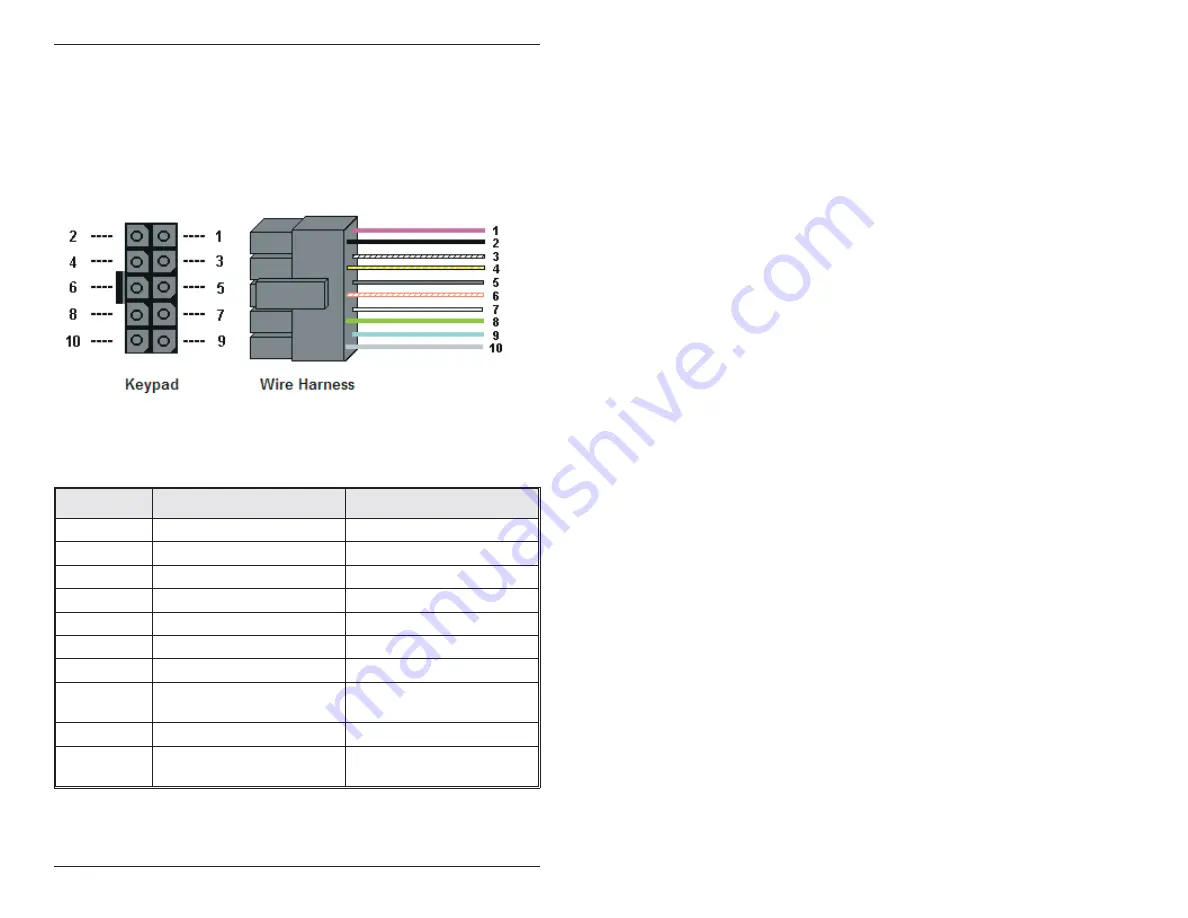
5.1 Wire Harness Configuration

Pin

Wire Color

Signal Name

1

Red

V+ (Keypad Power)

2

Black

V- (Keypad Power)

3

White/Black

Not Used

4

White/Yellow

Not Used

5

Brown

Remote Trigger (REX)

6

White/Orange

Loop Common

7

White

Door Loop Monitor

8

Green

Main Relay - Normally
Open

9

Blue

Main Relay - Common

10

Gray

Main Relay - Normally
Closed

Figure 4 Keypad Connector and Wire Harness

NOTE: For wiring the accessory relay board, see sections 5.6 and
5.7.

IEI 212eM/242eM Standalone Installation/Programming Manual

8

Document # 6174000, Rev. 1.1

Summary of Contents for 212eM

Page 1: ...d Product Description Section 2 Specifications Section 3 Keypad Tampering Section 4 Mounting Section 5 Wiring Section 6 Testing the Keypad Section 7 Programming Section 8 Troubleshooting Section 9 Programming Mode Loopback Section 10 Warranty Manual Revision Date 02 10 04 Firmware Version 1 0b Service Company Put Contact Information Here Company Name Service Number Document 6174000 Rev 1 1 1 ...

Page 2: ...ress Options Single Use Codes Lockout Users Passage Toggle Codes 10 to 30 Volt DC Operation 12 to 24 Volt AC Operation 2 Amp Main Relay Remote Trigger Input REX Door Monitor Input 5 Year Warranty 242eM only 1 1 1 Output Functionality Options 242eM only Four Independent Relay Outputs Four Independent Relay Timers All Relay Outputs Assignable By Code 1 1 2 Access Control Features 242eM only Lock Rel...

Page 3: ...med or latched and operated by a user s PIN code Additionally the 212eM key pad provides basic keyless entry by controlling a door locking de vice where security is not an issue All eM style keypads are designed for both indoor and outdoor flush mount applications The electronics for each keypad are con formal coated in the manufacturing process in order to provide this level of application flexib...

Page 4: ...Ds Bi Color Red Green Yellow 212eM 242eM Default Settings Parameter Default Setting Master Code 1234 Lock Output Relay 1 Main Relay Alarm Shunt Relay 2 Propped Door Relay 3 Forced Door Relay 4 Audio Alerts Not Assigned REX Triggers Lock Output REX Operation Always Triggers regardless of Door Loop Error Lockout Enabled Error Lockout Threshold 3 Attempts Error Lockout Duration 10 Seconds Lock Output...

Page 5: ...ested mounting location for each device 3 1 IEI Tamper Power Supplies IEI access system power supplies are designed specifically for ac cess control applications Two models are available board level and in a cabinet Both feature a tamper circuit with a reset button mounted on the circuit board Using the tamper switch as detailed and connected to the power supply tamper circuit unauthorized opening...

Page 6: ...Figure 1 Mounting a Sentrol 3012 Tamper Switch Figure 2 Mounting a Sentrol 3025T Tamper Switch IEI 212eM 242eM Standalone Installation Programming Manual 6 Document 6174000 Rev 1 1 ...

Page 7: ...s manual and on the unit s container Mounting height can vary depending on requirements An appro priate range is typically between 48 and 52 inches on center off the floor For outdoor installations use a weatherproof backbox and seal the wire entry locations with silicone and provide a drain hole In addi tion use the anti oxidant grease pack for the wire harness connec tors Figure 3 212eM 242eM Mo...

Page 8: ...own Remote Trigger REX 6 White Orange Loop Common 7 White Door Loop Monitor 8 Green Main Relay Normally Open 9 Blue Main Relay Common 10 Gray Main Relay Normally Closed Figure 4 Keypad Connector and Wire Harness NOTE For wiring the accessory relay board see sections 5 6 and 5 7 IEI 212eM 242eM Standalone Installation Programming Manual 8 Document 6174000 Rev 1 1 ...

Page 9: ...er supply 5 3 Wiring the Keypad to an Electric Strike Fail Secure Utilizing the same power supply for both the keypad and the lock Use the following steps to connect the keypad to an electric strike fail secure see Figure 6 for reference 1 Connect the red wire V to the blue wire common and then connect them to the positive on the power supply 2 Connect the green wire normally open to the positive ...

Page 10: ...e common to the common connection on the door position switch 2 Connect the green wire normally open to the normally closed connection on the door position switch Figure 6 Wiring the Keypad to Electric Strike Figure 7 Shunting a Normally Closed Zone IEI 212eM 242eM Standalone Installation Programming Manual 10 Document 6174000 Rev 1 1 ...

Page 11: ...wire door loop to the normally closed connection on the door switch NOTE By default the REX function operates the virtual lock out put only but this can be changed using command 49 In addition the door loop does not need to be closed for the REX function to operate by default but setting option 8 to 0 under command 30 programs the REX function to operate only when the door loop is closed This prev...

Page 12: ...ble below Wire Color Relay Connection Gray Normally Closed Blue Common Green Normally Open 5 7 Wiring an Integrated Access Control System Using the Accessory Relay Board Physical outputs 2 3 and 4 are defaulted to the alarm shunt propped door and forced door virtual outputs respectively Use the following steps to wire the alarm shunt propped door alarm and forced door alarm Figure 9 Wiring an Acce...

Page 13: ...d using a surface mount backbox use the right angle connector included in the backbox First insert the right angle connector into S3 on the relay board then plug the con nector onto P3 on the keypad This is shown in Option 2 below Use the included tie wrap to bundle all the wires together from the keypad wire harness and relay board Figure 11 Plugging on Relay Board Option 2 IEI 212eM 242eM Standa...

Page 14: ... the positive on the alarm device Connect the blue wire common to the positive on the power supply Connect the negative on the alarm device to the negative on the power supply 3 Wiring the forced door alarm Using P3 K4 connect the green wire normally open to the positive on the alarm device Connect the blue wire common to the positive on the power supply Connect the negative on the alarm device to...

Page 15: ...ypad 7890 123456 If all 12 keypresses are accepted the keypad enters self test mode The LEDs alternate green yellow and red followed by the sounder beeping three times 2 Verify that the master code works correctly The master code accesses program mode and activates the main relay to verify that the locking device is working The default master code is 1234 IEI 212eM 242eM Standalone Installation Pr...

Page 16: ...Programming Output Time Durations Step 3 Programming Users Step 4 Programming Keypad Options 7 2 Assigning Virtual Outputs to Physical Outputs The keypad is equipped with eleven Virtual Outputs and six Physi cal Outputs Virtual Outputs are functions that you can assign to operate any Physical Output Physical Outputs include the main relay the three relays on the accessory relay board and the two a...

Page 17: ... default output assignments The Lock Output is assigned to Relay 1 the Alarm Shunt Output to Relay 2 the Propped Door Output to Relay 3 and the Forced Door Output to Relay 4 7 2 1 Virtual Outputs Virtual Output Description Details Lock This output is used for your locking device Alarm Shunt This is used to shunt out an existing alarm panel It activates with the lock output and de energizes one sec...

Page 18: ...ed in case of emergency to activate an auxiliary device and should not be used to gain access Keypad Active The Keypad Active output is activated when any key is pressed Do not use this output to gain access 7 2 2 Audio Alerts Audio Alerts are produced by the local sounder on the keypad and can be used as a local propped door alarm or forced door alarm to free up the other relays for other functio...

Page 19: ...of seconds in each time unit prescaler 12 15 1 for fifteen seconds Command 44 Set Propped Door Time 44 time 0 Options time Propped Door Time rounded down to nearest 10 s of seconds entered as 00 10 through 990 defaults to 30 seconds entering a time of zero disables the propped door function Command 45 Set Forced Door Time 45 time 0 Options time Forced Door Time rounded down to nearest 10 s of seco...

Page 20: ...ode can be programmed with command 50 or command 60 as a standard user only Supervisor Code User 2 when programmed is the supervisor code The supervisor can access program mode but is limited to adding and deleting users as well as enabling or disabling users The supervisor code can not change delete or disable the master code or supervisor code itself Add Standard User short version user location...

Page 21: ...t code If another lockout code in another user location is entered the lockout user location level is set to the new lockout user location The master code and emergency users can not be locked out The current lockout is cleared when program mode is entered Lockout activated is indicated by two double beeps Lockout canceled is indicated by one double beep Access denied due to lockout is indicated b...

Page 22: ...d B user codes are converted to standard user codes Two Part users activate the virtual lock output Two Part Users can be enabled or disabled with command 30 Command 56 Enable Disable User 56 enable disable user location Options 1 Disable 0 Enable The master code and supervisor code cannot be disabled Command 59 Program users to operate virtual outputs OUT2 OUT3 OUT4 and OUT5 as well as the virtua...

Page 23: ...n use Auto Entry Suspend Just enter the key prior to your code followed by the key Example 23456 if the master code is four digits If auto entry is enabled the key is not used to enter Program mode Error Lockout When enabled the keypad keeps track of the number of consecutive invalid codes entered including attempts to access program mode When the threshold is reached the yellow LED turns on solid...

Page 24: ...aster code does not work Perform the programming mode loopback and reset the master code using the programming command No LEDs are lit on the keypad Power is not reaching the keypad Using a voltmeter confirm that there is voltage at the keypad on the red and black wires If there is no voltage at the keypad verify that there is voltage at the power supply If there is no voltage at the power supply ...

Page 25: ... and power down the system and restore the wire har ness to its original configuration and power the system back up First disconnect power from the system Next connect the White Yellow wire to the Brown REX and White Door Loop wire as shown in Figure 13 and then power up the keypad again Figure 13 Programming Mode Loopback Standalone IEI 212eM 242eM Standalone Installation Programming Manual Docum...

Page 26: ... obtaining IEI s Return Material Authorization IEI will not be liable to the purchaser or any one else for incidental or consequential damages arising from any defect in or malfunction of its products Except as stated above IEI makes no warranties either expressed or implied as to any matter whatsoever including and without limitation to the condition of its products their merchantability or fitne...

Page 27: ......

Page 28: ......

Reviews: