background image


ACT-457A Panel PC 

Page 11 


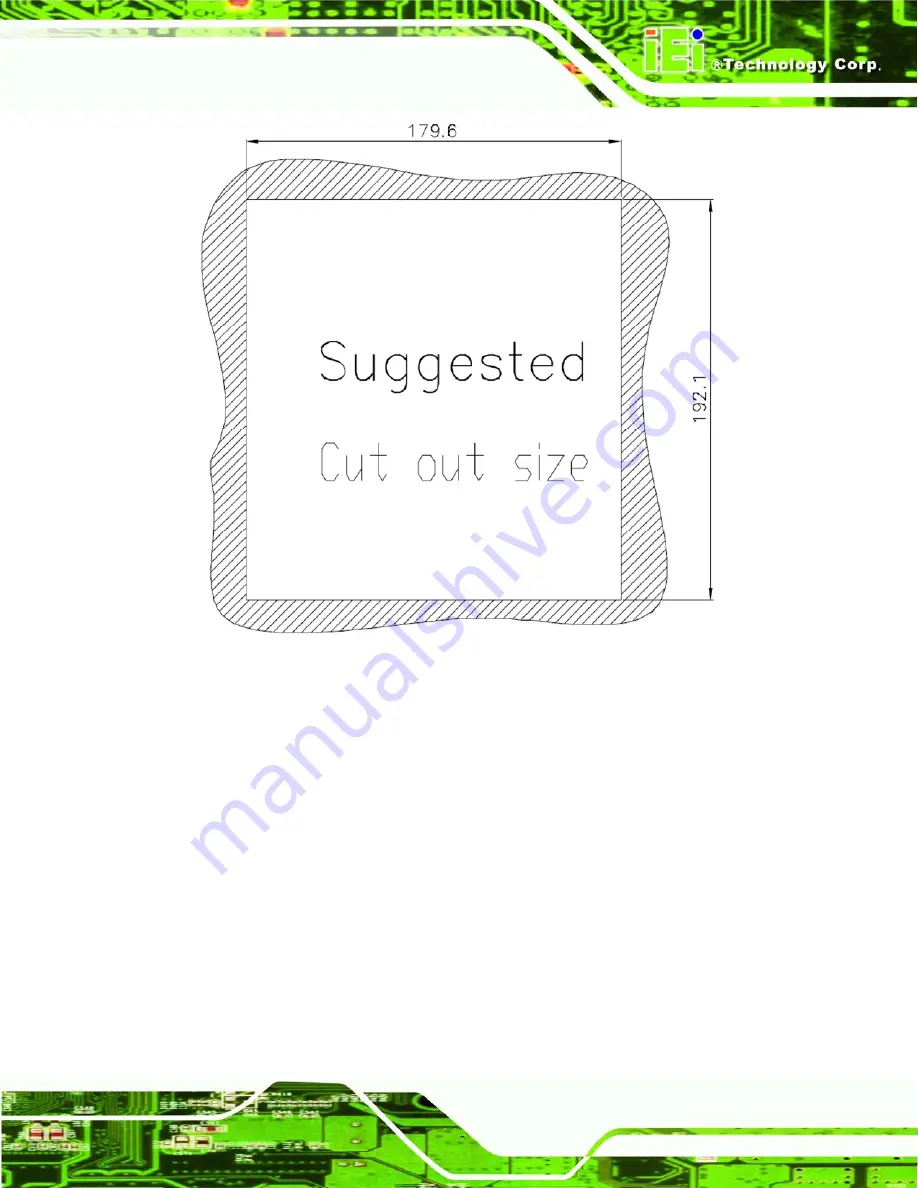
Figure 1-10: Cutout Dimensions 

Summary of Contents for ACT-457A

Page 1: ...C Page i IEI Technology Corp User Manual MODEL ACT 457A Panel PC with Touch Screen and 500 MHz Alchemy AU1250 Gigabit Ethernet 2 USB Audio RS 232 422 485 SATA IP64 Protection RoHS Compliant Rev 1 01 1...

Page 2: ...Revision Date Version Changes 15 December 2009 1 02 Changed rear panel screw picture in Figure 4 1 15 December 2009 1 01 Added some I O installation notes and warnings Changed RFID setup 30 September...

Page 3: ...rising out of the use or inability to use the product or documentation even if advised of the possibility of such damages This document contains proprietary information protected by copyright All righ...

Page 4: ...N AND CONFIGURATION STEPS 15 2 4 REAR PANEL REMOVAL 15 2 5 SD CARD INSTALLATION 16 2 6 SYSTEM POWER 17 2 6 1 ATX Power Mode Default 17 2 6 2 AT Power Mode 17 2 7 MOUNTING THE SYSTEM 17 2 7 1 Wall Moun...

Page 5: ...4 4 REAR PANEL REMOVAL 43 4 5 REPLACING COMPONENTS 44 4 5 1 SD Card Replacement 44 4 5 2 Motherboard Replacement 44 A EXTERNAL CONNECTOR PINOUTS 45 A 1 INTRODUCTION 46 A 2 DIGITAL I O CONNECTOR 46 A 3...

Page 6: ...nstallation 16 Figure 2 4 Wall mounting Bracket 18 Figure 2 5 Chassis Support Screws 19 Figure 2 6 Secure the ACT 457A 20 Figure 2 7 Cut Foam Tape 20 Figure 2 8 Attach Foam Tape 21 Figure 2 9 Foam Tap...

Page 7: ...ACT 457A Panel PC Page vii Figure 3 4 Write Block 36 Figure 3 5 Set Mifare Parameter 37 Figure 3 6 Get Mifare Parameter 38 Figure 3 7 Set RF 320 Mode 40 Figure 4 1 Rear Panel Retention Screws 43...

Page 8: ...5 Table 3 4 Read Block Response Format 35 Table 3 5 Write Block Raw Data Format 36 Table 3 6 Write Block Response Format 36 Table 3 7 Set Mifare Parameter Raw Data Format 37 Table 3 8 Set Mifare Param...

Page 9: ...ACT 457A Panel PC Page 1 Chapter 1 1 Introduction...

Page 10: ...applications The system comes with 256 MB DDR memory ensuring smooth data throughputs with reduced bottlenecks and fast system access Two serial ports and two external USB 2 0 ports ensure simplified...

Page 11: ...5 port Two USB 2 0 ports one on bottom rear I O and one behind front cover plate SD card slot Provides RFID configuration tool to read or write Mifare tags and EM tags Built in digital camera and micr...

Page 12: ...ACT 457A Panel PC Page 4 1 4 External Overview The diagrams below detail all the parts and connectors on the ACT 457A Figure 1 2 Front View...

Page 13: ...ACT 457A Panel PC Page 5 Figure 1 3 Front View Faceplate Removed Figure 1 4 Rear Panel VESA Mounting Holes...

Page 14: ...Figure 1 6 Top I O Figure 1 7 CompactFlash Card Slot 1 5 Internal Parts The ACT 457A has the following components installed internally 1 x Motherboard 1 x 1 GB DDR2 SDRAM SO DIMM 1 x Wireless module 1...

Page 15: ...00 Backlight MTBF 25000 SBC Model ACTMB AU1250 R10 CPU 500 MHz Alchemy AU1250 Memory 1 GB DDR2 SDRAM SO DIMM system max 2 GB LAN Two Realtek RTL8111CP PCIe GbE Controllers SSD CF Type II HDD One 2 5 S...

Page 16: ...n Temperature 0 C 45 C Storage temperature 20 C 60 C Net weight 0 7 kg IP level front panel IP64 Safety EMC CE FCC CB CCC Touch Screen 4 wire resistive type Power input 12 V Power Consumption 8 5 W I...

Page 17: ...ACT 457A Panel PC Page 9 1 7 Dimensions The dimensions of the ACT 457A are shown below Figure 1 8 Front Dimensions...

Page 18: ...ACT 457A Panel PC Page 10 Figure 1 9 Front Dimensions...

Page 19: ...ACT 457A Panel PC Page 11 Figure 1 10 Cutout Dimensions...

Page 20: ...ACT 457A Panel PC Page 12 Chapter 2 2 Installation...

Page 21: ...the installation process Step 1 Use box cutters a knife or a sharp pair of scissors that seals the top side of the external second box Step 2 Open the external second box Step 3 Use box cutters a kni...

Page 22: ...the following components Quantity Item Image 1 ACT 457A 1 Screw set 1 Power adapter 1 Power cord 1 Touch pen 1 User manual CD and driver CD 1 Mini jumper pack 2 0 mm Table 2 1 Packing List If any of...

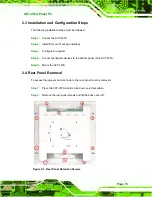
Page 23: ...Configure the system Step 4 Connect peripheral devices to the bottom panel of the ACT 457A Step 5 Mount the ACT 457A S t e p 0 2 4 Rear Panel Removal To access the jumpers and connectors the rear pan...

Page 24: ...he steps below Step 1 Locate the SD card cover on the rear panel Step 2 Remove the screw and lift the cover off Figure 2 2 SD Card Slot Cover Location Step 3 Insert the SD card into the card slot indi...

Page 25: ...urity surveillance Point of Sale POS Advertising terminal 2 6 2 AT Power Mode With the AT mode selected the power is controlled by a central power unit rather than a power switch The ACT 457A panel PC...

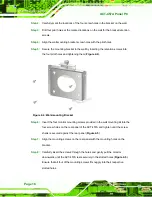
Page 26: ...hem Figure 2 4 Figure 2 4 Wall mounting Bracket Step 6 Insert the four monitor mounting screws provided in the wall mounting kit into the four screw holes on the real panel of the ACT 457A and tighten...

Page 27: ...age 19 Figure 2 5 Chassis Support Screws NOTE In the diagram below the bracket is already installed on the wall Step 9 Secure the ACT 457A by fastening the retention screw of the wall mounting bracket...

Page 28: ...anel PC Page 20 Figure 2 6 Secure the ACT 457A 2 7 2 In wall Mounting To mount the ACT 457A into a wall follow the directions below Step 1 Place the ACT 457A face down on a flat surface Figure 2 7 Cut...

Page 29: ...8 Attach Foam Tape Step 3 Attach the adhesive foam tape to the edge of rear panel of the ACT 457A see Figure 2 8 Make sure the adhesive tape does not cover the screw holes as shown below Figure 2 9 Fo...

Page 30: ...with the dimensions shown below Take care that the wall section that is cut out is no larger than the suggested cut out size Figure 2 10 ACT 457A Panel Opening Step 6 Slide the ACT 457A through the h...

Page 31: ...tep 8 Install the faceplate Snap faceplate onto the ACT 457A frame S t e p 0 Figure 2 12 Faceplate Installation 2 7 3 Arm Mounting The ACT 457A can be mounted on a VESA compliant 75 mm x 75 mm connect...

Page 32: ...t panel PC onto the interface pad of the mounting arm Step 3 Align the retention screw holes on the mounting arm interface with those in the flat panel PC The ACT 457A arm mount retention screw holes...

Page 33: ...connectors on the bottom panel of the ACT 457A Step 2 Align the connectors Align the RJ 45 connector on the LAN cable with one of the RJ 45 connectors on the bottom panel of the ACT 457A See Figure 2...

Page 34: ...al device connector to the external interface by tightening the two retention screws on either side of the connector Step 0 2 8 3 USB Device Connection There are four external USB 2 0 connectors All c...

Page 35: ...connector Once aligned gently insert the USB device connector into the onboard connector Step 0 2 8 4 Digital I O Installation WARNING 1 Power off before wiring 2 Do not connect external power when us...

Page 36: ...1 A C Relay signal can affect digital input signal space cables apart D Do not connect peripherals with unknown specifications E Do not connect unrated untested external power supplies The digital I...

Page 37: ...ACT 457A Panel PC Page 29 Figure 2 17 Digital I O Cable Installation...

Page 38: ...ACT 457A Panel PC Page 30 Chapter 3 3 RFID Reader...

Page 39: ...must be installed from the storage card To install the software follow the steps below Step 1 Run the installation file at Storage Card Apps RF320 exe Step 2 To launch the RF320 click Start menu Progr...

Page 40: ...es of the executed commands EM Card ID Display Area Displays the EM card ID when the EM card is detected Mifare Card ID Display Area Displays the Mifare card ID when the Mifare card is detected Error...

Page 41: ...t properties as shown below Bits per second 19200 Data bits 8 Parity None Stop bits 1 Flow control None 3 5 RF320 Commands The RF320 provides five commands including Read Block read the block data fro...

Page 42: ...command area Figure 3 3 Step 2 Configure the data including block key key data and time out Figure 3 3 Step 3 Click the Execute button to execute the command through the selected serial port Figure 3...

Page 43: ...0x0d 0x0a Table 3 4 Read Block Response Format 3 5 2 Write Block To write the block data into a Mifare card please follow the steps below Step 1 Select Write Block in the command area Figure 3 4 Step...

Page 44: ...0 99 Second 32 digits Hex CR 0x0 d Table 3 5 Write Block Raw Data Format Status 2 digits Block Data END 2 digits OK Null CR LF 0x0d 0x0a ER Error Code 3 digits CR LF 0x0d 0x0a Table 3 6 Write Block Re...

Page 45: ...k number and key data Figure 3 5 Step 4 Click the Execute button to execute the command through the selected serial port Figure 3 5 The raw data of this command shows in the Raw Data area in the forma...

Page 46: ...ad the parameter of a Mifare card reader please follow the steps below Step 1 Select Get Mifare Parameter in the command area Figure 3 6 Step 2 Click the Execute button to execute the command through...

Page 47: ...command is to set the type of RFID card for the RFID reader to detect To set the type of RFID card please follow the steps below Step 1 Select Set RF320 Mode in the command area Figure 3 7 Step 2 Sel...

Page 48: ...Mode Field Command Mode End Digit 2 1 1 Data SA 1 3 CR 0x0d Table 3 11 Set RF320 Mode Raw Data Format Status 2 digits Block Data END 2 digits OK Null CR LF 0x0d 0x0a ER Error Code 3 digits CR LF 0x0d...

Page 49: ...ACT 457A Panel PC Page 41 Chapter 4 4 System Maintenance...

Page 50: ...age to electronic components including the ACT 457A Dry climates are especially susceptible to ESD It is therefore critical that whenever the ACT 457A is accessed internally or any other electrical co...

Page 51: ...ance procedures are carried out on the system make sure the system is turned off 4 4 Rear Panel Removal To access the jumpers and connectors the rear panel must be removed Step 1 Turn off and disconne...

Page 52: ...ollow the instructions below Step 1 Follow all anti static procedures See Section 4 2 Step 2 Turn off the power See Section 4 3 Step 3 Follow the steps in the installation section S t e p 0 4 5 2 Moth...

Page 53: ...ACT 457A Panel PC Page 45 Appendix A A External Connector Pinouts...

Page 54: ...has the following pinouts Pin Description 1 VCC 2 GND 3 DO0 4 DO1 5 DI0 6 DI1 Table A 1 Digital I O Connector Pinouts A 3 External SATA Connector The ACT 457A has one external SATA connector on the re...

Page 55: ...el of the ACT 457A is a 12 V DC input power connector Pin Description 1 12V 2 GND 3 GND Table A 4 Power Connector Pinouts A 6 Serial Port Connector COM1 The ACT 457A has a DB 9 female connector for co...

Page 56: ...6 DSR3 RX1 2 RX3 TX3 D 7 RTS3 RX1 3 TX3 8 CTS3 4 DTR3 9 RI3 5 GND Table A 6 COM3 Pinouts A 8 USB Connectors The ACT 457A has two USB 2 0 connectors Pin Description Pin Description 1 USBVCC2 5 USBVCC2...

Page 57: ...ACT 457A Panel PC Page 49 Appendix B B Terminology...

Page 58: ...inary 0 while a high amplitude signal represents a binary 1 BIOS The Basic Input Output System BIOS is firmware that is first run when the computer is turned on and can be configured by the end user C...

Page 59: ...ep Technology EIST allows users to modify the power consumption levels and processor performance through application software The application software changes the bus to core frequency ratio and the p...

Page 60: ...sfers between storage devices and the computer chipsets The SATA bus has transfer speeds up to 1 5 Gbps and the SATA II bus has data transfer speeds of up to 3 0 Gbps S M A R T Self Monitoring Analysi...

Page 61: ...ACT 457A Panel PC Page 53 Appendix C C Watchdog Timer...

Page 62: ...S function call INT 15H is used to control the Watchdog Timer INT 15H AH 6FH Sub function AL 2 Sets the Watchdog Timer s period BL Time out value Its unit second is dependent on the item Watchdog Time...

Page 63: ...tem resets EXAMPLE PROGRAM INITIAL TIMER PERIOD COUNTER W_LOOP MOV AX 6F02H setting the time out value MOV BL 30 time out value is 48 seconds INT 15H ADD THE APPLICATION PROGRAM HERE CMP EXIT_AP 1 is...

Page 64: ...ACT 457A Panel PC Page 56 Appendix D D Hazardous Materials Disclosure...

Page 65: ...esences of small quantities of certain materials in the product and is applicable to China RoHS only A label will be placed on each product to indicate the estimated Environmentally Friendly Use Perio...

Page 66: ...oard X O O O O X Metal Fasteners X O O O O O Cable Assembly X O O O O X Fan Assembly X O O O O X Power Supply Assemblies X O O O O X Battery O O O O O O O This toxic or hazardous substance is containe...

Page 67: ...ACT 457A Panel PC Page 59 RoHS RoHS Pb Hg Cd CR VI PBB PBDE X O O O O X X O O O O X X O O O O X X O O O O O X O O O O X X O O O O X X O O O O X O O O O O O O SJ T11363 2006 X SJ T11363 2006...

Reviews: