AFL2-W07A-N26
P a g e 34
S te p 2:
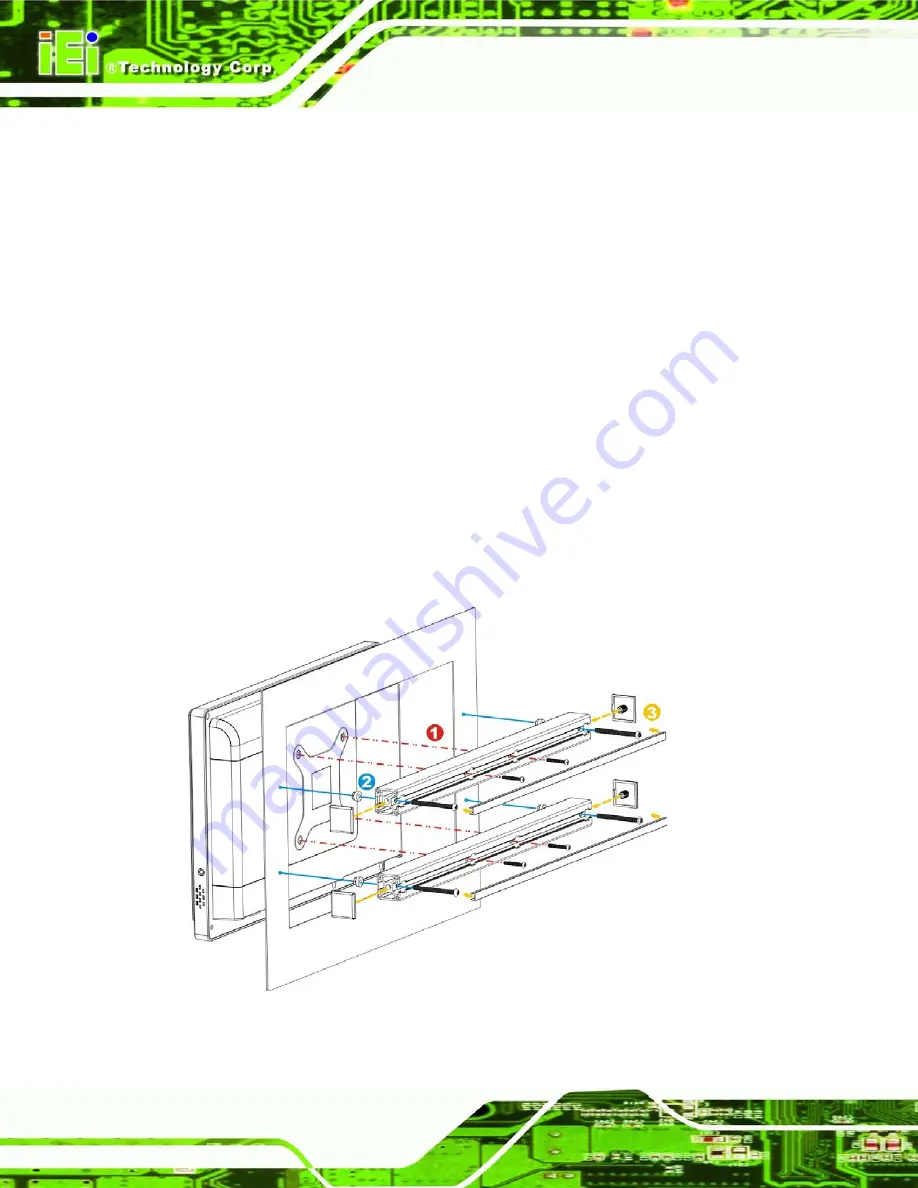
Slide the flat bezel panel PC through the hole until the frame is flush against the
panel.
S te p 3:
Align the panel mounting bracket screw holes with the VESA mounting holes on
the rear of the panel PC.
S te p 4:
Secure the two panel mounting brackets to the rear of the panel PC by inserting
the four retention screws into the VESA mounting holes (
).
S te p 5:
Insert the panel mounting clamps into the holes of the panel mounting brackets
). There are a total of 4 panel mounting clamps for
AFL2-W07A-N26.
S te p 6:
Tighten the screws that pass through the panel mounting clamps until the plastic
caps at the front of all the screws are firmly secured to the panel.
S te p 7:
Install the covers into the panel mounting bracket. Each mounting bracket
includes two side covers and one top cover (
).
Figure 4-13: Tighten the Panel Mounting Clamp Screws
Summary of Contents for AFL2-W07A-N26
Page 2: ...AFL2 W07A N26 Page II Revis ion Date Version Changes 19 February 2013 1 00 Initial release...
Page 17: ...AFL2 W07A N26 Page 1 1 Introduction Chapter 1...
Page 27: ...AFL2 W07A N26 Page 11 2 Detailed Specifications Chapter 2...
Page 33: ...AFL2 W07A N26 Page 17 3 Unpacking Chapter 3...
Page 37: ...AFL2 W07A N26 Page 21 4 Ins tallation Chapter 4...
Page 59: ...AFL2 W07A N26 Page 43 5 Sys tem Motherboard Chapter 5...
Page 73: ...AFL2 W07A N26 Page 57 6 Sys tem Maintenance Chapter 6...
Page 83: ...AFL2 W07A N26 Page 67 7 BIOS Setup Chapter 7...
Page 111: ...AFL2 W07A N26 Page 95 8 Software Drivers Chapter 8...
Page 143: ...AFL2 W07A N26 Page 127 A Safety Precautions Appendix A...
Page 148: ...AFL2 W07A N26 Page 132 B BIOS Menu Options Appendix B...
Page 151: ...AFL2 W07A N26 Page 135 Appendix C C One Key Recovery...
Page 159: ...AFL2 W07A N26 Page 143 Figure C 5 Partition Creation Commands...
Page 192: ...AFL2 W07A N26 Page 176 D Hazardous Materials Dis clos ure Appendix D...


