background image


DRPC-120-BTi Embedded System

Page 82 

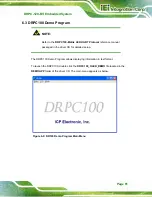
6.3.1 Dialog Menu 

The Dialog menu allows users to clear the OLED screen, and get ID. 


Figure 6-10: Dialog Menu 


Get ID

: Click to get ID. 


Clr OLED

: Click to clear the OLED screen. 


Close

: Click to return to the main menu. 


Clear

: Clear the messages. 


Summary of Contents for DRPC-120-BT

Page 1: ...i User Manual MODEL DRPC 120 BTi Fanless Embedded System with Intel Atom E3845 CPU DIN Rail Mounting Support OLED Display or LED Indicators Dual GbE USB DIO Serial Ports 9V 28V DC Power Input RoHS Co...

Page 2: ...DRPC 120 BTi Embedded System Page ii Revision Date Version Changes November 20 2014 1 00 Initial release...

Page 3: ...ages arising out of the use or inability to use the product or documentation even if advised of the possibility of such damages This document contains proprietary information protected by copyright Al...

Page 4: ...CKING 11 2 1 ANTI STATIC PRECAUTIONS 12 2 2 UNPACKING PRECAUTIONS 12 2 3 UNPACKING CHECKLIST 13 3 INSTALLATION 16 3 1 INSTALLATION PRECAUTIONS 17 3 1 1 High Surface Temperature 17 3 2 INTERNAL ACCESS...

Page 5: ...ARD REPLACEMENT 38 4 3 SO DIMM REPLACEMENT 39 5 BIOS 41 5 1 INTRODUCTION 42 5 1 1 Starting Setup 42 5 1 2 Using Setup 42 5 1 3 Getting Help 43 5 1 4 Unable to Reboot after Configuration Changes 43 5 1...

Page 6: ...3 6 3 3 DEMO Menu 84 7 INTERFACE CONNECTORS 85 7 1 PERIPHERAL INTERFACE CONNECTORS 86 7 2 INTERNAL PERIPHERAL CONNECTORS 87 7 2 1 Audio Line out Connector LINE_OUT1 88 7 2 2 Audio Mic in Connector MIC...

Page 7: ...ector VGA1 96 A SAFETY PRECAUTIONS 98 A 1 SAFETY PRECAUTIONS 99 A 1 1 General Safety Precautions 99 A 1 2 Anti static Precautions 100 A 1 3 Explanation of Graphical Symbols 100 A 1 4 Product Disposal...

Page 8: ...3 7 IPMI Module Installation 22 Figure 3 8 Clear CMOS Button Location 23 Figure 3 9 AT ATX Switch Location 24 Figure 3 10 DIN Rail Mounting Bracket Installation 24 Figure 3 11 Attach the Mounting Brac...

Page 9: ...Image Editor 78 Figure 6 6 Function List 78 Figure 6 7 OLED Control 79 Figure 6 8 OLED Erase Page 80 Figure 6 9 DR100 Demo Program Main Menu 81 Figure 6 10 Dialog Menu 82 Figure 6 11 LCD Menu 83 Figu...

Page 10: ...ble 7 1 Peripheral Interface Connectors 87 Table 7 2 Audio Line out Connector LINE_OUT1 Pinouts 88 Table 7 3 Audio Mic in Connector MIC_IN1 Pinouts 88 Table 7 4 Battery Connector BAT1 Pinouts 88 Table...

Page 11: ...nnector LAN1 Pinouts 94 Table 7 19 RJ 45 LAN Connector LAN2 Pinouts 95 Table 7 20 RS 232 Serial Port COM1 2 Pinouts 95 Table 7 21 RS 422 485 Serial Port COM3 4 Pinouts 95 Table 7 22 USB 2 0 Connectors...

Page 12: ......

Page 13: ...DRPC 120 BTi Embedded System Page 1 Chapter 1 1 Introduction...

Page 14: ...mounting method The DRPC 120 BTi accepts a wide range of DC power input 9 V 28 V allowing it to be powered anywhere Two USB 3 0 two USB 2 0 two GbE two RS 232 two RS 422 485 and one 8 bit DIO provide...

Page 15: ...tem max 8 GB Supports one mSATA and one 2 5 SATA HDD Wide range DC power input 9 V 28 V Extended temperature fanless design supports 20 C 60 C with SSD Two PCIe Mini card slots Serial interfaces with...

Page 16: ...abit LAN ports 2 x RS 232 serial ports with isolation 2 x RS 422 485 serial ports with isolation 2 x USB 3 0 ports 2 x USB 2 0 ports LED or OLED indicators Function keys DRPC 120 BTi E5 OLED only The...

Page 17: ...The DRPC 120 BTi top panel contains 1 x 8 bit digital I O Phoenix terminal block 4 bit input 4 bit output 1 x 9 V 28 V DC power terminal block 1 x AT ATX power switch 1 x HDMI connector 1 x Power butt...

Page 18: ...The LED indicators on the front panel of the DRPC 120 BTi E5 LED are shown in Figure 1 5 Figure 1 5 LED Indicators of DRPC 120 BTi E5 LED All the LED definitions are listed in Table 1 2 LED Color Stat...

Page 19: ...f Table 1 2 DRPC 120 BTi E5 LED LED Definitions 1 6 Programmable OLED Display DRPC 120 BTi E5 OLED Only For programming the OLED display on the front panel of the DRPC 120 BTi E5 OLED refer to Chapter...

Page 20: ...resolution up to 1920 x 1200 1 x VGA port 1 x HDMI port Digital I O 1 x Phoenix terminal block 8 bit 4 bit input 4 bit output Interior Expansion 1 x PCIe Mini full size card slot co lay mSATA 1 x PCI...

Page 21: ...non condensing Chassis Construction Extruded aluminum alloy for fanless support Color Blue C Black C Operating Shock Half sine shock test 5G 11ms 3 shocks per axis Operating Vibration MIL STD 810F 51...

Page 22: ...DRPC 120 BTi Embedded System Page 10 1 8 Dimensions The physical dimensions are shown below Figure 1 6 Physical Dimensions millimeters...

Page 23: ...DRPC 120 BTi Embedded System Page 11 Chapter 2 2 Unpacking...

Page 24: ...c wristband Wearing a simple anti static wristband can help to prevent ESD from damaging the board Self grounding Before handling the board touch any grounded conducting material During the time the b...

Page 25: ...0 BTi from or contact an IEI sales representative directly To contact an IEI sales representative please send an email to sales ieiworld com The DRPC 120 BTi is shipped with the following components Q...

Page 26: ...very CD 1 User manual and driver CD The following table lists the optional items that can be purchased separately Optional Power adapter P N 63000 FSP036RAB610 RS Power cord European standard 1830 mm...

Page 27: ...DRPC 120 BTi Embedded System Page 15 Optional Flash disk mSATA 2GB 32GB 0 C 70 C P N IPE 5200IM xxx Flash disk mSATA 2GB 32GB 40 C 85 C P N IPE 5200VM xxx...

Page 28: ...DRPC 120 BTi Embedded System Page 16 Chapter 3 3 Installation...

Page 29: ...on Make sure there is sufficient air circulation when installing the DRPC 120 BTi The DRPC 120 BTi s cooling vents must not be obstructed by any objects Blocking the vents can cause overheating of the...

Page 30: ...Removal Before installing or maintaining the internal components the internal access panel must be removed from the DRPC 120 BTi Follow the steps below to complete the task Step 1 Remove the three re...

Page 31: ...he SATA connector and SATA power connector on the motherboard Figure 3 2 Figure 3 2 HDD Installation Step 5 Replace and secure the internal access panel to the system 3 4 mSATA SSD Installation The DR...

Page 32: ...n angle Line up the notch on the card with the notch on the connector Slide the PCIe Mini card into the socket at an angle of about 20 Figure 3 4 Figure 3 4 Inserting the PCIe Mini Card into the Socke...

Page 33: ...the IEI iRIS 2400 IPMI 2 0 module only DO NOT install other modules into the IPMI module slot Doing so may cause damage to the DRPC 120 BTi Please follow the steps below to install the iRIS 2400 modu...

Page 34: ...the notch on the module with the notch on the IPMI module slot Step 4 Insert the iRIS 2400 module Push the module in at a 20 angle Figure 3 7 Step 5 Seat the iRIS 2400 module Gently push downwards an...

Page 35: ...few seconds If the CMOS Settings Wrong message is displayed during the boot up process the fault may be corrected by pressing the F1 to enter the CMOS Setup menu Do one of the following Enter the corr...

Page 36: ...gure 3 9 Figure 3 9 AT ATX Switch Location 3 8 Mounting the System The DRPC 120 BTi embedded system can be mounted onto a DIN rail Follow the steps below to complete the task Step 1 Attach the supplie...

Page 37: ...OTE In the diagrams below the DIN rail is already installed on a surface or on a chassis Step 2 Attach the upper edge of the mounting bracket to the DIN rail as shown in Figure 3 11 Figure 3 11 Attach...

Page 38: ...ket clips into place firmly Figure 3 12 Figure 3 12 Mounting the System 3 9 External Peripheral Interface Connectors The DRPC 120 BTi has the following connectors Detailed descriptions of the connecto...

Page 39: ...O provides 4 bit output and 4 bit input The pinouts for the digital I O terminal block are listed in the table below Pin Description Pin Description 1 DGI_0 2 DGO_0 3 DGI_1 4 DGO_1 5 DGI_2 6 DGO_2 7 D...

Page 40: ...P3 P5 TRD2N1 P9 TRD2N3 Table 3 3 LAN2 Pinouts Figure 3 14 RJ 45 Ethernet Connector The RJ 45 Ethernet connector has two status LEDs one green and one yellow The green LED indicates activity on the por...

Page 41: ...5 and Figure 3 15 Connect the leads of a 9 V 28 V DC power supply into the terminal block Make sure that the power and ground wires are attached to the correct sockets of the connector Pin Descriptio...

Page 42: ...ectors CN Location See Figure 1 2 CN Pinouts See Table 3 6 and Figure 3 16 RS 232 serial port devices can be attached to the DB 9 ports on the front panel Pin Description Pin Description 1 DCD 6 DSR 2...

Page 43: ...N Location See Figure 1 2 CN Pinouts See Table 3 7 and Figure 3 17 RS 422 485 serial port devices can be attached to the DB 9 ports on the front panel Pin RS 422 RS 485 1 RS 422TX RS 485D 2 RS 422TX R...

Page 44: ...and USB 3 0 connector pinouts are listed below Pin Description Pin Description 1 VCC 5 VCC 2 DATA 6 DATA 3 DATA 7 DATA 4 GROUND 8 GROUND Table 3 8 USB 2 0 Port USB3 USB4 Pinouts Pin Description Pin D...

Page 45: ...GND 7 GND 8 GND 9 VCC 10 GND 11 NC 12 DDC DAT 13 HSYNC 14 VSYNC 15 DDCCLK Table 3 10 VGA Connector Pinouts Figure 3 18 VGA Connector 3 10 IPMI Setup Procedure The DRPC 120 BTi features Intelligent Pl...

Page 46: ...the steps below Step 1 Obtain the IP address of the managed system It is recommended to use the IPMI Tool on the managed system to obtain the IP address To use IPMI Tool to obtain IP address follow t...

Page 47: ...admin Password admin Step 5 Press the login button to login the system Step 6 The IEI iMAN Web Interface appears S t e p 0 Figure 3 20 IEI iMAN Web GUI NOTE To understand how to use the IEI iMAN Web...

Page 48: ...Windows 8 operating systems Please select the corresponding drivers for the system The following drivers can be installed on the Windows 7 operating system Chipset I O driver Graphics Intel EMGD TXE...

Page 49: ...DRPC 120 BTi Embedded System Page 37 Chapter 4 4 System Maintenance...

Page 50: ...ling to do so may cause severe damage to the DRPC 120 BTi and injury to the user WARNING Please take antistatic precautions when working with the internal components The interior of the DRPC 120 BTi c...

Page 51: ...n the motherboard Figure 4 1 SO DIMM Module Location Step 3 Release the SO DIMM module by pulling both the spring retainer clips outward from the socket Step 4 Grasp the SO DIMM module by the edges an...

Page 52: ...System Page 40 Figure 4 2 SO DIMM Module Installation Step 7 Push the new SO DIMM module until it engages and the white plastic end clips click into place Make sure the end clips are fully secured aft...

Page 53: ...DRPC 120 BTi Embedded System Page 41 Chapter 5 5 BIOS...

Page 54: ...ess the DEL or F2 key as soon as the system is turned on or 2 Press the DEL or F2 key when the Press DEL or F2 to enter SETUP message appears on the screen If the message disappears before the DEL or...

Page 55: ...cribing the appropriate keys to use and the possible selections for the highlighted item appears To exit the Help Window press ESC or the F1 key again 5 1 4 Unable to Reboot after Configuration Change...

Page 56: ...57 55 iWDD Vendor iEi iWDD Version E445ET18 bin IPMI Module N A CPU Configuration Microcode Patch 901 BayTrail SoC D0 Stepping Memory Information Total Memory 2048 MB LPDDR3 GOP Information Intel R GO...

Page 57: ...the CPU The fields in CPU Information cannot be changed The items shown in the system overview include Microcode Patch Installed microcode patch BayTrail SoC CPU stepping level Memory Information The...

Page 58: ...w field has two user configurable fields System Date xx xx xx Use the System Date option to set the system date Manually enter the day month and year System Time xx xx xx Use the System Time option to...

Page 59: ...Exit ESC Exit Version 2 16 1242 Copyright C 2013 American Megatrends Inc BIOS Menu 2 Advanced 5 3 1 ACPI Settings The ACPI Settings menu BIOS Menu 3 configures the Advanced Configuration and Power Int...

Page 60: ...er IO Configuration menu BIOS Menu 4 to set or change the configurations for the serial ports Aptio Setup Utility Copyright C 2013 American Megatrends Inc Advanced F81866 Super IO Configuration F81866...

Page 61: ...ues F3 Optimized Defaults F4 Save Exit ESC Exit Version 2 16 1242 Copyright C 2013 American Megatrends Inc BIOS Menu 5 Serial Port n Configuration Menu 5 3 2 1 1 Serial Port 1 Configuration Serial Por...

Page 62: ...rupt address is IRQ3 4 5 6 7 9 10 11 12 IO 2E8h IRQ 3 4 5 6 7 9 10 11 12 Serial Port I O port address is 2E8h and the interrupt address is IRQ3 4 5 6 7 9 10 11 12 5 3 2 1 2 Serial Port 2 Configuration...

Page 63: ...11 12 IO 3E8h IRQ 3 4 5 6 7 9 10 11 12 Serial Port I O port address is 3E8h and the interrupt address is IRQ3 4 5 6 7 9 10 11 12 IO 2E8h IRQ 3 4 5 6 7 9 10 11 12 Serial Port I O port address is 2E8h a...

Page 64: ...l Port I O port address is 2F8h and the interrupt address is IRQ3 4 5 6 7 9 10 11 12 IO 3E8h IRQ 3 4 5 6 7 9 10 11 12 Serial Port I O port address is 3E8h and the interrupt address is IRQ3 4 5 6 7 9 1...

Page 65: ...ress are automatically detected IO 2E8h IRQ 7 Serial Port I O port address is 2E8h and the interrupt address is IRQ7 IO 3F8h IRQ 3 4 5 6 7 9 10 11 12 Serial Port I O port address is 3F8h and the inter...

Page 66: ...ges Aptio Setup Utility Copyright C 2013 American Megatrends Inc Advanced PC Health Status CPU temperature 43 C System temperature 39 C CPU_FAN1 Speed N A CPU_CORE 0 886 V 5V 4 968 V V12 11 866 V DDR...

Page 67: ...merican Megatrends Inc Advanced Smart Fan Mode Configuration CPU_FAN1 Smart Fan Control Auto Mode Auto mode fan start temperature 50 Auto mode fan off temperature 40 Auto mode fan start PWM 30 Auto mo...

Page 68: ...start temperature value Enter a decimal number between 1 and 100 Auto mode fan off temperature Use the or key to change the Auto mode fan off temperature value Enter a decimal number between 1 and 100...

Page 69: ...ed system will wake on the date hr min sec specified Select Screen Select Item EnterSelect Change Opt F1 General Help F2 Previous Values F3 Optimized Defaults F4 Save Exit ESC Exit Version 2 16 1242 C...

Page 70: ...eyboard input and text output through the serial port Aptio Setup Utility Copyright C 2013 American Megatrends Inc Advanced COM1 Console Redirection Disabled Console Redirection Settings COM2 Console...

Page 71: ...is VT100 VT100 The target terminal type is VT100 VT UTF8 The target terminal type is VT UTF8 ANSI DEFAULT The target terminal type is ANSI Bits per second 115200 Use the Bits per second option to spec...

Page 72: ...in the data bits is odd Mark The parity bit is always 1 This option does not provide error detection Space The parity bit is always 0 This option does not provide error detection Stop Bits 1 Use the...

Page 73: ...F3 Optimized Defaults F4 Save Exit ESC Exit Version 2 16 1242 Copyright C 2013 American Megatrends Inc BIOS Menu 10 CPU Configuration The CPU Configuration menu BIOS Menu 10 lists the following CPU de...

Page 74: ...re Intel Virtualization technology allows several OSs to run on the same system at the same time Disabled Disables Intel Virtualization Technology Enabled DEFAULT Enables Intel Virtualization Technolo...

Page 75: ...ect Screen Select Item EnterSelect Change Opt F1 General Help F2 Previous Values F3 Optimized Defaults F4 Save Exit ESC Exit Version 2 16 1242 Copyright C 2013 American Megatrends Inc BIOS Menu 11 IDE...

Page 76: ...al Help F2 Previous Values F3 Optimized Defaults F4 Save Exit ESC Exit Version 2 16 1242 Copyright C 2013 American Megatrends Inc BIOS Menu 12 USB Configuration USB Devices The USB Devices Enabled fie...

Page 77: ...the wrong values for the Chipset BIOS selections in the Chipset BIOS menu may cause the system to malfunction Aptio Setup Utility Copyright C 2013 American Megatrends Inc Main Advanced Chipset Securit...

Page 78: ...orth Bridge 5 4 2 South Bridge Use the South Bridge menu BIOS Menu 15 to configure the south bridge parameters Aptio Setup Utility Copyright C 2013 American Megatrends Inc Chipset Auto Power Button Fu...

Page 79: ...If it was off it remains off Audio Controller Enabled Use the Audio Controller BIOS option to enable or disable the High Definition Audio controller Disabled The High Definition Audio controller is d...

Page 80: ...n the Chipset Select Screen Select Item EnterSelect Change Opt F1 General Help F2 Previous Values F3 Optimized Defaults F4 Save Exit ESC Exit Version 2 16 1242 Copyright C 2013 American Megatrends Inc...

Page 81: ...r on password and must be entered to boot or enter Setup In Setup the User will have Administrator rights The password must be In the following range Maximum length 3 Minimum length 20 Administrator P...

Page 82: ...rsion 2 16 1242 Copyright C 2013 American Megatrends Inc BIOS Menu 18 Boot Bootup NumLock State On Use the Bootup NumLock State BIOS option to specify if the number lock setting must be modified durin...

Page 83: ...o boot from a UEFI device Enabled Enable to boot from a UEFI device Disabled DEFAULT Disable to boot from a UEFI device Launch PXE OpROM Disabled Use the Launch PXE OpROM option to enable or disable b...

Page 84: ...ct Item EnterSelect Change Opt F1 General Help F2 Previous Values F3 Optimized Defaults F4 Save Exit ESC Exit Version 2 16 1242 Copyright C 2013 American Megatrends Inc BIOS Menu 19 Exit Save Changes...

Page 85: ...Page 73 Save as User Defaults Use the Save as User Defaults option to save the changes done so far as user defaults Restore User Defaults Use the Restore User Defaults option to restore the user defau...

Page 86: ...DRPC 120 BTi Embedded System Page 74 Chapter 6 6 Programming OLED for DRPC 120 BTi E5 OLED...

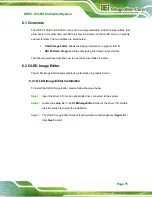
Page 87: ...in text format The following sections describe how to use these two utilities in detail 6 2 OLED Image Editor The OLED Image Editor allows displaying information in graphic format 6 2 1 OLED Image Ed...

Page 88: ...20 BTi Embedded System Page 76 Figure 6 1 OLED Image Editor Setup Wizard Step 4 Select a folder for OLED Image Editor Installation in Figure 6 2 Click Next to continue Figure 6 2 Select Installation F...

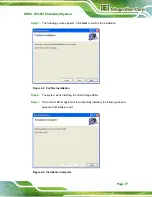
Page 89: ...ick Next to confirm the installation Figure 6 3 Confirm Installation Step 6 The system starts installing the OLED Image Editor Step 7 When the OLED Image Editor is successfully installed the following...

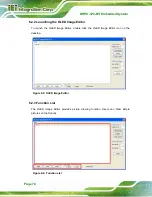
Page 90: ...Editor To launch the OLED Image Editor double click the OLED Image Editor icon on the desktop Figure 6 5 OLED Image Editor 6 2 3 Function List The OLED Image Editor provides picture drawing function U...

Page 91: ...ets the pen color to black or white 6 2 4 OLED Control The OLED Control allows users to setup the OLED module Refer to the DRPC100 OLED UART Protocol reference manual packaged in the driver CD for det...

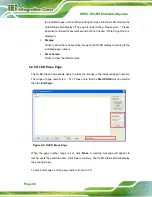
Page 92: ...the indicated page number Clear Screen Clicks to clear the OLED screen 6 2 5 OLED Erase Page The OLED Erase Page allows users to erase the images in the indicated page numbers The range of page numbe...

Page 93: ...reference manual packaged in the driver CD for detailed setup The DRPC100 Demo Program allows displaying information in text format To launch the DRPC100 double click the DRPC100_OLED_DEMO file locate...

Page 94: ...2 6 3 1 Dialog Menu The Dialog menu allows users to clear the OLED screen and get ID Figure 6 10 Dialog Menu Get ID Click to get ID Clr OLED Click to clear the OLED screen Close Click to return to the...

Page 95: ...u The LCD menu allows users to edit the text for displaying on the OLED screen of the system Figure 6 11 LCD Menu Send Click to send the input text to be displayed on the OLED display Clear Clear the...

Page 96: ...DRPC 120 BTi Embedded System Page 84 6 3 3 DEMO Menu The DEMO menu lists the activities of the function keys Click Close to return to the main menu Figure 6 12 DEMO Menu...

Page 97: ...DRPC 120 BTi Embedded System Page 85 Chapter 7 7 Interface Connectors...

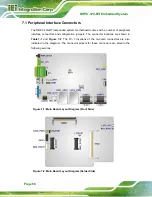
Page 98: ...e connectors and configuration jumpers The connector locations are shown in Table 7 1 and Figure 7 2 The Pin 1 locations of the on board connectors are also indicated in the diagrams The connector pin...

Page 99: ...dio mic in connector 4 pin wafer MIC_IN1 Battery connector 2 pin wafer BAT1 Chassis intrusion connector 2 pin header CHASSIE1 CPU fan connector 3 pin wafer CPU_FAN1 IPMI module slot SO DIMM connector...

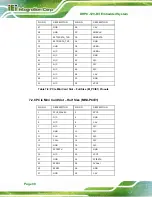
Page 100: ...uts 7 2 2 Audio Mic in Connector MIC_IN1 PIN NO DESCRIPTION 1 MIC_R 2 AUDIO_GND 3 AUDIO_GND 4 MIC_L Table 7 3 Audio Mic in Connector MIC_IN1 Pinouts 7 2 3 Battery Connector BAT1 PIN NO DESCRIPTION 1 V...

Page 101: ...N NO DESCRIPTION 1 3V 2 12V 3 LED_SDA 4 GPIO 5 LED_SCL 6 GPIO 7 GND 8 RESET Table 7 7 OLED LED Signal Connector OLED1 Pinouts 7 2 7 PCIe Mini Card Slot Full Size M_PCIE1 PIN NO DESCRIPTION PIN NO DESC...

Page 102: ...N C 44 N C 45 N C 46 N C 47 N C 48 1 5V 49 N C 50 GND 51 N C 52 VCC3 Table 7 8 PCIe Mini Card Slot Full Size M_PCIE1 Pinouts 7 2 8 PCIe Mini Card Slot Half Size MINI PCIE1 PIN NO DESCRIPTION PIN NO DE...

Page 103: ...D 35 GND 36 USBD 37 N C 38 USBD 39 N C 40 GND 41 N C 42 N C 43 N C 44 N C 45 N C 46 N C 47 N C 48 1 5V 49 N C 50 GND 51 N C 52 VCC3 Table 7 9 PCIe Mini Card Slot Half Size MINI PCIE1 Pinouts 7 2 9 SAT...

Page 104: ..._PWR1 Pinouts 7 2 11 SPI Flash Connector JSPI1 PIN NO DESCRIPTION 1 SPI_VCC 2 SPI_CS 3 SPI_SO_SW 4 SPI_CLK_SW 5 SPI_SI_SW 6 GND Table 7 12 SPI Flash Connector JSPI1 Pinouts 7 2 12 SPI Flash Connector...

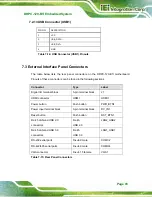
Page 105: ...in the following sections Connector Type Label Digital I O terminal block 5 pin terminal block J1 HDMI connector HDMI HDMI1 Power button Push button PWR_BTN1 Power input terminal block 3 pin terminal...

Page 106: ...16 Digital I O Terminal Block J1 Pinouts 7 3 2 Power Input Terminal Block DC_IN1 PIN NO DESCRIPTION 1 9 28V input 2 9 28V input 3 GND Table 7 17 Power Input Terminal Block DC_IN1 Pinouts 7 3 3 RJ 45...

Page 107: ...5 LAN Connector LAN2 Pinouts 7 3 5 RS 232 Serial Ports COM1 2 PIN NO DESCRIPTION PIN NO DESCRIPTION 1 DCD 6 DSR 2 RXD 7 RTS 3 TXD 8 CTS 4 DTR 9 RI 5 GND Table 7 20 RS 232 Serial Port COM1 2 Pinouts 7...

Page 108: ...SB 3 0 Connectors USB1 PIN NO DESCRIPTION PIN NO DESCRIPTION 1 VCC 10 VCC 2 USB_DATA 11 USB_DATA 3 USB_DATA 12 USB_ DATA 4 GND 13 GND 5 USB3_RX 14 USB3_RX 6 USB3_RX 15 USB3_ RX 7 GND 16 GND 8 USB3_TX...

Page 109: ...DRPC 120 BTi Embedded System Page 97 13 HSYNC 14 VSYNC 15 DDCCLK Table 7 24 VGA Connector VGA1 Pinouts...

Page 110: ...DRPC 120 BTi Embedded System Page 98 Appendix A A Safety Precautions...

Page 111: ...cted when moving installing or modifying the system Do not apply voltage levels that exceed the specified voltage range Doing so may cause fire and or an electrical shock Electric shocks can occur if...

Page 112: ...nt Self grounding Before handling any electrical component touch any grounded conducting material During the time the electrical component is handled frequently touch any conducting materials that are...

Page 113: ...ical and electronic products carrying the mark left must be disposed of separately from normal household waste This includes monitors and electrical accessories such as signal cables or power cords Wh...

Page 114: ...be explicitly mentioned in the cleaning tips Below is a list of items to use when cleaning the DRPC 120 BTi Cloth Although paper towels or tissues can be used a soft clean piece of cloth is recommend...

Page 115: ...DRPC 120 BTi Embedded System Page 103 Appendix B B Digital I O Interface...

Page 116: ...and digital outputs are generally control signals that control the on off circuit of external devices or TTL devices Data can be read or written to the selected address to enable the DIO functions NOT...

Page 117: ...tting the digital port as input INT 15H AL low byte value AH 6FH Sub function AL 9 Set the digital port as OUTPUT BL Digital I O input value B 3 Assembly Language Sample 2 MOV AX 6F09H setting the dig...

Page 118: ...DRPC 120 BTi Embedded System Page 106 Appendix C C Hazardous Materials Disclosure...

Page 119: ...the presences of small quantities of certain materials in the product and is applicable to China RoHS only A label will be placed on each product to indicate the estimated Environmentally Friendly Use...

Page 120: ...cuit Board O O O O O O Metal Fasteners O O O O O O Cable Assembly O O O O O O Fan Assembly O O O O O O Power Supply Assemblies O O O O O O Battery O O O O O O O This toxic or hazardous substance is co...

Page 121: ...RPC 120 BTi Embedded System Page 109 RoHS RoHS Pb Hg Cd CR VI PBB PBDE O O O O O O O O O O O O O O O O O O O O O O O O O O O O O O O O O O O O O O O O O O O O O O O O O SJ T11363 2006 X SJ T11363 2006...

Reviews: