background image


DRPC-330-A7K Embedded System 

Page 28 

3.12 Power-On Procedure 

3.12.1 Installation Checklist 

  WARNING: 

Make sure a power supply with the correct input voltage is being fed into 

the system. Incorrect voltages applied to the system may cause damage to 

the internal electronic components and may also cause injury to the user. 

To power on the embedded system please make sure of the following: 


The rear surface panel is installed 


All peripheral devices (monitor, serial communications devices etc.) are 

connected 


The system is securely mounted 

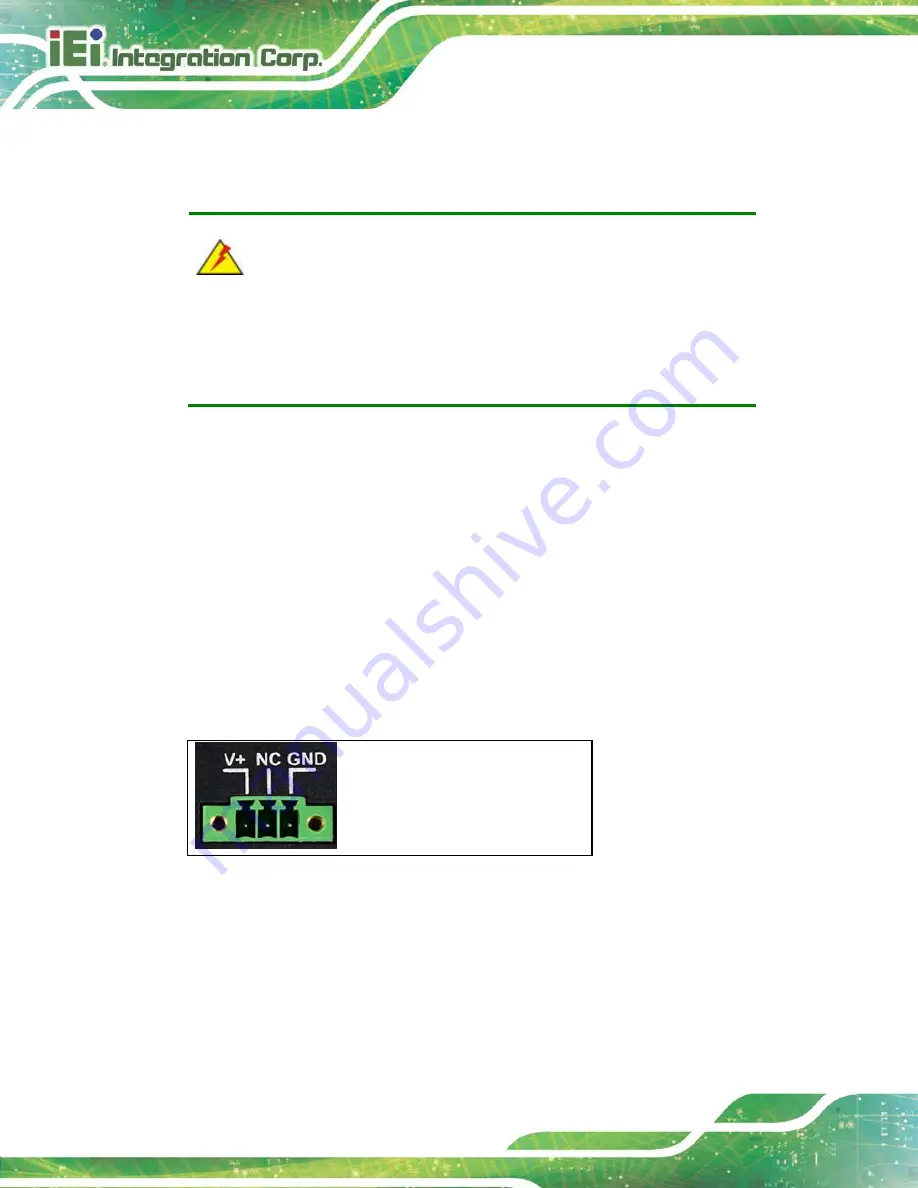
3.12.2 Terminal Block Pinouts 

The  DRPC-330-A7K  model has a 9  V

36  V power input terminal block. The terminal 

block pinouts are shown below. Make sure that the power and ground wires are attached 

to the correct sockets of the connector. 


Table 3-8: 3-pin Power Terminal Block Pinouts 


Summary of Contents for DRPC-330-A7K Series

Page 1: ...r Manual MODEL DRPC 330 A7K Fanless Embedded System with Marvell ARMADA 88F7040 CPU 10GbE SFP Dual GbE Isolated Serial Ports USB 3 2 Gen 1 M 2 Slots 9V 36V DC Power Input DIN Rail Mounting Support and...

Page 2: ...DRPC 330 A7K Embedded System Page ii Revision Date Version Changes January 7 2021 1 00 Initial release...

Page 3: ...ages arising out of the use or inability to use the product or documentation even if advised of the possibility of such damages This document contains proprietary information protected by copyright Al...

Page 4: ...nary messages should be heeded to help reduce the chance of losing data or damaging the product NOTE These messages inform the reader of essential but non critical information These messages should be...

Page 5: ...NSTALLATION PRECAUTIONS 14 3 1 1 High Surface Temperature 14 3 2 INTERNAL ACCESS PANEL REMOVAL 15 3 3 M 2 MODULE INSTALLATION 16 3 4 SIM CARD INSTALLATION 17 3 5 WIRELESS LAN MODULE INSTALLATION OPTIO...

Page 6: ...ECTORS 38 5 2 INTERNAL PERIPHERAL CONNECTORS 39 5 2 1 Battery Connector BAT1 39 5 2 2 I2 C Connector CN4 40 5 2 3 LED Connector JP3 40 5 2 4 M 2 2230 A key Slot J6 40 5 2 5 M 2 2280 B key Slot M_2_B2...

Page 7: ...0 A7K Embedded System Page vii C WATCHDOG TIMER 57 D ERROR BEEP CODE 60 D 1 PEI BEEP CODES 61 D 2 DXE BEEP CODES 61 E HAZARDOUS MATERIALS DISCLOSURE 62 E 1 ROHS II DIRECTIVE 2015 863 EU 63 E 2 CHINA R...

Page 8: ...18 Figure 3 7 SIM Card Installation 19 Figure 3 8 Lock SIM Card Slot Cover 19 Figure 3 9 Knockout Holes for Wireless Antenna 20 Figure 3 10 Connecting RF Cables 21 Figure 3 11 Securing SMA Connector a...

Page 9: ...10GbE SFP Connector LEDs 25 Table 3 8 3 pin Power Terminal Block Pinouts 28 Table 4 1 Watchdog Timer Jumper Settings 36 Table 5 1 Peripheral Interface Connectors 39 Table 5 2 Battery Connector BAT1 P...

Page 10: ......

Page 11: ...DRPC 330 A7K Embedded System Page 1 Chapter 1 1 Introduction...

Page 12: ...7040 processor It is designed for harsh environment applications and supports DIN rail mounting method The DRPC 330 A7K accepts a wide range of DC power input 9 V 36 V allowing it to be powered anywhe...

Page 13: ...n board 4GB DDR4 memory 32GB eMMC 5 1 and one microSD slot for storage Wide range DC power input 9 V 36 V Extended temperature fanless design supports 20 C 60 C 2 5kV isolated serial interfaces two RS...

Page 14: ...port 2 x RJ 45 Gigabit LAN port 2 x RS 232 422 485 serial port with 2 kV isolation 2 x RS 232 serial port with 2 kV isolation 1 x Console port 2 x USB 3 2 Gen 1 5Gb s port 1 x Power LED green 1 x Sto...

Page 15: ...4 Top Panel The DRPC 330 A7K top panel contains 1 x 9 V 36 V DC power terminal block 1 x microSD slot 1 x Power button 1 x Reset button 1 x Clear CMOS button An overview of the top panel is shown in...

Page 16: ...GB pre installed I O and Indicators Ethernet 2 x GbE RJ 45 port by Marvell 88E1512 1 x 10GbE SFP port by Marvell 88F7040 Note The 10GbE SPF port has no transceiver COM Port 1 x Console RJ 45 2 x RS 2...

Page 17: ...C with air flow Storage Temperature 40 C 80 C with air flow Operating Humidity 10 95 non condensing Storage Humidity 10 90 non condensing Chassis Construction Extruded aluminum alloy for fanless suppo...

Page 18: ...DRPC 330 A7K Embedded System Page 8 1 6 Dimensions The physical dimensions are shown below Figure 1 4 Physical Dimensions millimeters...

Page 19: ...DRPC 330 A7K Embedded System Page 9 Chapter 2 2 Unpacking...

Page 20: ...c wristband Wearing a simple anti static wristband can help to prevent ESD from damaging the board Self grounding Before handling the board touch any grounded conducting material During the time the b...

Page 21: ...ion Contact the IEI reseller or vendor you purchased the DRPC 330 A7K from or contact an IEI sales representative directly To contact an IEI sales representative please send an email to sales ieiworld...

Page 22: ...0 100 RS Power cord P N 32702 000200 100 RS USB to console cable P N 32013 004000 100 RS Wi Fi module2 P N 27319 000009 RS Antenna2 P N 32505 000900 100 RS RF cable2 P N 32501 004000 100 RS 20 pin Inf...

Page 23: ...DRPC 330 A7K Embedded System Page 13 Chapter 3 3 Installation...

Page 24: ...on Make sure there is sufficient air circulation when installing the DRPC 330 A7K The DRPC 330 A7K s cooling vents must not be obstructed by any objects Blocking the vents can cause overheating of the...

Page 25: ...TOOL or lock and key or other means of security and is controlled by the authority responsible for the location 3 2 Internal Access Panel Removal Before installing or maintaining the internal componen...

Page 26: ...ternal access panel from the DRPC 330 A7K See Section 3 2 Step 2 Locate the M 2 slots on the motherboard Figure 3 2 Remove the corresponding on board retention screw Figure 3 2 M 2 Slot Locations Step...

Page 27: ...oved previously Figure 3 4 Figure 3 4 Securing the M 2 Module 3 4 SIM Card Installation NOTE A WWAN module must be installed in the M 2 2242 2280 B key slot M_2_B1 to provide WWAN communication To ins...

Page 28: ...Embedded System Page 18 Figure 3 5 Unlock SIM Card Slot Cover Step 2 Unlock the SIM card slot cover by sliding the cover in the direction as shown by the arrow in Figure 3 6 Figure 3 6 Unlock SIM Car...

Page 29: ...onto the slot The cut mark on the corner should be facing away from the slot as shown in Figure 3 7 Figure 3 7 SIM Card Installation Step 4 Close the slot cover and lock it by sliding it in the direc...

Page 30: ...truction described in Section 3 2 Step 2 Remove the two knockout holes for antenna installation The two knockout holes are located on the top panel of the DRPC 330 A7K as shown below Figure 3 9 Knocko...

Page 31: ...A connector at the other end of the RF cable Step 7 Insert the SMA connector to the antenna connector holes on the rear panel Step 8 Secure the SMA connector by inserting the washer and tightening it...

Page 32: ...4 DTR RX 5 GND 6 DSR 7 RTS 8 CTS 9 RI Table 3 1 RS 232 422 485 Connector Pinouts 3 7 RS 232 Serial Port Connection The DRPC 330 A7K has two DB 9 connectors with 2 5kV isolation for RS 232 connection...

Page 33: ...tified easily as the RJ 45 for the network has two LEDs on the port while the connectors for the serial cables don t The pinouts of the serial port are listed below Pin Description Pin Description 1 N...

Page 34: ...2 2 MDI_N0 6 MDI_N2 3 MDI_P1 7 MDI_P3 4 MDI_N1 8 MDI_N3 Table 3 4 1GbE Port Pinouts Figure 3 12 RJ 45 1GbE Connector The RJ 45 Ethernet connector has two status LEDs one yellow and one green The yello...

Page 35: ...tion 1 GND 11 GND 2 SFP _TX_FAULT 12 SFP _RD 3 SFP _TX_DISABLE 13 SFP _RD 4 SFP _SDA 14 GND 5 SFP _SCL 15 SFP _VCCR 6 SFP _MOD_ABS 16 SFP _VCCT 7 SFP _RS0 17 GND 8 SFP _LOS 18 SFP _TD 9 SFP _RS1 19 SF...

Page 36: ...the steps below Step 1 Attach the supplied DIN rail mounting bracket to the rear panel of the embedded system Secure the bracket to the embedded system with three retention screws Figure 3 14 Figure 3...

Page 37: ...dge of the mounting bracket to the DIN rail as shown in Figure 3 15 Figure 3 15 Attach the Mounting Bracket to the DIN Rail Step 3 Push the system toward the DIN rail until the mounting bracket clips...

Page 38: ...y to the user To power on the embedded system please make sure of the following The rear surface panel is installed All peripheral devices monitor serial communications devices etc are connected The s...

Page 39: ...Power on Procedure To power on the DRPC 330 A7K please follow the steps below Step 1 Connect the power source to the power input terminal block Step 2 Short press the power button and the power LED gr...

Page 40: ...er to find all the relevant software utilities and documentation Figure 3 18 IEI Resource Download Center 3 13 1 Driver Download To download drivers from IEI Resource Download Center follow the steps...

Page 41: ...d with the following window You can download the entire ISO file or click the small arrow to find an individual driver and click the file name to download NOTE To install software from the downloaded...

Page 42: ...DRPC 330 A7K Embedded System Page 32 Chapter 4 4 Troubleshooting and Maintenance...

Page 43: ...age To preserve the working integrity of the DRPC 330 A7K embedded system the system must be properly maintained If embedded system components need replacement the proper maintenance procedures must b...

Page 44: ...he power is turned on See Section 4 2 1 above Step 2 Make sure the SO DIMM modules are properly installed Step 0 4 2 3 More Troubleshooting Nothing appears on the monitor after booting up the system M...

Page 45: ...30 A7K fails to boot due to improper BIOS settings the clear CMOS button clears the CMOS data and resets the system BIOS information To do this push the clear CMOS button for a few seconds The clear C...

Page 46: ...lows users to enable or disable the watchdog timer function Refer to Figure 4 2 and Table 4 1 for the jumper location and settings Setting Description Open Disable watchdog timer Short Enable watchdog...

Page 47: ...DRPC 330 A7K Embedded System Page 37 Chapter 5 5 Interface Connectors...

Page 48: ...s with a number of peripheral interface connectors and configuration jumpers The connector locations are shown in Table 5 1 The Pin 1 locations of the on board connectors are also indicated in the dia...

Page 49: ...the following sections Connector Type Label Battery connector 2 pin wafer BAT1 I2 C connector 4 pin wafer CN4 LED connector 6 pin header JP3 M 2 A key slot 2230 A key slot J6 M 2 B key slot 2280 B key...

Page 50: ...4 3 3V 5 GPIO_Alarm 6 3 3V Table 5 4 LED Connector JP3 Pinouts 5 2 4 M 2 2230 A key Slot J6 The M 2 2230 A key Slot J6 supports USB 2 0 and PCIe x1 signals PIN NO DESCRIPTION PIN NO DESCRIPTION 1 GND...

Page 51: ...40 NC 41 M 2_PCIE_RXp_0 42 NC 43 M 2_PCIE_RXn_0 44 NC 45 GND 46 NC 47 M 2_PCIEx1_CLKp_0_C 48 NC 49 M 2_PCIEx1_CLKn_0_C 50 NC 51 GND 52 PCIE_RSTn_3V3 53 CLKREQ _C_3 54 55 LAN_WOL _3V3 56 W_DISABLE _A 5...

Page 52: ...Module Key 14 Module Key 15 Module Key 16 Module Key 17 Module Key 18 Module Key 19 Module Key 20 NC 21 GND 22 NC 23 NC 24 NC 25 NC 26 NC 27 GND 28 NC 29 RX_U3_N3 30 NC 31 RX_U3_P3 32 NC 33 GND 34 NC...

Page 53: ...The M 2 2242 2280 B key Slot M_2_B1 supports PCIe x1 USB 3 2 and USB 2 0 signals it also supports WWAN communication together with the on board SIM card slot PIN NO DESCRIPTION PIN NO DESCRIPTION 1 G...

Page 54: ...PCIE_RXp_5 44 NC 45 GND 46 NC 47 M 2_PCIE_TXn_5_C 48 NC 49 M 2_PCIE_TXp_5_C 50 PCIE_RSTn_3V3 51 GND 52 CLKREQ _C_1 53 M 2_PCIEx1_CLKn_2 54 LAN_WOL _3V3 55 M 2_PCIEx1_CLKp_2 56 CP0_I2C1_SDA 57 GND 58 C...

Page 55: ...I_SI 6 GND Table 5 8 SPI Flash Connector JSPI1 Pinouts 5 2 8 TPM Connector TPM1 PIN NO DESCRIPTION PIN NO DESCRIPTION 1 NC 2 TPM_RST 3 3 3V_TPM 4 TPM_PIRQ 5 NC 6 NC 7 GND 8 TPM_CS 0_SW 9 TPM_SI_SW 10...

Page 56: ...DRPC 330 A7K Embedded System Page 46 Appendix A A Regulatory Compliance...

Page 57: ...sential requirements and other relevant provisions of Directive 1999 5 EC Bulgarian IEI Integration Corp 1999 5 esky Czech IEI Integration Corp t mto prohla uje e tento za zen je ve shod se z kladn mi...

Page 58: ...EK Lietuvi Lithuanian IEI Integration Corp deklaruoja kad is ranga atitinka esminius reikalavimus ir kitas 1999 5 EB Direktyvos nuostatas Nederlands Dutch IEI Integration Corp dat het toestel toestel...

Page 59: ...olo ili direktive 1999 5 ES Slovensky Slovak IEI Integration Corp t mto vyhlasuje e zariadenia sp a z kladn po iadavky a v etky pr slu n ustanovenia Smernice 1999 5 ES Suomi Finnish IEI Integration Co...

Page 60: ...and used in accordance with the instruction manual may cause harmful interference to radio communications Operation of this equipment in a residential area is likely to cause harmful interference in w...

Page 61: ...DRPC 330 A7K Embedded System Page 51 Appendix B B Safety Precautions...

Page 62: ...ystem Do not apply voltage levels that exceed the specified voltage range Doing so may cause fire and or an electrical shock Electric shocks can occur if opened while still powered on Do not drop or i...

Page 63: ...t Self grounding Before handling any electrical component touch any grounded conducting material During the time the electrical component is handled frequently touch any conducting materials that are...

Page 64: ...ording to instructions and local regulations Outside the European Union If you wish to dispose of used electrical and electronic products outside the European Union please contact your local authority...

Page 65: ...id eating drinking and smoking within vicinity of the DRPC 330 A7K B 2 2 Cleaning Tools Some components in the DRPC 330 A7K may only be cleaned using a product specifically designed for the purpose In...

Page 66: ...Embedded System Page 56 Swabs Swaps moistened with rubbing alcohol or water are excellent tools for wiping hard to reach areas Whenever possible it is best to use lint free swabs such as foam swabs f...

Page 67: ...DRPC 330 A7K Embedded System Page 57 Appendix C C Watchdog Timer...

Page 68: ...T 15H AH 6FH Sub function AL 2 Sets the Watchdog Timer s period BL Time out value Its unit second is dependent on the item Watchdog Timer unit select in CMOS setup Table C 1 AH 6FH Sub function Call s...

Page 69: ...is not deactivated the system will automatically restart after the Timer has finished its countdown EXAMPLE PROGRAM INITIAL TIMER PERIOD COUNTER W_LOOP MOV AX 6F02H setting the time out value MOV BL...

Page 70: ...DRPC 330 A7K Embedded System Page 60 Appendix D D Error Beep Code...

Page 71: ...s not found 4 Recovery failed 4 S3 Resume failed 7 Reset PPI is not available D 2 DXE Beep Codes Number of Beeps Description 1 Invalid password 4 Some of the Architectural Protocols are not available...

Page 72: ...DRPC 330 A7K Embedded System Page 62 Appendix E E Hazardous Materials Disclosure...

Page 73: ...PBB Polybrominated Diphenyl Ethers PBDE Bis 2 ethylhexyl phthalate DEHP Butyl benzyl phthalate BBP Dibutyl phthalate DBP Diisobutyl phthalate DIBP Housing O O O O O O O O O O Printed Circuit Board O...

Page 74: ...dded System Page 64 E 2 China RoHS RoHS RoHS Pb Hg Cd CR VI PBB PBDE O O O O O O O O O O O O O O O O O O O O O O O O O O O O O O O O O O O O O O O O O O O SJ T11364 2014 GB T26572 2011 X SJ T11364 201...

Reviews: