background image


IOVU-210AR-RK39 Panel PC 


Page 44 

B.1.2 Anti-static Precautions 

  WARNING: 

Failure to take ESD precautions during the installation of the 

IOVU-210AR-RK39  may result in permanent damage to the 

IOVU-210AR-RK39 and severe injury to the user.   

Electrostatic discharge (ESD) can cause serious damage to electronic components, 

including the IOVU-210AR-RK39. Dry climates are especially susceptible to ESD. It is 

therefore critical that whenever the IOVU-210AR-RK39 is opened and any of the electrical 

components are handled, the following anti-static precautions are strictly adhered to. 


Wear an anti-static wristband

: Wearing a simple anti-static wristband can 

help to prevent ESD from damaging any electrical component. 


Self-grounding

: Before handling any electrical component, touch any 

grounded conducting material. During the time the electrical component is 

handled, frequently touch any conducting materials that are connected to the 

ground. 


Use an anti-static pad

: When configuring or working with an electrical 

component, place it on an anti-static pad. This reduces the possibility of ESD 

damage. 


Only handle the edges of the electrical component

: When handling the 

electrical component, hold the electrical component by its edges. 

Summary of Contents for IOVU-210AR-RK39

Page 1: ...l PC Page i User Manual 10 1 RISC Based Panel PC with P CAP Touchscreen Rockchip RK3399 On board SoC Wi Fi Bluetooth Camera USB SOS Key GbE with PoE Android 7 1 RoHS Compliant MODEL IOVU 210AR RK39 Rev 1 00 November 8 2018 ...

Page 2: ...IOVU 210AR RK39 Panel PC Page ii Revision Date Version Changes November 8 2018 1 00 Initial release ...

Page 3: ...ges arising out of the use or inability to use the product or documentation even if advised of the possibility of such damages This document contains proprietary information protected by copyright All rights are reserved No part of this manual may be reproduced by any mechanical electronic or other means in any form without prior written permission of the manufacturer TRADEMARKS All registered tra...

Page 4: ...l injury Warnings should be taken seriously CAUTION Cautionary messages should be heeded to help reduce the chance of losing data or damaging the product NOTE These messages inform the reader of essential but non critical information These messages should be read carefully as any directions or instructions contained therein can help avoid making mistakes ...

Page 5: ... INSTALLATION PRECAUTIONS 12 3 3 EXTERNAL I O CONNECTORS 13 3 3 1 Digital I O Connectors 13 3 3 2 Digital I O Terminal Block 13 3 3 3 I2 C Connectors 14 3 3 4 microSD Card Slot 14 3 3 5 RJ 45 LAN Connectors 15 3 3 5 1 LAN1 Connector with PoE 15 3 3 5 2 LAN2 Connector 15 3 3 6 RS 232 Serial Interface 16 3 3 7 RS 232 422 485 Serial Interface 17 3 3 8 USB Connectors 17 3 4 MOUNTING THE SYSTEM 18 3 4 ...

Page 6: ...etween Home Screens 30 4 1 3 Favorites Tray 30 4 1 4 Adding Shortcuts 31 4 1 5 Arranging the Home Screen 33 4 2 NAVIGATION BUTTONS 34 4 3 STATUS BAR 35 A REGULATORY COMPLIANCE 37 B SAFETY PRECAUTIONS 42 B 1 SAFETY PRECAUTIONS 43 B 1 1 General Safety Precautions 43 B 1 2 Anti static Precautions 44 B 1 3 Product Disposal 45 B 2 MAINTENANCE AND CLEANING PRECAUTIONS 45 B 2 1 Maintenance and Cleaning 4...

Page 7: ... Wall Mount Bracket Dimensions Unit mm 20 Figure 3 8 Drill Holes for Securing In Wall Mounting Box 21 Figure 3 9 Secure Mounting Screws 22 Figure 3 10 Mounting Panel PC 22 Figure 3 11 In Wall Mounting Box Dimensions Unit mm 23 Figure 3 12 Power Input Jack 24 Figure 3 13 IEI Resource Download Center 25 Figure 4 1 Adding a Home Screen 29 Figure 4 2 Multiple Home Screens 30 Figure 4 3 Favorites Tray ...

Page 8: ...nector DIO2 DIO3 Pinouts 13 Table 3 2 DIO Terminal Block DIO1 Pinouts 13 Table 3 3 I2 C Connector I2C Pinouts 14 Table 3 4 LAN1 Connector Pinouts 15 Table 3 5 LAN2 Connector Pinouts 15 Table 3 6 LAN2 Ethernet Connector LEDs 16 Table 3 7 RS 232 Connector UART2 Pinouts 16 Table 3 8 RS 232 422 485 Terminal Block UART1 Pinouts 17 Table 4 1 Navigation Buttons 34 ...

Page 9: ...IOVU 210AR RK39 Panel PC Page 1 Chapter 1 1 Introduction ...

Page 10: ...d capacitive touchscreen Other peripherals include RFID reader digital I O one USB 2 0 port one USB 3 0 port one RS 232 port one RS 232 422 485 port and one GbE LAN port with PoE support 1 2 Features The IOVU 210AR RK39 features the following Fanless design Rockchip RK3399 on board SoC On board 1866 MHz 2 GB LPDDR3 memory 16 GB eMMC NAND flash Projected capacitive touchscreen Equips with Wi Fi 802...

Page 11: ... compliant 1 3 Front Panel The front panel of the IOVU 210AR RK39 contains a 10 1 LCD with projected capacitive touchscreen 5 megapixel camera an SOS key two volume keys a power indicator and an RFID indicator Figure 1 2 Front Panel The states of the LED indicators located on the front panel are listed below Power LED Off The system is turned off Green The system is turned on RFID LED Off RFID rea...

Page 12: ...el contains several I O interfaces as shown below The detailed information of each connector is listed in Section 3 3 Figure 1 3 Rear Panel NOTE When both DC in and PoE are connected to the device the connection with higher voltage will be the main power source ...

Page 13: ...pixel front facing camera Thermal Solution Fanless Watchdog Timer Yes Real time Clock Battery backup RTC OS Android 7 1 Display LCD Size 10 1 Max Resolution 800 x 1280 Brightness cd m2 250 typ Contrast Ratio 800 1 typ Pixel Pitch mm 0 0564 H x 0 1692 V Viewing Angle 85 85 85 85 degree Touchscreen Projected capacitive touchscreen Communication Wireless LAN 802 11a b g n ac Bluetooth Bluetooth v4 1 ...

Page 14: ...d Indicators External I O 1 x USB 3 0 Type A port 1 x USB 2 0 Type A port 1 x RJ 45 GbE port with PoE by RTL8211E 1 x RJ 45 GbE port by RTL8211E 1 x RS 232 422 485 port via 4 pin terminal block COM1 1 x RS 232 port via Grove connector COM2 1 x Digital I O via 6 pin terminal block 4 bit 2 in 2 out 2 x Digital I O via Grove connector 2 bit 1 in 1 out 3 x I2 C sensor connector via Grove connector Int...

Page 15: ...IOVU 210AR RK39 Panel PC Page 7 1 6 Dimensions The dimensions of the IOVU 210AR RK39 are shown below Figure 1 4 Dimensions Unit mm ...

Page 16: ...IOVU 210AR RK39 Panel PC Page 8 Chapter 2 2 Unpacking ...

Page 17: ...nough to break the tape Step 2 Open the box Step 3 Lift the IOVU 210AR RK39 out of the box Step 4 Make sure all the components listed in the packing list are present Step 0 2 1 Packing List NOTE If any of the components listed in the checklist below are missing do not proceed with the installation Contact the IEI reseller or vendor the IOVU 210AR RK39 was purchased from or contact an IEI sales rep...

Page 18: ... for wall mounting 1 4 pin terminal block 1 6 pin terminal block Table 2 1 Packing List 2 2 Optional Item The following is optional component which may be separately purchased Item Image 90V 264V AC input 12V 60W DC power adapter P N 63040 010060 120 RS In wall mounting box P N 41320 0490E4 00 RS Table 2 2 Optional Item ...

Page 19: ...IOVU 210AR RK39 Panel PC Page 11 Chapter 3 3 Installation ...

Page 20: ...n help to prevent ESD from damaging the board Self grounding Before handling the board touch any grounded conducting material During the time the board is handled frequently touch any conducting materials that are connected to the ground Use an anti static pad When configuring the IOVU 210AR RK39 place it on an anti static pad This reduces the possibility of ESD damaging the IOVU 210AR RK39 Only h...

Page 21: ...connectors of the IOVU 210AR RK39 3 3 1 Digital I O Connectors The IOVU 210AR RK39 has two digital I O connectors in Grove interface The pinouts are shown below Pin Description 1 GND 2 DIO_3V3 3 DIO_D5 D7 4 DIO_D6 D8 Table 3 1 DIO Connector DIO2 DIO3 Pinouts 3 3 2 Digital I O Terminal Block The IOVU 210AR RK39 has one 6 pin digital I O terminal block The pinouts are shown below Pin Description 1 V...

Page 22: ...C connectors in Grove interface The pinouts are shown below Pin Description 1 GND 2 IOT_3V3 3 SDA1_3V3 4 SCL1_3V3 Table 3 3 I2 C Connector I2C Pinouts 3 3 4 microSD Card Slot The system comes with a push push microSD card slot for installation of a microSD card Figure 3 1 microSD Card Slot ...

Page 23: ...s connection to an external network and supports PoE The LAN1 connector pinouts are shown below Pin Description 1 LAN1_MDX0 2 LAN1_MDX0 3 LAN1_MDX1 4 LAN1_MDIX2 5 LAN1_MDX2 6 LAN1_MDX1 7 LAN1_MDIX3 8 LAN1_MDX3 Table 3 4 LAN1 Connector Pinouts 3 3 5 2 LAN2 Connector The LAN2 connector pinouts are shown below Pin Description 1 LAN1_MD0 2 LAN1_MD0 3 LAN1_MD1 4 LAN1_MD1 5 LAN1_MD2 6 LAN1_MD2 7 LAN1_MD...

Page 24: ...3 2 LAN2 Connector SPEED LED LINK LED Status Description Status Description Green 10 100 Mbps Green On Linked Flashing Activity Orange 1000 Mbps Table 3 6 LAN2 Ethernet Connector LEDs 3 3 6 RS 232 Serial Interface The IOVU 210AR RK39 has one RS 232 connector in Grove interface The pinouts are shown below Pin Description 1 GND 2 VIO_3V3 3 RS232_TXD1 4 RS232_RXD1 Table 3 7 RS 232 Connector UART2 Pin...

Page 25: ...block Its pinouts are shown below Pin RS 232 RS 422 RS 485 1 N A TX DATA 2 TXD TX DATA 3 RXD RX N A 4 N A RX N A Table 3 8 RS 232 422 485 Terminal Block UART1 Pinouts 3 3 8 USB Connectors The external USB Series A receptacle connectors provide easier and quicker access to external USB devices Figure 3 3 USB Connectors ...

Page 26: ...ocations Figure 3 4 Step 2 Secure the mounting bracket to the wall by inserting the retention screws into the four pilot holes and tightening them Figure 3 4 Figure 3 4 Wall Mounting Bracket Installation Step 3 Insert the four mounting screws M4 6 came with the panel PC into the four screw holes on the mounting bracket and tighten until the screw shank is secured Figure 3 5 CAUTION Please use the ...

Page 27: ...to the mounting screws and gently pull the panel PC downwards until the panel PC rests securely on screws Ensure that all four of the slotted holes fit snuggly into their respective mounting screws Figure 3 6 Step 6 Secure the panel PC by installing the two retention screws M3 4 came with the panel PC into the screw hole on the bottom of the bracket Figure 3 6 Figure 3 6 Mounting Panel PC ...

Page 28: ...ll Mounting To mount the IOVU 210AR RK39 into a wall using the optional in wall mounting box please follow the steps below Step 1 When constructing the building leave a section from the wall that corresponds to the dimensions of the in wall mounting box Step 2 Carefully mark the locations of the screw holes of the in wall mounting box on the mounting area Drill the pilot holes at the marked locati...

Page 29: ...Insert the four mounting screws M4 6 came with the panel PC into the four screw holes on the mounting bracket and tighten until the screw shank is secured Figure 3 9 CAUTION Please use the M4 screws provided in the package for the mounting screws If the screw is missing the thread depth of the replacement screw should be not more than 4 mm Step 5 Slide the in wall mounting box into the wall Secure...

Page 30: ...l PC to the mounting screws and gently pull the panel PC downwards until the panel PC rests securely on screws Ensure that all four of the slotted holes fit snuggly into their respective mounting screws Figure 3 10 Step 8 Secure the panel PC by installing the two screws M3 4 came with the panel PC into the two screw holes on the bottom of the bracket Figure 3 10 Figure 3 10 Mounting Panel PC ...

Page 31: ...IOVU 210AR RK39 Panel PC Page 23 3 4 2 1 In Wall Mounting Box Dimensions The dimensions of the optional in wall mounting box are shown below Figure 3 11 In Wall Mounting Box Dimensions Unit mm ...

Page 32: ... to the system may cause damage to the internal electronic components and may also cause injury to the user The IOVU 210AR RK39 supports 9 V 30 V DC power input To power on connect the IOVU 210AR RK39 power input jack to a power source Once connected the system will automatically turn on and the power LED on the front panel will light up in green Figure 3 12 Power Input Jack ...

Page 33: ...er to find all the relevant software utilities and documentation Figure 3 13 IEI Resource Download Center 3 6 1 Driver Download To download drivers from IEI Resource Download Center follow the steps below Step 1 Go to https download ieiworld com Type IOVU 210AR RK39 and press Enter Step 2 All product related software utilities and documentation will be listed You can choose Driver to filter the re...

Page 34: ...ge 26 Step 3 Click the driver file name on the page and you will be prompted with the following window You can download the entire ISO file or click the small arrow to find an individual driver and click the file name to download ...

Page 35: ...K39 fail they must be replaced Please contact the system reseller or vendor to purchase the replacement parts NOTE A user cannot replace a motherboard If the motherboard fails it must be shipped back to IEI to be replaced Please contact the system vendor reseller or an IEI sales person directly ...

Page 36: ...IOVU 210AR RK39 Panel PC Page 28 Chapter 4 4 Android OS ...

Page 37: ...d OS supports multiple home screens allowing users to customize the screen with widgets apps and shortcuts The following sections describe the basic technique to manage the home screen 4 1 1 Adding a Home Screen To add a home screen touch and hold an app widget icon The following screen appears indicating that a new home screen is available Drag and release the icon to the new home screen Figure 4...

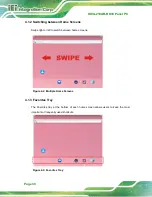
Page 38: ...e Screens Swipe right or left to switch between home screens Figure 4 2 Multiple Home Screens 4 1 3 Favorites Tray The Favorites tray at the bottom of each home screen allows users to keep the most important or frequently used shortcuts Figure 4 3 Favorites Tray ...

Page 39: ... To add app or widget shortcuts on the home screen follow the steps below Step 1 To add an app shortcut tap the up arrow on the home screen to access the All Apps page To add a widget shortcut touch and hold the background of a home screen then tap WIDGETS ...

Page 40: ...IOVU 210AR RK39 Panel PC Page 32 Step 2 Touch and hold an app icon or a widget and drag it to the home screen Figure 4 4 All Apps WIDGETS Page ...

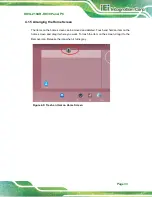
Page 41: ...reen The items on the home screen can be moved and deleted Touch and hold an item on the home screen and drag it where you want To trash the item on the screen drag it to the Remove icon Release the icon when it turns gray Figure 4 5 Trash an Item on Home Screen ...

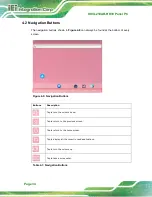
Page 42: ... found at the bottom of every screen Figure 4 6 Navigation Buttons Buttons Description Tap to turn the volume down Tap to return to the previous screen Tap to return to the home screen Tap to display all the recently used applications Tap to turn the volume up Tap to take a screenshot Table 4 1 Navigation Buttons ...

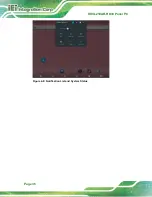
Page 43: ...4 3 Status Bar The status bar on the top of the screen Figure 4 9 displays system status such as battery level or signal strength Figure 4 7 Status Bar Swipe down from the status bar to view notification and status details Figure 4 10 ...

Page 44: ...IOVU 210AR RK39 Panel PC Page 36 Figure 4 8 Notification List and System Status ...

Page 45: ...IOVU 210AR RK39 Panel PC Page 37 Appendix A A Regulatory Compliance ...

Page 46: ...EC Български Bulgarian IEI Integration Corp декларира че този оборудване е в съответствие със съществените изисквания и другите приложими правила на Директива 1999 5 ЕС Česky Czech IEI Integration Corp tímto prohlašuje že tento zařízení je ve shodě se základními požadavky a dalšími příslušnými ustanoveními směrnice 1999 5 ES Dansk Danish IEI Integration Corp erklærer herved at følgende udstyr over...

Page 47: ...n citiem ar to saistītajiem noteikumiem Direktīvas 1999 5 EK Lietuvių Lithuanian IEI Integration Corp deklaruoja kad šis įranga atitinka esminius reikalavimus ir kitas 1999 5 EB Direktyvos nuostatas Nederlands Dutch IEI Integration Corp dat het toestel toestel in overeenstemming is met de essentiële eisen en de andere relevante bepalingen van richtlijn 1999 5 EG Malti Maltese IEI Integration Corp ...

Page 48: ...čili direktive 1999 5 ES Slovensky Slovak IEI Integration Corp týmto vyhlasuje že zariadenia spĺňa základné požiadavky a všetky príslušné ustanovenia Smernice 1999 5 ES Suomi Finnish IEI Integration Corp vakuuttaa täten että laitteet on direktiivin 1999 5 EY oleellisten vaatimusten ja sitä koskevien direktiivin muiden ehtojen mukainen Svenska Swedish IEI Integration Corp förklarar att denna utrust...

Page 49: ...terference at his own expense Federal Communication Commission Interference Statement This equipment has been assembled with components that comply with the limits for a Class B digital device pursuant to Part 15 of the FCC Rules These limits are designed to provide reasonable protection against harmful interference in a residential installation This equipment generates uses and can radiate radio ...

Page 50: ...IOVU 210AR RK39 Panel PC Page 42 Appendix B B Safety Precautions ...

Page 51: ...er the IOVU 210AR RK39 is being installed moved or modified Do not apply voltage levels that exceed the specified voltage range Doing so may cause fire and or an electrical shock Electric shocks can occur if the IOVU 210AR RK39 chassis is opened when the IOVU 210AR RK39 is running Do not drop or insert any objects into the ventilation openings of the IOVU 210AR RK39 If considerable amounts of dust...

Page 52: ...led the following anti static precautions are strictly adhered to Wear an anti static wristband Wearing a simple anti static wristband can help to prevent ESD from damaging any electrical component Self grounding Before handling any electrical component touch any grounded conducting material During the time the electrical component is handled frequently touch any conducting materials that are conn...

Page 53: ... and electronic products carrying the mark left must be disposed of separately from normal household waste This includes monitors and electrical accessories such as signal cables or power cords When you need to dispose of your display products please follow the guidance of your local authority or ask the shop where you purchased the product The mark on electrical and electronic products only appli...

Page 54: ...d using a product specifically designed for the purpose In such case the product will be explicitly mentioned in the cleaning tips Below is a list of items to use when cleaning the IOVU 210AR RK39 Cloth Although paper towels or tissues can be used a soft clean piece of cloth is recommended when cleaning the IOVU 210AR RK39 Water or rubbing alcohol A cloth moistened with water or rubbing alcohol ca...

Page 55: ...IOVU 210AR RK39 Panel PC Page 47 Appendix C C Hazardous Materials Disclosure ...

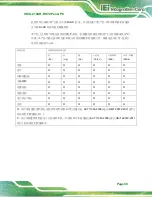
Page 56: ...nd lamps These components will be separately marked Please refer to below table Part Name Toxic or Hazardous Substances and Elements Lead Pb Mercury Hg Cadmium Cd Hexavalent Chromium CR VI Polybrominated Biphenyls PBB Polybrominated Diphenyl Ethers PBDE Housing O O O O O O Display O O O O O O Printed Circuit Board O O O O O O Metal Fasteners O O O O O O Cable Assembly O O O O O O Fan Assembly O O ...

Page 57: ...像是电池或灯管 这些元 件将会单独标示出来 部件名称 有毒有害物质或元素 铅 Pb 汞 Hg 镉 Cd 六价铬 CR VI 多溴联苯 PBB 多溴二苯醚 PBDE 壳体 O O O O O O 显示 O O O O O O 印刷电路板 O O O O O O 金属螺帽 O O O O O O 电缆组装 O O O O O O 风扇组装 O O O O O O 电力供应组装 O O O O O O 电池 O O O O O O O 表示该有毒有害物质在该部件所有物质材料中的含量均在 SJ T11363 2006 现由 GB T 26572 2011 取代 标准规定的限量要求以下 X 表示该有毒有害物质至少在该部件的某一均质材料中的含量超出 SJ T11363 2006 现由 GB T 26572 2011 取代 标准规定的限量要求 ...

Reviews: