background image


PAC-1000G QIG                    IEI Technology Corp.                                    Page  3 


INSTALLATION STEPS 

 
To install the PAC-1000G chassis, the following installation steps 
must be completed: 

Step 1: 

Unpack the chassis. 

Step 2: 

Remove the top cover and hold-down clamp. 

Step 3: 

Install the PSU. 

Step 4: 

Install the backplane. 

Step 5: 

Install the CPU card. 

Step 6: 

Install the PCI and ISA expansion cards. 

Step 7: 

Install the disk drives. 

Step 8: 

Connect the cables. 

Step 9: 

Connect the PSU cable and the interface cable. 

Step 10: 

Reinstall the hold-down clamp, shock absorbers 

and top cover. 

Step 11: 

Install the wall-mount plates.

Step 0:


The installation steps outlined above are described in detail below. 
Please refer to the relevant section. 

STEP 1: UNPACK 

The PAC-1000G is shipped in a plastic bag that is placed inside a 
cardboard box. The items are also shipped with the chassis. When 
you unpack the chassis you must: 


Make sure all the items listed in the 

PACKING LIST


section are present. 


Make sure the chassis has not been damaged in any 

way. 

STEP 2: REMOVE THE TOP COVER AND 
HOLD-DOWN CLAMP 

S

TEP 

2.1: R

EMOVE THE 

T

OP 

C

OVER


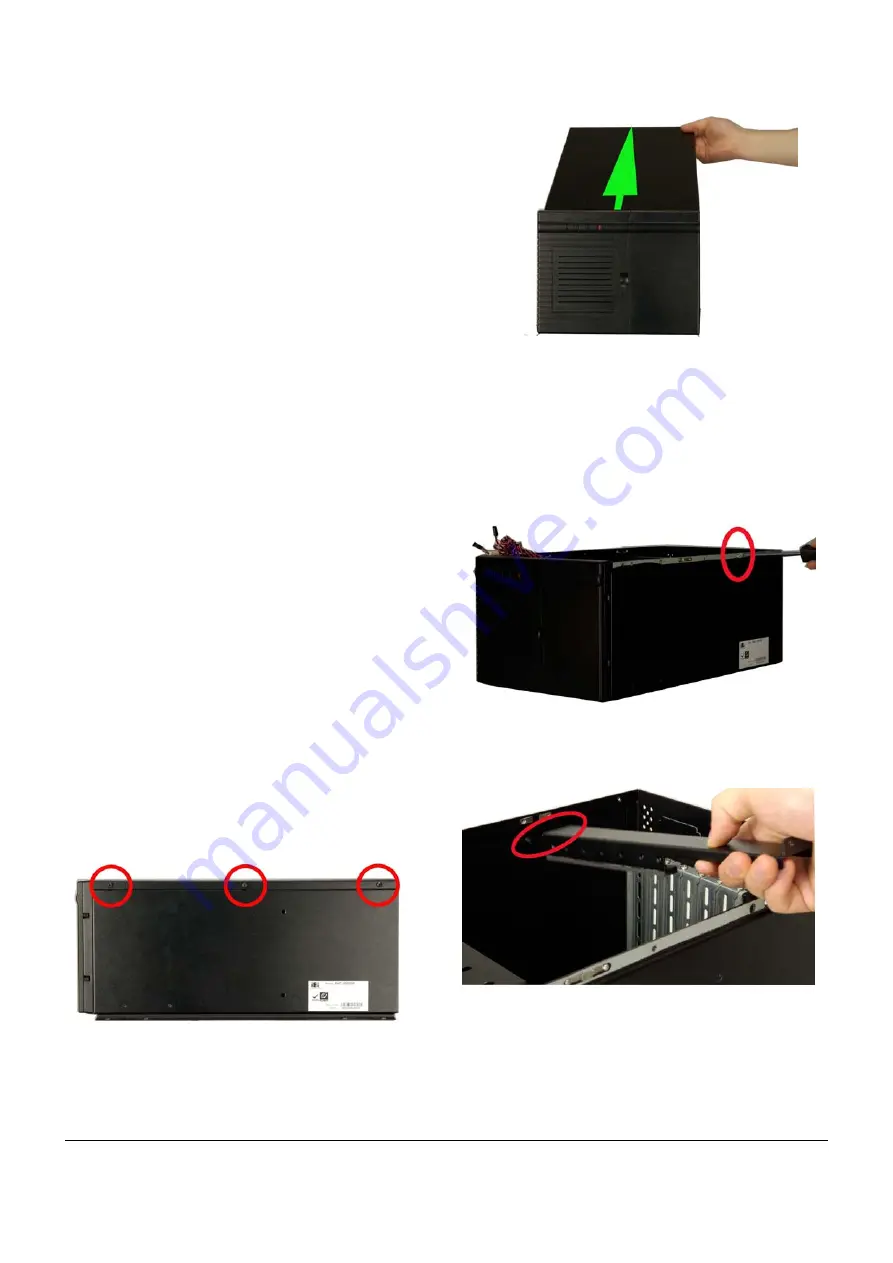
The top cover is secured to the chassis with 6 retention 
screws, 3 on each side of the chassis.   

Step 1: 

Remove all six top cover retention screws. 
Remove three retention screws from each side of 
the chassis. 

Figure 2: Remove Top Cover Retention Screws 

Step 2: 

Slide the cover backwards and then lift the cover 

up gently.

Step 0:


Figure 3: Remove the Top Cover 

 
S

TEP 

2.2: H

OLD

-

DOWN CLAMP REMOVAL


Detach the hold-down clamp by removing the two screws 
located on the right side of the chassis and pull the hold-down 
clamp out of the two securing pillars on the left side of the 
chassis. 

Figure 4:   

Remove Two Hold-Down Clamp Side 

Retention Screws 


Figure 5:   

Two Hold-Down Clamp Securing Pillars 


Summary of Contents for PAC-1000G

Page 1: ...5 Internal HDD hard disk drive drive bay Dimensions DxWxH o 421mm x 232mm x 176mm Operating Temperature 0 40 C Relative Humidity 5 95 Vibration o 5 to 17Hz 0 1 double amplitude displacement o 17 to 64...

Page 2: ...PAC 1000G QIG IEI Technology Corp Page 2 DIMENSION DRAWING The dimensions of PAC 1000G are shown below Figure 1 Dimension Drawing measurement units millimeter...

Page 3: ...box The items are also shipped with the chassis When you unpack the chassis you must Make sure all the items listed in the PACKING LIST section are present Make sure the chassis has not been damaged i...

Page 4: ...Correctly position the PSU at the rear of the chassis Make sure the power switch and the cable socket both face outwards Step 3 Secure the PSU to the rear of the chassis To do this insert four retenti...

Page 5: ...e CPU Card Sockets Step 3 To secure the CPU card reinsert the previously removed slot cover retention screw Step 0 STEP 6 PCI ISA EXPANSION CARD INSTALLATION The PAC 1000G supports up to five PCI ISA...

Page 6: ...screws two on each side Step 0 Figure 16 Secure an HDD to the Right Side of the Drive Bracket STEP 7 3 FDD HDD INSTALLATION To install a 3 5 FDD HDD into the 3 5 front accessible drive bracket please...

Page 7: ...the right side of the chassis Step 0 STEP 8 CABLING The PAC 1000G has the following components accessible at the front o 1 x Power LED o 1 x HDD LED o 1 x Power switch o 1 x Reset button These compone...

Page 8: ...EP 11 WALL MOUNT PLATES INSTALLATION Two wall mount plates are shipped with the PAC 1000G chassis The wall mount plates are installed on the sides at the bottom of the chassis Each plate is secured to...

Page 9: ...ve the Metal Front Panel Plate Step 8 Remove the fan filter cover and the fan filter pad inside Please refer to Step 1 of FAN FILTER REPLACEMENT section Step 9 Press the three fan clips one on the top...

Page 10: ...from the right side of the fan filter cover Figure 29 Flip Open the Fan Filter Cover Step 2 Replace the fan filter pad inside Step 3 Reinstall the fan filter cover Step 0 CABINET INSTALLATION Support...

Reviews: