10
to static electric charges and can be damaged by a
sudden rush of power. To protect it from unintended
damage, be sure to follow these precautions:
Ground yourself to remove any static charge before
touching PCISA-6770 SBC. You can do it by using a
grounded wrist strap at all times or by frequently
touching any conducting materials that is connected to
the ground.
Handle the PCISA-6770 SBC by its edges. Don’t touch IC
chips, leads or circuitry if not necessary.
Do not plug any connector or jumper while the power is
on.
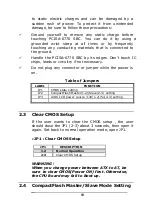
Table of Jumpers
LABEL FUNCTION
JP1
CMOS state setting
JP2
CompactFlash Master(1-2)/Slave(2-3) setting
JP3
LVDS LCD power source 3.3V(1-2)/5v(2-3) setting
2.3 Clear CMOS Setup
If the user wants to clear the CMOS setup , the user
should close the JP1 (2-3) about 3 seconds, then open it
again. Set back to normal operation mode, open JP1.
•
JP1 : Clear CMOS Setup
JP1
DESCRIPTION
1-2
Normal Operation
2-3
Clear CMOS Setup
WARNING !
When you change power between ATX to AT, be
sure to clear CMOS(Power ON) first .Otherwise,
the CPU Board may fail to Boot up.
2.4 CompactFlash Master/Slave Mode Setting
Summary of Contents for PCISA-6770 Series
Page 10: ......
Page 52: ...51 Digital Output is 1001b...


