POC-W24C-ULT3 FHD Medical Panel PC
Page 21
Anti-static Discharge
: If a user open the rear panel of the medical panel PC,
to configure the jumpers or plug in added peripheral devices, ground
themselves first and wear an anti-static wristband.
3.3 Installation and Configuration Steps
The following installation steps must be followed.
Step 1:
Unpack the medical panel PC.
Step 2:
Install an HDD.
Step 3:
Install necessary accessories (handset, handle or combo reader).
Step 4:
Configure the system.
Step 5:
Connect peripheral devices to the medical panel PC.
Step 6:
Mount the medical panel PC.
Step 0:
3.4 HDD Installation
To install the HDD into the system, please follow the steps below:
Step 1:
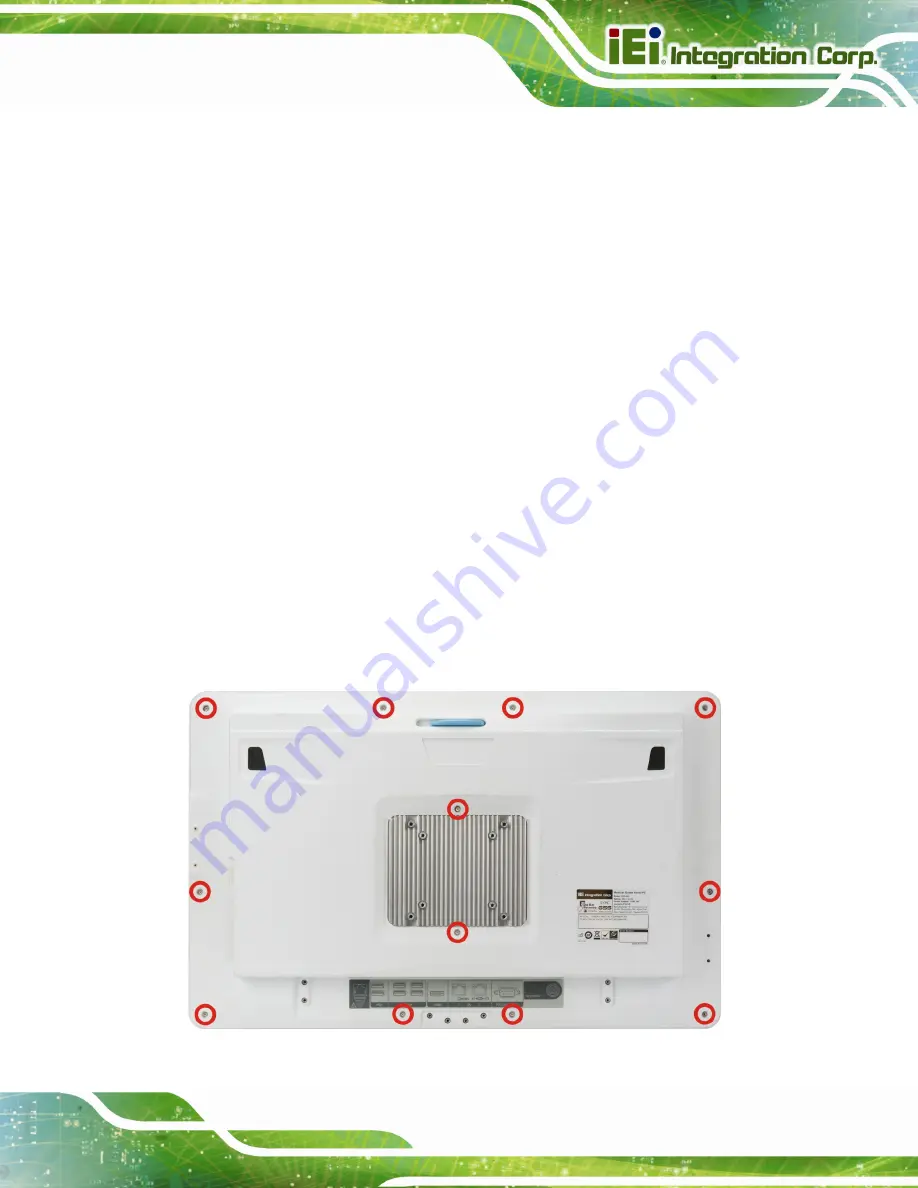
Remove the twelve retention screws from the back cover (
).
Figure 3-1: Back Cover Retention Screws
Summary of Contents for POC-W24C-ULT3
Page 16: ...POC W24C ULT3 FHD Medical Panel PC Page 1 1 Introduction Chapter 1 ...
Page 28: ...POC W24C ULT3 FHD Medical Panel PC Page 13 2 Unpacking Chapter 2 ...
Page 34: ...POC W24C ULT3 FHD Medical Panel PC Page 19 3 Installation Chapter 3 ...
Page 60: ...POC W24C ULT3 FHD Medical Panel PC Page 45 4 BIOS Setup Chapter 4 ...
Page 94: ...POC W24C ULT3 FHD Medical Panel PC Page 79 Chapter 5 5 Driver Installation ...
Page 118: ...POC W24C ULT3 FHD Medical Panel PC Page 103 6 System Maintenance Chapter 6 ...
Page 125: ...POC W24C ULT3 FHD Medical Panel PC Page 110 7 Interface Connectors Chapter 7 ...
Page 141: ...POC W24C ULT3 FHD Medical Panel PC Page 126 Appendix A A Regulatory Compliance ...
Page 146: ...POC W24C ULT3 FHD Medical Panel PC Page 131 B Safety Precautions Appendix B ...
Page 152: ...POC W24C ULT3 FHD Medical Panel PC Page 137 C BIOS Menu Options Appendix C ...
Page 155: ...POC W24C ULT3 FHD Medical Panel PC Page 140 Appendix D D Watchdog Timer ...
Page 158: ...POC W24C ULT3 FHD Medical Panel PC Page 143 Appendix E E Hazardous Materials Disclosure ...


