PPC2-Cxxx-EHL Series Panel PC
Page 42
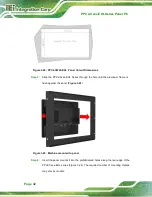
Figure 3-22: PPC2-CW22-EHL Panel Cutout Dimensions
Step 3:
Slide the PPC2
-
Cxxx
-
EHL Series through the hole until the aluminum frame is
flush against the panel (
).
Figure 3-23: Machine mounted to panel
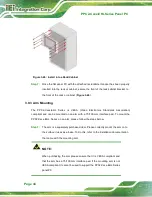
Step 4:
Insert the panel mount kit into the prefabricated holes along the rear edge of the
PPC2
-
Cxxx
-
EHL series (Figure
24). The required number of mounting clamps
may vary by models.
Summary of Contents for PPC2-C-EHL Series
Page 13: ...PPC2 Cxxx EHL Series Panel PC Page xiii Table 5 23 USB 3 2 Gen 1 Connector USB3_CON1 69...
Page 14: ......
Page 15: ...PPC2 Cxxx EHL Series Panel PC Page 1 1 Introduction Chapter 1...
Page 36: ...PPC2 Cxxx EHL Series Panel PC Page 22 2 Unpacking Chapter 2...
Page 39: ...PPC2 Cxxx EHL Series Panel PC Page 25 3 Installation Chapter 3...
Page 51: ...PPC2 Cxxx EHL Series Panel PC Page 37 Figure 3 12 Secure the Chassis...
Page 68: ...PPC2 Cxxx EHL Series Panel PC Page 54 Chapter 4 4 System Maintenance...
Page 70: ...PPC2 Cxxx EHL Series Panel PC Page 56 5 Interface Connectors Chapter 5...
Page 84: ...PPC2 Cxxx EHL Series Panel PC Page 70 Appendix A A Regulatory Compliance...
Page 89: ...PPC2 Cxxx EHL Series Panel PC Page 75 B Safety Precautions Appendix B...
Page 95: ...PPC2 Cxxx EHL Series Panel PC Page 81 C Watchdog Timer Appendix C...
Page 98: ...PPC2 Cxxx EHL Series Panel PC Page 84 Appendix D D Hazardous Materials Disclosure...


