SBOX-100-QM87i Fanless Marine Computer
Page 16
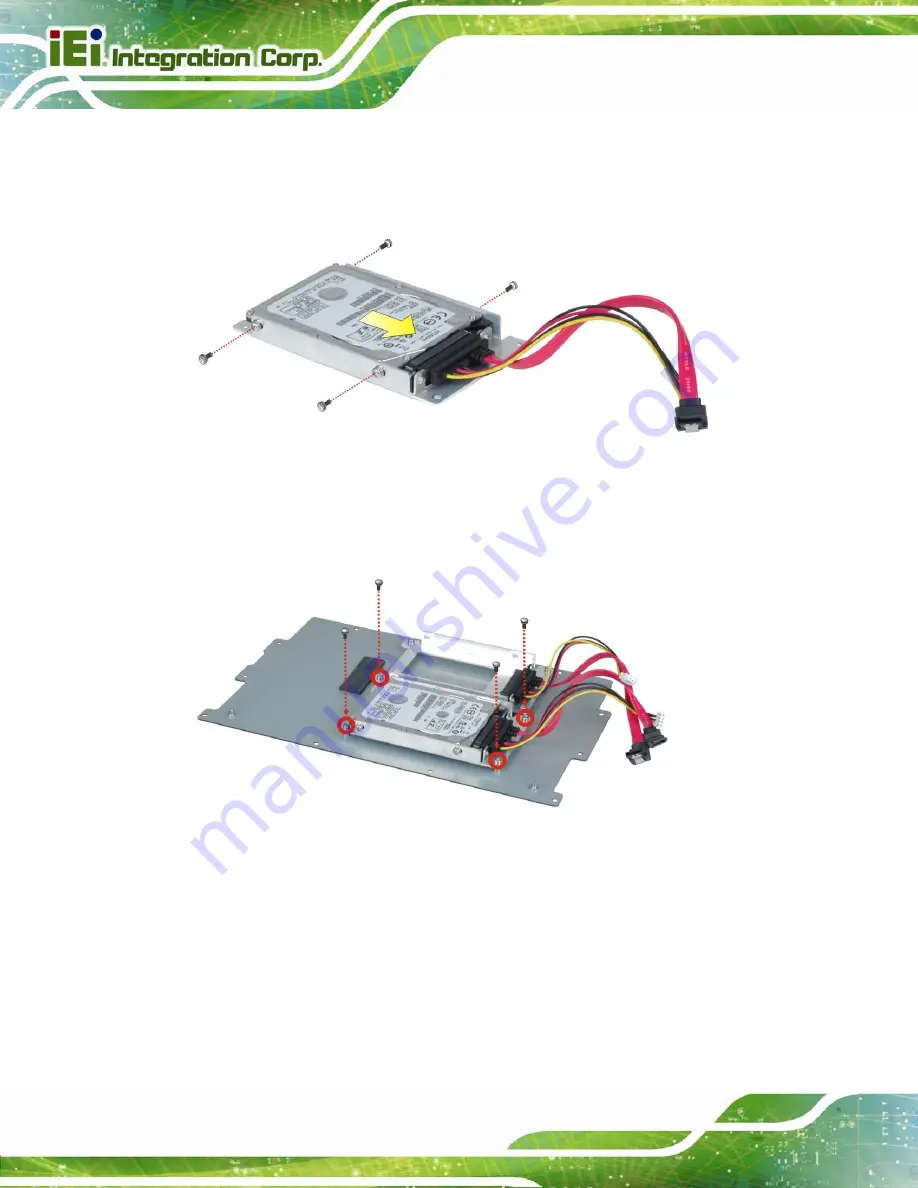
Step 3:
Insert an HDD into the bracket until the HDD is firmly connected with the SATA
cable connector. Secure the HDD to the bracket using four retention screws (two
screws on each side). See
.
Figure 3-5: Inserting the HDD
Step 4:
Install the HDD bracket in the same position it was before.
Figure 3-6: Installing the HDD
Step 5:
Repeat the steps described above to install another HDD if necessary.
Step 6:
Connect the SATA cables and the SATA power cables to the motherboard.
Step 7:
Reinstall the bottom cover with the previously removed retention screws.
Summary of Contents for SBOX-100-QM87i
Page 12: ......
Page 13: ...SBOX 100 QM87i Fanless Marine Computer Page 1 Chapter 1 1 Introduction ...
Page 20: ...SBOX 100 QM87i Fanless Marine Computer Page 8 Chapter 2 2 Unpacking ...
Page 24: ...SBOX 100 QM87i Fanless Marine Computer Page 12 Chapter 3 3 Installation ...
Page 38: ...SBOX 100 QM87i Fanless Marine Computer Page 26 Chapter 4 4 BIOS Setup ...
Page 76: ...SBOX 100 QM87i Fanless Marine Computer Page 64 Chapter 5 5 Maintenance ...
Page 80: ...SBOX 100 QM87i Fanless Marine Computer Page 68 Chapter 6 6 Interface Connectors ...
Page 96: ...SBOX 100 QM87i Fanless Marine Computer Page 84 Appendix A A Regulatory Compliance ...
Page 101: ...SBOX 100 QM87i Fanless Marine Computer Page 89 Appendix B B Safety Precautions ...
Page 106: ...SBOX 100 QM87i Fanless Marine Computer Page 94 Appendix C C BIOS Menu Options ...
Page 109: ...SBOX 100 QM87i Fanless Marine Computer Page 97 Appendix D D Watchdog Timer ...
Page 112: ...SBOX 100 QM87i Fanless Marine Computer Page 100 E Hazardous Materials Disclosure Appendix E ...


