TRN-TABLET3
Page 14
Anti-static Discharge
: If a user open the rear panel of the TRN-TABLET3, to
configure the jumpers or plug in added peripheral devices, ground themselves
first and wear and anti-static wristband.
3.4
Installing and Charging the Battery Pack
CAUTION:
Risk of explosion if the battery is replaced by an incorrect type;
Replacement of a battery with an incorrect type that can defeat a safeguard
(for example, in the case of some lithium battery types);
Disposal of a battery into fire or a hot oven, or mechanically crushing or
cutting of a battery, that can result in an explosion;
Leaving a battery in an extremely high temperature surrounding environment
that can result in an explosion or the leakage of flammable liquid or gas;
A battery subjected to extremely low air pressure that may result in an
explosion or the leakage of flammable liquid or gas
To install and charge the battery pack, please follow the steps below.
Step 1:
Adjust the stand to a position that allows the installation of the battery pack
).
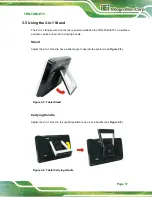
Figure 3-1: Adjusting the 2-in-1 Stand Kit
Summary of Contents for TRN-TABLET3
Page 10: ......
Page 11: ...TRN TABLET3 Page 1 Chapter 1 1 Introduction...
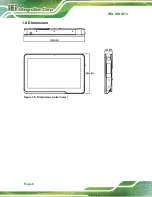
Page 18: ...TRN TABLET3 Page 8 1 8 Dimensions Figure 1 6 Dimensions units in mm...
Page 19: ...TRN TABLET3 Page 9 Chapter 2 2 Unpacking...
Page 21: ...TRN TABLET3 Page 11 Chapter 3 3 Installation...
Page 29: ...TRN TABLET3 Page 19 Chapter 4 4 BIOS Setup...
Page 53: ...TRN TABLET3 Page 43 Appendix A A Regulatory Compliance...
Page 59: ...TRN TABLET3 Page 49 B Product Disposal Appendix B...
Page 61: ...TRN TABLET3 Page 51 C Maintenance and Cleaning Precautions Appendix C...
Page 64: ...TRN TABLET3 Page 54 Appendix D D Symbol Definitions...
Page 66: ...TRN TABLET3 Page 56 Appendix E E BIOS Options...
Page 69: ...TRN TABLET3 Page 59 Appendix F F Hazardous Materials Disclosure...


