background image

en

18

User manual BALI

www.igloo.pl

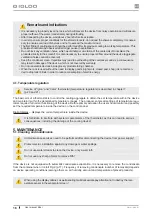
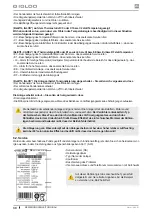
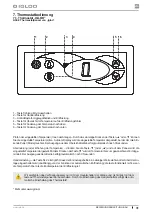
During maintenance services it is necessary to pay attention not to damage the data place of the 

device Fig.13 (p.20), which contains significant information for servicing organs and waste removal 

companies.

6. SERVICE

6.1. Fault identification and repair

In case of any difficulties during actuation of the device or during its exploitation, please return to these chapters in this 

manual, which explain the performed operation. This aims to ensure that the device is properly operated. If you still 

experience difficulties, the following hints will help you solve the problem.

The device is not working... – Make sure that:

•  The device is connected to the supply network

•  Voltage and frequency in the network are compliant with those recommended by the producer, 230V/50Hz

•  The main switch is turned on

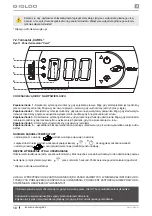
•  Thermostat is turned on (This concerns the Igloo thermostat – If only two spots are visible on the display – turn on 

the thermostat)

The device is operating, but the lighting is off...– Make sure that:

•  Lighting switch is turned on

•  Fluorescent lamp or starting switch of the device are not burnt 

Water leakage from under the device

•  Check whether the device is properly levelled

•  Empty the condensate container

The device does not reach the proper temperature, the lighting is on...– Make sure that:

•  The main switch is on

•  Temperature setting on the thermostat is properly set

•  Thermostat works properly

•  The condenser is clean, if necessary – clean the condenser

•  Ambient temperature does not exceed 25ºC 

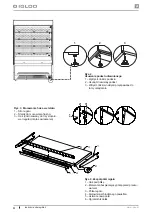
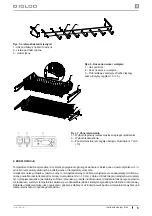
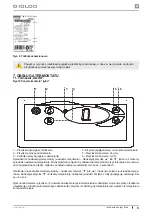
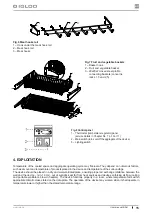
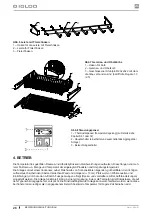
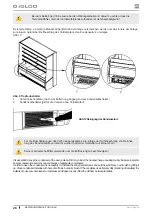
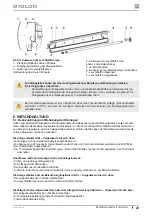
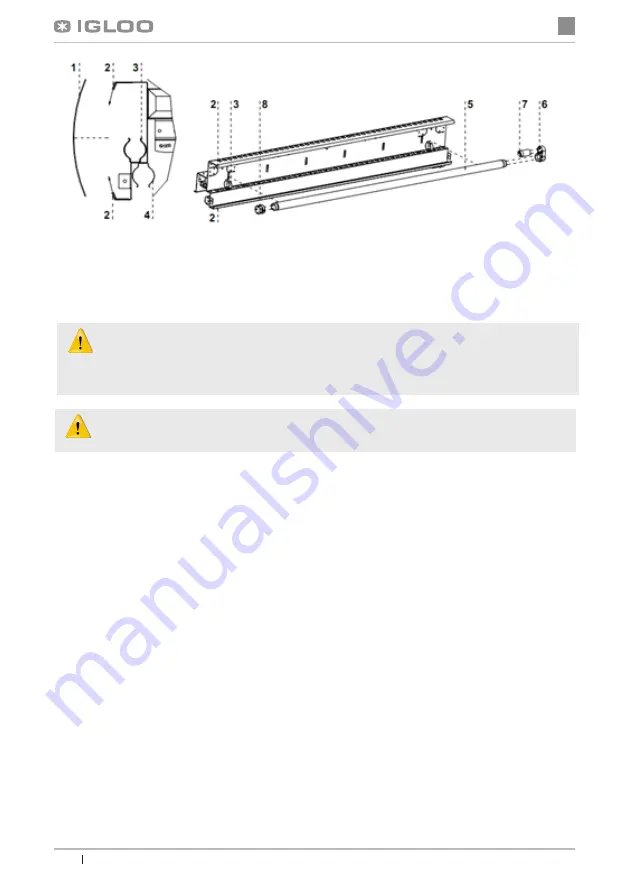
Fig.11 Changing the fluorescent lamp

1 – Upper panel plexiglas

2 – Plexiglas fixing handles

3 – Fluorescent lamp handle (upper panel lighting)

4 – Fluorescent lamp handle (upper lighting, internal)

5 – Fluorescent lamp 

6  –  Casing  of  the  fluorescent  lamp  and  starting 

switch

7 – Fluorescent lamp starting switch

8 – Casing of the fluorescent lamp

Elements of device can corrode when improper used and maintenance. To avoid that please 

follow the rules:

• Do not allow contact of the surface of the device with substances  containing chlorine and / or baking 

soda in different varieties, which destroy the protective layer and components of the device (also 

includes various stainless steel)

Summary of Contents for BALI

Page 1: ...Instrukcja obs ugi p 1 10 Instruction manual p 11 21 Bedienungsanleitung p 22 32 p 33 43 Manuale d uso p 44 53 en de ru it pl BALI...

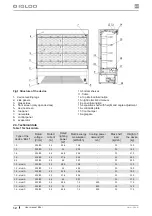
Page 2: ...BALI BALI mod C BALI DP BALI DP mod C BALI DU BALI DU mod C...

Page 3: ...uniwersalne urz dzenia ch odnicze przeznaczone do przechowywania i eksponowania szerokiego asortymentu artyku w spo ywczych uprzednio wych odzonych do temperatury przechowywania Gwarantowana temperat...

Page 4: ...5 230 50 5 5 68 30 7 33 290 1 0 mod A 230 50 3 2 28 8 15 8 33 130 1 3 mod A 230 50 3 3 34 20 2 33 160 1 6 mod A 230 50 4 2 44 8 24 9 33 190 1 9 mod A 230 50 4 5 57 6 25 4 33 230 2 5 mod A 230 50 5 5...

Page 5: ...kownika cz ciowo zdemontowane dla zabezpieczenia w czasie transportu nale y wykona nast puj ce czynno ci 1 Umie ci p k siatkow na hakach wg Rys 6 str 5 2 Hak i wraz z p k i cen wk zespo em p ki umie c...

Page 6: ...wej regulacji k ta zawieszenia 1 2 3 Rys 2 Usuwanie podestu drewnianego 1 Wykr ci n ki z podestu 2 Usun drewniany podest 3 Wkr ci n ki w nakr tki przyspawane do ramy urz dzenia Rys 4 Zesp p ki rega u...

Page 7: ...pracy agregatu mog ulega wahaniom Zale one od wielu czynnik w m in od ilo ci i temperatury w o onych produkt w oraz od temperatury otoczenia Urz dzenie nale y ustawi w miejscu suchym nienas oneczniony...

Page 8: ...e wewn trz urz dzenia jest wyr wnywane w przeci gu 1 2 minut co pozwala na swobodne otwarcie drzwi Unika niepotrzebnego otwierania drzwi i pozostawienia ich otwartych przez d u szy czas 4 1 Regulacja...

Page 9: ...tabliczki znamionowej urz dzenia Rys 9 str 9 kt ra zawiera istotne informacje dla serwisant w oraz firm zajmuj cych si usuwaniem odpad w 6 SERWIS 6 1 Identyfikacja i naprawa usterek W przypadku wyst...

Page 10: ...ie czujnika parownika wezwa autoryzowany serwis L0 alarm niskiej temperatury ni szej ni zadany zakres wewn trz urz dzenia wezwa autoryzowany serwis HI alarm wysokiej temperatury wezwa autoryzowany ser...

Page 11: ...je automatycznie po ok 3 sekundach Obni enie lub podwy szenie temperatury naciskamy przycisk lub i na panelu pojawi si ustawiona tempe ratura Naciskaj c przycisk obni amy temperatur do danej warto ci...

Page 12: ...st w toku Zapalona dioda 4 Alarm symbol jest widoczny gdy aktywny jest alarm Zapalona dioda 5 wy wietlana bie ca temperatura wewn trz urz dzenia po przecinku wy wietlane miejsca dzie si tne NASTAWA DA...

Page 13: ...thermostat optionally cooperating with a temperature recording module allowing for the recording and signaling of excessively high and excessively low temperatures inside the device They can also be...

Page 14: ...1 3 mod A 230 50 3 3 34 20 2 33 160 1 6 mod A 230 50 4 2 44 8 24 9 33 190 1 9 mod A 230 50 4 5 57 6 25 4 33 230 2 5 mod A 230 50 5 5 68 30 7 33 270 1 0 mod C 230 50 0 3 28 8 1 0 800 33 115 1 3 mod C 2...

Page 15: ...rns the devices to be mounted on central aggregate Defrosting water outflow is located under the bot tom of the body about 10mm from the back of the rack in the middle part of the body which needs toa...

Page 16: ...l angle regulation 1 2 3 Fig 3 Removing the wooden platform 1 Unscrew the feet from the platform 2 Remove the wooden platform 3 Screw the feet in nuts welded to the frame of the device Fig 5 Rack shel...

Page 17: ...ooled space and aggregate operating cycle may fluctuate They depend on numerous factors such as amount and temperature of products placed in the device and temperature of the surroundings The device s...

Page 18: ...display goods night work closed post shop it is recommen ded to drop roller blinds in order to reduce consumption of electric energy 4 1 Temperature regulation Service of Igloo and Carel thermostat te...

Page 19: ...y increase in electric energy consumption and may cause damage of aggregate compressor In order to clean the condenser it is necessary to unscrew the sheet metal screws and pull the wind brace out of...

Page 20: ...lighting is off Make sure that Lighting switch is turned on Fluorescent lamp or starting switch of the device are not burnt Water leakage from under the device Check whether the device is properly lev...

Page 21: ...ad of temperature E0 failure of temperature sensor inside the chamber call authorized service E1 failure of evaporator sensor call authorized service L0 low temperature alarm lower than temperature ra...

Page 22: ...decrease the temperature to the desired value The preview shall finish automatically after about 3 seconds Manual defrosting switch No 2 enables to initiate the defrosting cycle at any moment when the...

Page 23: ...erature inside the device is displayed decimal places displayed after the comma SETTING THE DESIRED TEMPERATURE press for 1 second leading value shall be displayed on the screen increase or decrease t...

Page 24: ...m glich diese in einer Reihenweise zu verbinden und mit dem Innen oder Aussenaggregat zu versorgen mod C Die Vitrinen besitzten denAufbewahrungsraum UnsereAnlagen sind nach modernen Techniken gebaut u...

Page 25: ...30 50 4 2 44 8 24 9 33 190 1 9 mod A 230 50 4 5 57 6 25 4 33 230 2 5 mod A 230 50 5 5 68 30 7 33 270 Fig 1 Bau der Anlage 1 Beinen zum Justieren der Anlage 2 ABS Seiten 3 ABS Seiten mit Scheibe 4 Fron...

Page 26: ...bb 9 S 28 4 Betrifft die Anlagen die mit dem zentralen Aggregat versorgt sind Unter dem Boden des K rpers ca 110 mm von R cken des Regals in der Mitte des K rpers befi ndet sich der Wasserablass mit E...

Page 27: ...Regelung des Aufh ngungswinkels 1 2 3 Abb 3 Entfernen des Holzpodestes 1 Die Beinen aus dem Podest abschrauben 2 Holzpodest entfernen 3 Die Beine in die Mutter einschrauben die an dem Rahmen der Anlag...

Page 28: ...die Abweichungen aufweisen Diese h ngen von meh rerer Faktoren u a Menge und Temperatur der eingelegten Produkten und Umgebungstemperatur Die Anlage soll auf einem trockenem au er Reichweite von Sonne...

Page 29: ...n nicht notwendig Nachtbetrieb geschlossener Stand Laden die Rollos absenken um den elektrischen Energieverbrauch zu verringern 4 1 Die Temperaturregelung Die Bedienung der Thermostate Temperaturregle...

Page 30: ...denser of the device clean Dirt may hinder the heat exchange causing mainly increase in electric energy consumption and may cause damage of aggregate compressor In order to clean the condenser it is n...

Page 31: ...edienungsanleitung zur ckkehren in denen die durchgef hrte T tigkeit erkl rt ist Damit k n nen Sie sich vergewissern dass dieAnlage richtig bedient ist Wurden die St rungen nicht beseitigt verwenden S...

Page 32: ...s aner kannte Service rufen Betrifft CAREL Der Thermostat zeigt E0 oder E1 sowie L0 bzw HI bzw EE bzw Ed bzw DF statt Temperatur E0 Besch digung des Temperaturf hlers in der Kammer das anerkannte Serv...

Page 33: ...m Betrieb erfolgt automatisch nach 3 Sekunden Handentrostung die Taste Nr 2 erm glicht dass der Entrostungsbetrieb in beliebiger Weile w hrend der Arbeit der An lage eingeschaltet wird unabh ngig von...

Page 34: ...st die aktuelle Temperatur innen der Anlage gezeigt nach Komma sind die Zehnstellen gezeigt ENSTELLUNG DER GEW NSCHTEN TEMEPRATUR eine Sekunde lang die Taste dr cken auf dem Display wird der Richtwert...

Page 35: ...mod A mod C 4 5 1 34 Rys 2 36 Rys 3 36 Rys 4 36 Rys 5 37 Rys 6 37 Rys 7 37 Rys 8 39 Rys 9 39 Rys 10 39 Rys 11 41 Rys 12 Igloo 42 Rys 13 Carel 43 1 33 2 33 2 1 33 2 2 33 2 3 34 3 35 3 1 35 3 2 35 4 37...

Page 36: ...5 68 30 7 33 290 1 0 mod A 230 50 3 2 28 8 15 8 33 130 1 3 mod A 230 50 3 3 34 20 2 33 160 1 6 mod A 230 50 4 2 44 8 24 9 33 190 1 9 mod A 230 50 4 5 57 6 25 4 33 230 2 5 mod A 230 50 5 5 68 30 7 33...

Page 37: ...00 33 115 1 3 mod C 230 50 0 3 34 1 4 800 33 145 1 6 mod C 230 50 0 5 44 8 1 9 800 33 175 1 9 mod C 230 50 0 6 57 6 2 0 800 33 215 2 5 mod C 230 50 0 7 68 2 5 800 33 255 3 3 1 PBUE 3 2 3 36 1 4 36 2 5...

Page 38: ...ru 36 Bali www igloo pl 1 3 2 4 5 6 3 1 2 3 1 2 3 2 1 2 3 4 1 2 3 4 5 6 1 2 3...

Page 39: ...ru 37 Bali www igloo pl 1 3 2 2 1 1 2 3 5 1 2 3 6 1 2 3 20x20x2 1 3 2 5 7 1 v 7 42 43 2 3 4 10...

Page 40: ...ru 38 Bali www igloo pl 2 4 1 Igloo Carel 7 42 43 D 5 5 1 8 39...

Page 41: ...ru 39 Bali www igloo pl 8 1 2 9...

Page 42: ...ru 40 Bali www igloo pl 13 43 10 1 2 3 4 5 6 7 8 6 6 1 230 50 Igloo 25 C 25 C...

Page 43: ...ru 41 Bali www igloo pl IGLOO C0 C1 C2 C0 C1 C2 CAREL E0 E1 L0 HI EE Ed DF 0 1 L0 HI EE Ed DF IGLOO 25 C 60 6 2 6 1 Igloo 11 41 NS 1 18 34 Bali...

Page 44: ...ru 42 Bali www igloo pl 7 7 1 IGLOO 12 Igloo 1 2 3 4 5 6 2 1 3 4 6 5 3 3 2 www igloo pl...

Page 45: ...ru 43 Bali www igloo pl 7 2 CAREL 13 Carel 1 2 3 4 5 1 2 4 4 5 1 5 1 www alfaco pl IGLOO...

Page 46: ...RISTICA DEL PRODOTTO 2 1 Destinazione La vetrina Bali un banco frigorifero universale utilizzato per la conservazione e l esposizione di un ampia gamma di prodotti alimentari previamente raffreddati f...

Page 47: ...3 2 28 8 15 8 33 130 1 3 mod A 230 50 3 3 34 20 2 33 160 1 6 mod A 230 50 4 2 44 8 24 9 33 190 1 9 mod A 230 50 4 5 57 6 25 4 33 230 2 5 mod A 230 50 5 5 68 30 7 33 270 Figura 1 Costruzione del dispos...

Page 48: ...l fine di evitare il danneggiamento durante il traspor to occorre procedere come segue Posizionare lo scaffale a rete sui ganci come indicato nella Figura 6 p 5 Posizionare il gancio e lo scaffare con...

Page 49: ...ozione della piattaforma lignea 1 Svitare i piedini dalla piattaforma 2 Rimuovere la piattaforma lignea 3 Avvitare i piedini nei dadi saldati al telaio del dispositivo Figura 4 Gruppo scaffale per il...

Page 50: ...peratura dell area refrigerata e il ciclo di lavoro possono variare a seconda di molti fattori come la quantit e la temperatura dei prodotti caricati nonch la temperatura dell ambiente Il dispositivo...

Page 51: ...pressione ne gativa creata all interno del dispositivo viene bilanciata entro 1 2 minuti ci che consente la riapertura della porta Evitare di aprire la porta inutilmente e lasciarla aperta per un lung...

Page 52: ...ificazione del dispositivo presentata nella Figura 9 p 9 che contiene le informazioni rilevanti per l assistenza tecnica e per le ditte specializzate in smaltimento di rifiuti 6 ASSISTENZA TECNICA 6 1...

Page 53: ...to del sensore dell evaporatore contattare il servizio di assistenza tecnica autorizzato L0 allarme di bassa temperatura inferiore al perimetro di temperatura interiore richiesto contattare il servizi...

Page 54: ...e di temperatura impostato Per abbassare la temperatura fino al valore desiderato premere il tasto La chiusura della funzione avviene in modo automatico dopo circa 3 secondi Sbrinamento manuale il tas...

Page 55: ...so Diodo 4 acceso Allarme il simbolo viene visualizzato quando l allarme attivo Diodo 5 acceso Visualizzazione del valore di temperatura interna del dispositivo il valore viene visualizzato con il num...

Page 56: ...Correspondence Stary Wi nicz 289 32 720 Nowy Wi nicz Poland NIP 868 000 50 40 Tel 48 14 662 19 10 fax 48 14 662 19 12 e mail info igloo pl www igloo pl...

Reviews: