background image


7


OPERATING YOUR UNIT 


  Setting the Temperature Control 

  Your unit has only one control for regulating the temperature in the compartment. The temperature 

control is located on the upper right hand side of the compartment. 

  The first time you turn the unit on, set the temperature control to “5.”  

  The range  of  the  temperature control  is from position "0” to  “5”.  After  24 to 48  hours,  adjust  the 

temperature  control  to  the  setting  that  best  suites  your  needs.    The  setting  of  “3”  should  be 
appropriate for home or office use. 

   To turn the appliance off, turn the temperature control to ”0”. 


NOTE: 


Turning  the  temperature  control to  “0”  position  stops the  cooling  cycle but  does  not shut  off  the 
power to the unit. 


If  the  unit  is  unplugged,  has  lost  power,  or  is  turned  off,  you  must  wait  3  to  5  minutes  before 
restarting the unit.  If you attempt to restart before this time delay, the unit will not start. 


  Using Your Ice Cube Tray


Recommended thermostat setting for ice making is position 5.


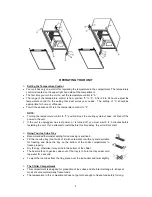
Fill the ice cube tray (two thirds of it) with cold water or with any liquid suitable 
for  freezing  and  place  the  tray  on  the  bottom  of  the  chiller  compartment  to 
freeze properly. 


Dry the tray, otherwise it may stick to the bottom of the chiller. 


The best method to get ice cubes out of the tray is to hold the tray under cold 
tap water for a second. 


To eject the ice cubes from the tray, place over the ice bucket and twist slightly 


  The Chiller Compartment 


This compartment is designed for production of ice cubes and short-term storage (3-4 days at 
most) of some commercially frozen foods. 


The temperature in this compartment does not get cold enough to freeze food safely for long 

Summary of Contents for FR465I-E

Page 1: ...1 INSTRUCTION MANUAL Model Number FR465I E REFRIGERATOR BEFORE USE PLEASE READ AND FOLLOW ALL SAFETY RULES AND OPERATING INSTRUCTIONS...

Page 2: ...ator follow basic precaution including the following Plug into a grounded 3 prong outlet do not remove grounding prong do not use an adapter and do not use an extension cord Replace all panels before...

Page 3: ...e solvent based cleaning agents of abrasives on the interior These cleaners may damage or discolor the interior Do not use this apparatus for other than its intended purpose This appliance is not inte...

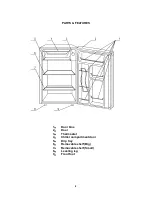
Page 4: ...4 PARTS FEATURES 1 Door bins 2 Door 3 Thermostat 4 Chiller compartment door 5 Drip tray 6 Removable shelf Big 7 Removable shelf Small 8 Leveling leg 9 Front foot...

Page 5: ...ce let it stand upright for approximately 2 hours This will reduce the possibility of a malfunction in the cooling system from handling during transportation Clean the interior surface with lukewarm w...

Page 6: ...moving the unit be careful not to damage the power cord Extension Cord Because of potential safety hazards under certain conditions it is strongly recommended that you do not use an extension cord wi...

Page 7: ...ost power or is turned off you must wait 3 to 5 minutes before restarting the unit If you attempt to restart before this time delay the unit will not start Using Your Ice Cube Tray Recommended thermos...

Page 8: ...er and baking soda solution The solution should be about 2 tablespoons of baking soda to a quart of water Wash the shelves and trays with a mild detergent solution The outside of the unit should be cl...

Page 9: ...H YOUR UNIT You can solve many common unit problems easily saving you the cost of a possible service call Try the suggestions below to see if you can solve the problem before calling the servicer TROU...

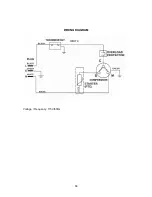
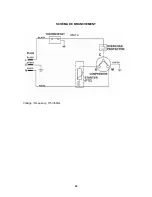
Page 10: ...10 WIRING DIAGRAM Voltage Frequency 115V 60Hz WHITE...

Page 11: ...11 MANUEL D INSTRUCTIONS R f rence FR465I E R FRIG RATEUR AVANT UTILISATION VEUILLEZ LIRE ET SUIVRE TOUTES LES R GLES DE S CURIT ET INSTRUCTIONS D UTILISATION...

Page 12: ...Veuillez donc le lire attentivement Pour r duire le risque d incendie d lectrocution ou de blessures lors de l utilisation de ce r frig rateur veuillez suivre des pr cautions de base comme Brancher s...

Page 13: ...ine cause du transit et de l entreposage parfois long la premi re production de glace devra tre jet e Ne pas utiliser d agents nettoyants base de solvants ou d abrasifs pour l int rieur de l appareil...

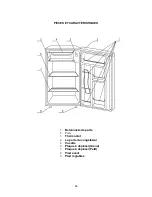
Page 14: ...14 PI CES ET CARACT RISTIQUES 1 Balconnets de porte 2 Porte 3 Thermostat 4 La porte du cong lateur 5 Cuvette 6 Plaque d placer Grand 7 Plaque d placer Petit 8 Pied avant 9 Pied r glables...

Page 15: ...l d instructions Avant de raccorder l unit la source d alimentation laisser le r frig rateur en position debout pendant environ 2 heures Ceci permettra de r duire la possibilit de dysfonctionnement du...

Page 16: ...de l unit faire attention ne pas endommager le cordon Rallonge En raison de risques pour la s curit dans certaines conditions il est fortement recommand de ne pas utiliser de rallonge avec cette unit...

Page 17: ...lateau gla ons Le r glage de temp rature recommand pour la production de gla ons est la position 5 Remplir le plateau gla ons aux deux tiers avec de l eau froide ou avec tout liquide pouvant geler et...

Page 18: ...s clayettes et les plateaux avec une solution nettoyante douce L ext rieur de l unit doit tre nettoy avec du d tergent doux et de l eau ti de Bien essorer l ponge ou le chiffon avant de nettoyer les b...

Page 19: ...possible en une seule fois et refermer la porte aussi vite que possible PROBL MES AVEC L UNIT Vous pouvez r soudre plusieurs probl mes courants facilement vous vitant alors de payer pour un technicien...

Page 20: ...20 SCH MA DE BRANCHEMENT Voltage Frequency 115V 60Hz WHITE...

Reviews: