background image

WATER DISPENSER MAINTENANCE

1- Always turn you

r

 water dispenser off when there is no water left in the bottle or 

when you are changing bottles. Turn it back on after the new bottle has been placed 
and the air purged from the dispensing buttons.
2- To clean the unit, first unplug the power cord. Wipe the outside of the water 
dispenser with a soft cloth dampened with liquid dish wa

s

hing soap. Use 

toothpaste to remove spots on the cabinet.
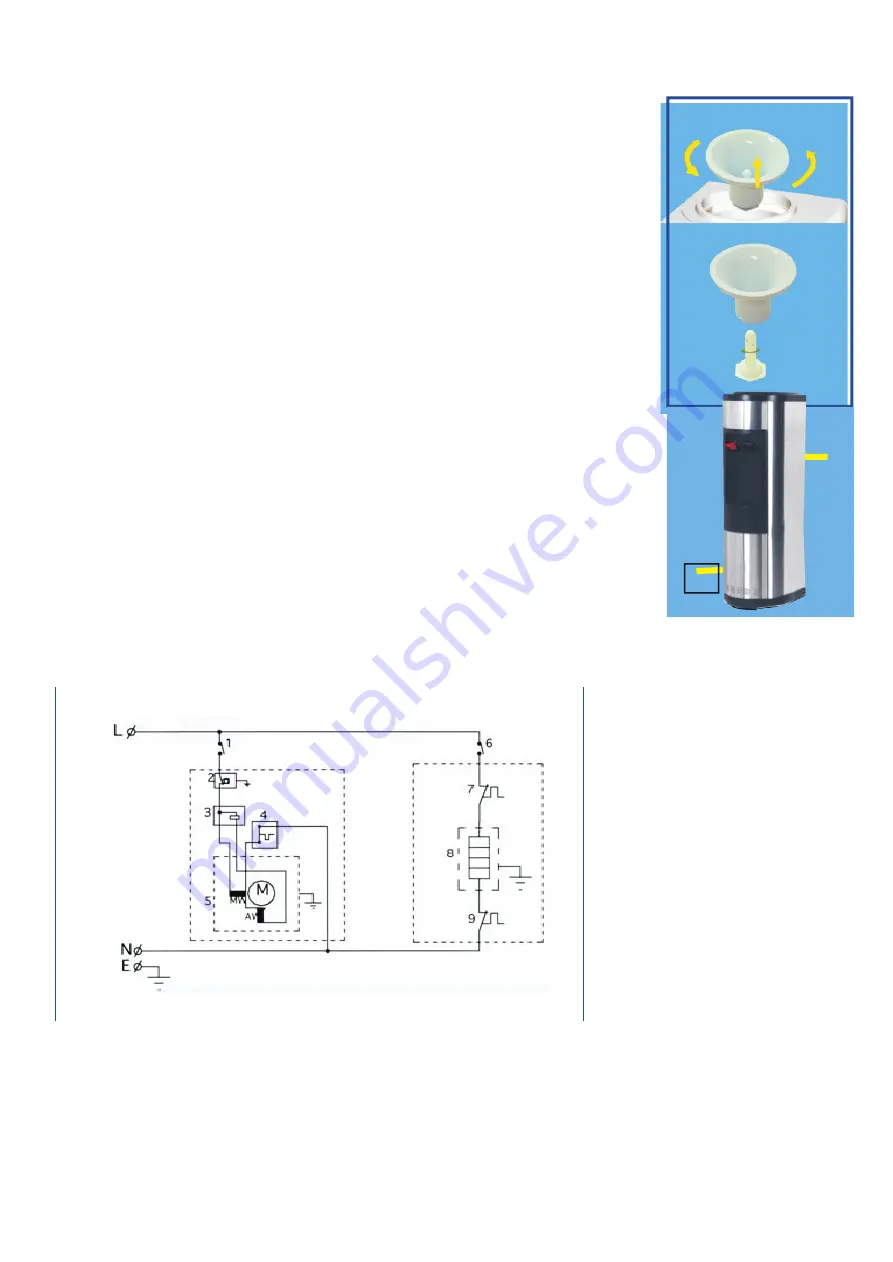
3- Twist the bottle receptacle of the no-spill system counte

r

clockwise

 and

 pull it

 up.

.

4- Take apart the no-spill system by unscrewing the base (piercing pin) . Then 
proceed to wash it with a dish washing fluid, rinse it and re

-

assemble.

5- Empty both tanks (hot and cold) by removing the cap and rubber gasket around 
drain plug located on the side of the unit.
6- Clean the inside of the water dispenser periodi

i

cally with CLR solution ( calcium 

lime, rust removal) available at most hardware stores. If not available,


you can use

vinegar or a 2 % citric acid solution. This removes mineral scaling caused by the 
water.

back in order to get the water out.

Rinse it well. Use the drain on the 

Replace the drain plug after you have completed the rinsing. Put all of the parts 
back, securely fasten the drain plug . IT IS IMPORTANT TO LET THE WATER 
DISPENSER 

GET 

DRY FOR TWO HOURS BEFORE PLUGGING IT BACK IN. 

Cover the bottle receptable to prevent it f

r

om contamination.

7- The harder the water you use, the more often you should clean the interior of the 
unit. Recommended intervals are between on

e


to

 three months depending on the 

mineral content of the water and the frequency of bottle changes.

DIAGRAM

3

AC115V/60Hz

Summary of Contents for MWC529

Page 1: ...INSTRUCTION MANUAL WATER COOLER MODEL MWC529 ...

Page 2: ...en appliance is used by or near children Do not use your water dispenser outdoors Place the water dispenser away from direct sunlight and make sure that there is at least 4 inches of space between the back of you unit and the wall Keep a miminum distance of 2 inches on each side of your unit free UNPACKING YOUR WATER DISPENSER 1 Remove the water dispenser from the cardboard box with out turning it...

Page 3: ...stat is set properly It is not advisable to adjust the thermostat when using the water dispenser NOTE When your water dispense is in operation there is a small amount of water in the water passage between the water tanks and the taps This water is not controlled by the cold or hot temperature settings We recom mend that in order to fully enjoy the desired water setting you should eliminate this sm...

Page 4: ...e cap and rubber gasket around drain plug located on the side of the unit 6 Clean the inside of the water dispenser period iically with CLR solution calcium lime rust removal available at most hardware stores If not available you can use vinegar or a 2 citric acid solution This removes mineral scaling caused by the water back in order to get the water out Rinse it well Use the drain on the Replace...

Page 5: ... noisy after it s first use unplug the water dispenser for 1 2 hour then start it up again Problem 3 The radiator at the back of the unit is very hot Check if 3 If you are not satisfied with the water dispenser performance check if there is enough room around the water dispenser to provide ample ventilation When the compressor is working it is normal for the radiator to be hot Problem 4 The compress...

Page 6: ...MANUEL D UTILISATION FONTAINE D EAU MODELE MWC529 5 ...

Page 7: ...teur d eau ou de mettre les interrupteurs d alimentation en position ON lorsque l appareil est vide Faire preuve de prudence et exercer une surveillance lorsque l appareil est utilisé par ou près des enfants Eviter d utiliser le distributeur d eau en plein air Placer l appareil à l écart du rayonnement solaire direct et s assurer de laisser un espace d au moins 10 cm entre l arrière de l appareil ...

Page 8: ...eil est réglé adéquatement Il n es pas recommandé de régler le thermostat lors de la première utilisation NOTE Lorsque la fontaine d eau fonctionne il y a une petite quantité d eau dans le passage d eau entre le réser voir et les robinets Cette eau ne dépend pas du réglage de température d eau froide ou chaude Nous vous recommandons pour une meilleure utilisation d éliminer cette eau 200ml 400ml a...

Page 9: ...t pour retirer le receveur 5 Démonter le système anti gaspillage en dévissant la base tige de perçage voir B Laver ensuite les pièces avec un détergent à vaisselle rincer les puis remonter le tout 6 Vous devez vider les 2 réservoirs au chaude et froide Et ce en retirant le bouchon et le joint d étanchéité autour de la vidange La vidange est sitée sur le côté de l unité 7 Nettoyer l intérieur du di...

Page 10: ... débranchez le pui allumez le de nouveau après 30 minutes Problème 3 Le radiateur arrière du distributeur est très chaud Vérifi er 3 Si le rendement du distributeur ne vous satisfait pas vérifi er si l espace laissé autour est suffi sant pour permettre une bonne aération Il est normal que la radiateur devienne chaud lorsque le compresseur fonc tionne Problème 4 Le compresseur fonctionne sans arrêt Vé...

Reviews: