background image

27

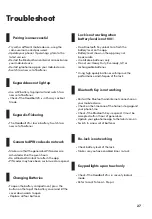
Troubleshoot

Pairing is unsuccessful

• Try with a different mobile device, using the 

same username and password

• Update your phone’s Operating system to the 

latest version

• Restart the Bluetooth and internet connection on 

your mobile device 

• Restart igloohome app on your mobile device

• Switch to a new set of batteries

• Use a 9V battery to jumpstart and switch to a 

new set of batteries

•  Check if the Deadbolt 2S is in Privacy Lockout 

Mode

Keypad does not light up 

• The Deadbolt 2S is low in battery. Switch to a 

new set of batteries

Keypad is flickering

• Make sure that the generated PIN codes are 

activated within the given hours

• Do a Bluetooth Unlock to refresh the app

• PIN codes may have been customised or expired

Generated PIN codes do not work

• To open the battery compartment, press the 

button on the top of the battery cover and tilt the 

cover downwards to open

•  Replace all four batteries

Changing Batteries

• Do a Bluetooth Key unlock to refresh the   

battery level on the app 

• Battery level shown in the app may not  

be accurate

• Use Alkaline batteries only

• Do not use: Heavy Duty, Eveready, GP, or  

rechargeable batteries

Lock is not working when 

battery level is not 100%

• Restart the Bluetooth and internet connection on 

your mobile device

• Check on the timezone of the home listing against 

your phone time

• Check if the Bluetooth Key is expired. It must be 

accepted within 1 hour of generation

• Update your igloohome app to the latest version

• Switch to a new set of batteries

Bluetooth Key is not working

• Check battery level of the lock 

• Make sure you have enabled timer re-lock

Re-lock is not working

• Check if the Deadbolt 2S is in security lockout 

mode

• Refer to Lock Tutorial - Step 4

Keypad lights up on touch only

* Using high quality batteries will improve the  

   performance and lifespan of the lock

Summary of Contents for Deadbolt 2S

Page 1: ...1 Installers User guide Deadbolt 2S Version 0 3 12 18...

Page 2: ...anual Please refer to ourwebsite igloohome co support for the latestversion of the manual Welcome This guide will get you up and running with your igloohome Deadbolt 2S In the meantime you should foll...

Page 3: ...for Installation 6 Prepare Lock for Installation 7 Installation Instructions 9 Test Lock 13 Prepare the Door Frame 14 User Guide Lock Anatomy 15 Features 16 Unlocking and Locking 18 App Onboarding 19...

Page 4: ...Wood Screw x4 8mm 5 16 Bolt Screw x2 20mm 25 32 Bolt Screw Door Sensor Magnet Edge of the door Face of the door Fold this line 60mm 2 3 8 backset 70mm 2 3 4 backset Centerline 10mm Optional 54mm Door...

Page 5: ...to 9 months Unlock Mechanism Bluetooth PIN code Physical Keys Thumbturn Front Back Side 145mm 5 11 16 60mm 2 23 64 11mm 7 16 51mm 2 1 64 64 5mm 2 35 64 160mm 6 19 64 DO NOT USE Heavy Duty Eveready GP...

Page 6: ...44 5mm 5 11 16 160mm 6 19 64 Requirements Measurements 35mm 1 3 8 to 60mm 2 3 8 10mm 25 64 20mm 25 32 110mm 4 21 64 for 60mm 2 3 8 120mm 4 23 32 for 70mm 2 3 4 backset 50mm 2 a b c d e a b b b c e d C...

Page 7: ...sure if your door is suitable send us web links to your door pictures to info igloohome co PrepareDoorforInstallation Itemsneeded Recommended Door and door frame material Wood Recommended Gap between...

Page 8: ...Make sure this is aligned to the centre of door edge Door edge Fold here before drilling holes for side Chiselling Depth 4 5mm 11 64 or until bolt assembly plate is flush against door Put the bolt ton...

Page 9: ...Remove Battery Cover from the Back Assembly L R Press the button on the top of the battery cover and pull outwards L R Set the toggle to R for right side installation Right Installation Set the toggl...

Page 10: ...length you should use so measure the distance x between the center of 54mm 2 1 8 hole to door edge Prepare bolt assembly based on the distance x Bolt ships with bolt assembly in 60mm 2 3 8 position If...

Page 11: ...crews 15mm 19 32 Measure and cute the tailpiece if necessary After inserting the tailpiece measure the distance of protrusion from the door c c Please ensure that tailpiece is in vertical position Doo...

Page 12: ...t installation Use the 2 x 5 13 64 mm screws to secure the door sensor to the back plate Screws 5mm 13 64 Right Installation Left Installation e d e e e e Secure the FrontAssembly using the Back Plate...

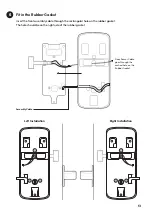
Page 13: ...assembly cable through the rectangular hole on the rubber gasket The hole should be on the right side of the rubber gasket Assembly Cable Door Sensor Cable goes through the arched hole on the Rubber G...

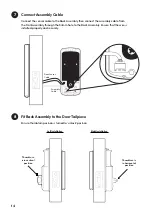
Page 14: ...gh the 54mm hole to the Back Assembly Ensure that the wire is installed properly and securely LR Fit Back Assembly to the DoorTailpiece LeftInstallation RightInstallation Ensure thumbturn position is...

Page 15: ...15 Insert4AAAlkalineBatteriesandpushthebatterycaselid inwardstoclose SecuretheBackAssembly Screws 8mm 5 16 20mm 25 32 9 Do not overtighten the screws SideView 10...

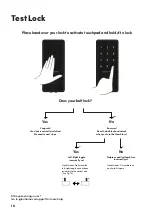
Page 16: ...alled Proceed to next steps Bummer Does the bolt lock and unlock when you turn the thumbturn Yes Left Right toggle incorrectly set No Tailpiece and or thumbturn incorrectly set Troubleshoot Try Settin...

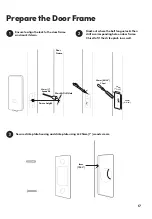
Page 17: ...ht Door Frame Mark out where the bolt tongue locks then drill a corresponding hole on door frame Chisel to fit the strike plate in as well Mark Drill Hole Secure strike plate housing and strike plate...

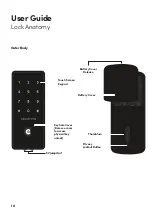
Page 18: ...18 Outer Body Touch Screen Keypad Key hole Cover Remove cover to access physical key unlock 9V Jumpstart Thumbturn Privacy Lockout Button Battery Cover Release Battery Cover User Guide Lock Anatomy...

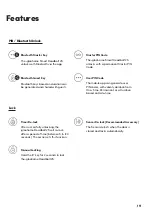
Page 19: ...rt Deadbolt 2S unlocks with a permanent Master PIN Code User PIN Code The mobile app can generate user PIN codes with validity duration from One Time Permanent or a Duration based on Date time Manual...

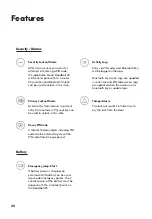
Page 20: ...will be logged in the app Bluetooth key access logs are updated in real time and PIN code access logs are updated when the owner uses a bluetooth key or update logs Security Alarms TamperAlarm The loc...

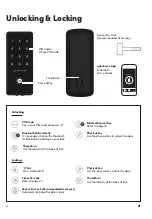
Page 21: ...nlock the door Unlocking Bluetooth Basic Unlock igloohome App Thumbturn Use thumbturn at the back of lock PIN Code Decoy PIN Code Physical Key Thumbturn 22 Main Door Timer Re Lock Refer to page 24 Phy...

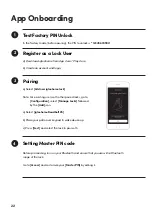
Page 22: ...PIN code a Select Add new igloohome lock Note For exitisting users with other paired locks go to Configuration select Manage Locks followed by the Add icon a Select igloohome Deadbolt 2S b Place your...

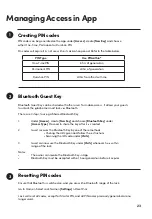
Page 23: ...using a Shared Bluetooth Key 1 Under Access create New Key and choose Bluetooth Key under Access Type Proceed to share the key after it is created 2 Guest receives the Bluetooth Key by one of these me...

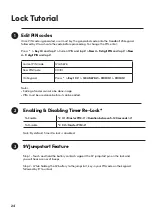
Page 24: ...enter Press Key 1 0 and tap Current PIN and tap New 4 9 digit PIN and tap New 4 9 digit PIN and tap Current PIN Code 1234 5678 New PIN Code 010101 On Keypad Press Key 1 0 1234 5678 010101 010101 Note...

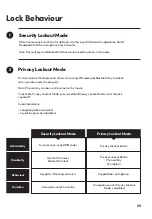
Page 25: ...kout Mode After 5 consecutive unsuccessful attempts at entering a PIN code the igloohome Samrt Deadbolt 2S will be unresponsive for 5 minutes Note Physical key and Bluetooth Unlock can be used to unlo...

Page 26: ...sting to view or edit its details Notes If the access mail has not been sent changing your check in check out time via the app modifies the start and end time of the PIN codes to be shared with your g...

Page 27: ...on the top of the battery cover and tilt the cover downwards to open Replace all four batteries Changing Batteries Do a Bluetooth Key unlock to refresh the battery level on the app Battery level shown...

Page 28: ...28 For enquiries go to igloohome co support...

Reviews: