background image

19

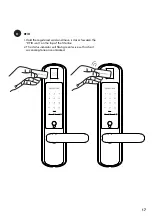
Multi-Function Button 

b

Press the Multi-Function button to unlock.  

The multi-function button will only rotate for door thickness less than 55mm.

Summary of Contents for Mortise 2

Page 1: ...1 Installers User guide Mortise 2 Version 0 1 01 20 IGM3...

Page 2: ...anual Please refer to our website igloohome co support for the latest version of the manual Welcome This guide will get you up and running with your igloohome Mortise 2 In the meantime you should foll...

Page 3: ...ide Lock Anatomy 13 Features 14 Unlocking from the Outside 16 Unlocking from the Inside 18 Locking from the Outside 20 Locking from the Inside 21 Child Pet Safety Handle Function 22 App Onboarding 24...

Page 4: ...r Mortise Indoor plate Outdoor unit Rubber pad Indoor unit FH M3 16 X1 2 x4 BH M5 X 20 x4 for 40 50mm door BH M5 X 30 x4 for 50 60mm door BH M5 X 45 x4 for 60 70mm door PH M4 X 14 x6 FH4 X 20 x4 26mm...

Page 5: ...BS Weight Net 3 44kg Gross 3 56kg Unlock Methods Bluetooth PIN Code RFID Tags RFID Stickers Multi Function Button Handle Physical Keys Front 354mm 13 95 Back 160mm 6 30 354mm 13 95 162mm 6 38 Side 68m...

Page 6: ...kness 190mm 7 48 with handle 40mm 70mm 1 57 2 75 355 mm 13 97 73mm 2 87 10 mm 0 39 Mortise Assembly Length Dead bolt Latch bolt 120mm including 10mm forthe wire Cable 10 mm 0 39 4 72 0 39 Installation...

Page 7: ...45mm 1 77 14mm 0 55 20mm 0 78 For doors with thickness 40 50mm 1 57 1 98 For doors with thickness 50 60mm 1 98 2 36 For doors with thickness 60 70mm 2 36 2 75 Right Hand Installation Note Hinge is on...

Page 8: ...inks to your door pictures to support igloohome co Preparing the Door Items needed Recommended Door and door frame material Wood Recommended Gap between door and door frame 3mm 0 01 Drill 32mm 1 25 Ho...

Page 9: ...k the center of the holes and then drill for accuracy Drilling Door Make sure this is aligned to the centre of door edge Dooredge Fold here before drilling holes for side Dooredge 120mm 4 72 Chisellin...

Page 10: ...es 50 55 NA Yes 55 70 10mm from the end No In case you have positioned the door handle wrongly release the handle catch thatcanbefoundbehindthe front back lock assembly Releasing of Catch Front Assemb...

Page 11: ...11 Install Mortise Flat side of the latch faces in Inside Install Outer Body Screws Mortise Pin Mortise Shaft 15mm 0 23...

Page 12: ...e Striker Install Inner Body Screws 20mm 0 78 14mm 0 55 20mm 0 78 Mortise Cable Outer Body Cable Chip is attached to the back assembly Installation Confirmation 1 Insert batteries then the buzzer will...

Page 13: ...uide Lock Anatomy Outer Body Inner Body Touch Screen Keypad RFID Reader Unlock Tri Coloured LED Clear 9V Jumpstart Emergency Keyhole Battery Cover Multi Function button Safety Button Outer Handle Inne...

Page 14: ...external 9 Volt battery can be used to provide emergency power The 2 contact points of the battery must be aligned with the 2 contact points on the Mortise Low Battery Indicator When battery power is...

Page 15: ...IN codes and Bluetooth Key will be logged in the app Bluetooth key access logs are updated in real time and PIN code access logs are updated when the owner uses a bluetooth key or update logs Fire Det...

Page 16: ...3 The status indicator will flash green twice with 4 short ascending tone once unlocked PIN Code b 1 Press any button on the keypad to wake device up 2 Key in a valid PIN code with or without masking...

Page 17: ...17 RFID c 1 Hold the registered card and move it closer towards the RFID icon on the top of the Mortise 2 The status indicator will flash green twice with 4 short ascending tone once unlocked...

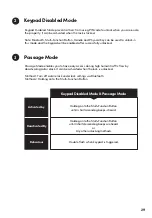
Page 18: ...18 Unlocking from the Inside Handle a Manually unlock by holding the handle down...

Page 19: ...19 Multi Function Button b Press the Multi Function button to unlock The multi function button will only rotate for door thickness less than 55mm...

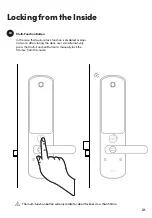
Page 20: ...er can configure the delay or deactivate relock if they prefer to Note Function will only work when Sensor is installed Manual Relock b Press and hold the Unlock icon on the bottom right of the keypad...

Page 21: ...se that auto relock function is disabled or does not work after closing the door user can alternatively press the Multi Function Button to manually lock the Mortise from the inside b The multi functio...

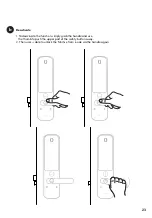
Page 22: ...ty Handle Function a Activate 1 The function is deactivated by default 2 To activate it simply twist the safety button in the clockwise direction 3 Then user is unable to unlock the Mortise from insid...

Page 23: ...1 To deactivate the function simply grab the handle and use the thumb to push the upper part of the safety button away 2 Then user is able to unlock the Mortise from inside via the handle again Deacti...

Page 24: ...N code a Select Add new igloohome lock Note For existing users with other paired locks go to Configuration select Add Lock and follow the instructions Before proceeding turn on your Bluetooth and ensu...

Page 25: ...ss Type Proceed to share the key after it is created 2 Guest receives the Bluetooth Key by one of these methods Clicking the URL given and follow the instructions Claiming Bluetooth Key under Configur...

Page 26: ...u will hear a series of beeps and the keypad will light up 2 While holding the 9V battery to the jumpstart key in your PIN code on the keypad followed by the Unlock icon 9V 9V 9V Please ensure termina...

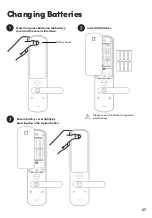
Page 27: ...Secure battery cover tightly by pressing down the square button Please use 8 AA batteries for optimal performance Press the square button on the battery cover and the cover will release Insert AA Bat...

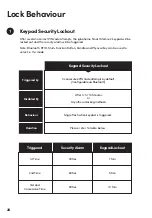
Page 28: ...ndle and Physical Key can be used to unlock in this mode 1stTime 2ndTime 3rd and ConsecutiveTime 30 Sec 60 Sec 90 Sec 1 Min 5 Min 10 Min Triggered SecurityAlarm KeypadLockout 5 consecutive PIN Code at...

Page 29: ...e enables you to have easy access during high human traffic flow by deactivating auto relock It can be activated when the lock is unlocked Method 1 Turn off auto relock under lock settings via Bluetoo...

Page 30: ...iew or edit its details Notes If the access mail has not been sent changing your check in check out time via the app modifies the start and end time of the PIN codes to be shared with your guest If th...

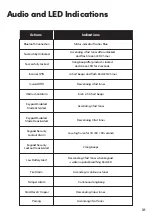
Page 31: ...ir Pairing Status indicatorflashes Blue Ascending 4fasttones afterunlocked and flash Green LED 2times 1 long beep afterproductis locked and Green LEDfor2 seconds 4 shortbeeps and flash Red LED 2times...

Page 32: ...against your phone time Check if the Bluetooth Key is expired It must be accepted within 1 hour of generation Update your igloohome app to the latest version Switch to a new set of batteries Bluetoot...

Page 33: ...33 For enquiries go to igloohome co support...

Reviews: