ACC-SVN190B-EN
7
Installation
Controller
W
WA
AR
RN
NIIN
NG
G
H
Ha
azza
arrd
do
ou
uss V
Vo
olltta
ag
ge
e w
w//C
Ca
ap
pa
acciitto
orrss!!
F
Fa
aiillu
urre
e tto
o d
diisscco
on
nn
ne
ecctt p
po
ow
we
err a
an
nd
d d
diisscch
ha
arrg
ge
e
cca
ap
pa
acciitto
orrss b
be
effo
orre
e sse
errv
viicciin
ng
g cco
ou
ulld
d rre
essu
ulltt iin
n d
de
ea
atth
h o
orr
sse
erriio
ou
uss iin
njju
urry
y..
D
Diisscco
on
nn
ne
ecctt a
allll e
elle
eccttrriicc p
po
ow
we
err,, iin
nccllu
ud
diin
ng
g rre
em
mo
otte
e
d
diisscco
on
nn
ne
eccttss a
an
nd
d d
diisscch
ha
arrg
ge
e a
allll m
mo
otto
orr sstta
arrtt//rru
un
n
cca
ap
pa
acciitto
orrss b
be
effo
orre
e sse
errv
viicciin
ng
g.. F
Fo
ollllo
ow
w p
prro
op
pe
err
llo
occkko
ou
utt//tta
ag
go
ou
utt p
prro
occe
ed
du
urre
ess tto
o e
en
nssu
urre
e tth
he
e p
po
ow
we
err
cca
an
nn
no
ott b
be
e iin
na
ad
dv
ve
errtte
en
nttlly
y e
en
ne
errg
giizze
ed
d.. F
Fo
orr v
va
arriia
ab
blle
e
ffrre
eq
qu
ue
en
nccy
y d
drriiv
ve
ess o
orr o
otth
he
err e
en
ne
errg
gy
y sstto
orriin
ng
g
cco
om
mp
po
on
ne
en
nttss p
prro
ov
viid
de
ed
d b
by
y T
Trra
an
ne
e o
orr o
otth
he
errss,, rre
effe
err tto
o
tth
he
e a
ap
pp
prro
op
prriia
atte
e m
ma
an
nu
uffa
accttu
urre
err’’ss lliitte
erra
attu
urre
e ffo
orr
a
allllo
ow
wa
ab
blle
e w
wa
aiittiin
ng
g p
pe
erriio
od
dss ffo
orr d
diisscch
ha
arrg
ge
e o
off
cca
ap
pa
acciitto
orrss.. V
Ve
erriiffy
y w
wiitth
h a
a C
CA
AT
T IIIIII o
orr IIV
V v
vo
ollttm
me
ette
err
rra
atte
ed
d p
pe
err N
NF
FP
PA
A 7
70
0E
E tth
ha
att a
allll cca
ap
pa
acciitto
orrss h
ha
av
ve
e
d
diisscch
ha
arrg
ge
ed
d..
W
WA
AR
RN
NIIN
NG
G
P
Prro
op
pe
err F
Fiie
elld
d W
Wiirriin
ng
g a
an
nd
d G
Grro
ou
un
nd
diin
ng
g
R
Re
eq
qu
uiirre
ed
d!!
F
Fa
aiillu
urre
e tto
o ffo
ollllo
ow
w cco
od
de
e cco
ou
ulld
d rre
essu
ulltt iin
n d
de
ea
atth
h o
orr
sse
erriio
ou
uss iin
njju
urry
y..
A
Allll ffiie
elld
d w
wiirriin
ng
g M
MU
US
ST
T b
be
e p
pe
errffo
orrm
me
ed
d b
by
y q
qu
ua
alliiffiie
ed
d
p
pe
errsso
on
nn
ne
ell.. IIm
mp
prro
op
pe
errlly
y iin
nsstta
alllle
ed
d a
an
nd
d g
grro
ou
un
nd
de
ed
d
ffiie
elld
d w
wiirriin
ng
g p
po
osse
ess F
FIIR
RE
E a
an
nd
d E
EL
LE
EC
CT
TR
RO
OC
CU
UT
TIIO
ON
N
h
ha
azza
arrd
dss.. T
To
o a
av
vo
oiid
d tth
he
esse
e h
ha
azza
arrd
dss,, y
yo
ou
u M
MU
US
ST
T ffo
ollllo
ow
w
rre
eq
qu
uiirre
em
me
en
nttss ffo
orr ffiie
elld
d w
wiirriin
ng
g iin
nsstta
alllla
attiio
on
n a
an
nd
d
g
grro
ou
un
nd
diin
ng
g a
ass d
de
essccrriib
be
ed
d iin
n N
NE
EC
C a
an
nd
d y
yo
ou
urr llo
occa
all//
sstta
atte
e//n
na
attiio
on
na
all e
elle
eccttrriicca
all cco
od
de
ess..
1. Prepare the unit for installation.
a. Disconnect and lock out all power from the unit.
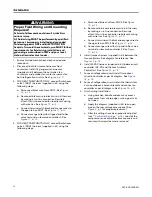
b. Remove the compressor and control box access
panel(s), see
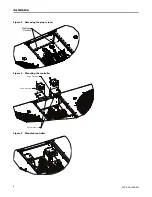
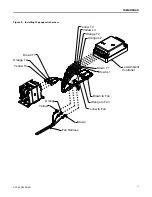
2. Remove the Plug screws and install the two
brackets with edge protection as shown in
and
.
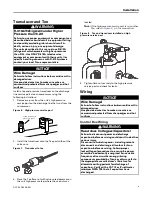
3. Mount one controller on each bracket using two 8-
32 x 1.25 screws provided. Refer to
Figure 2. Removing the compressor and control box access panel
Compressor
access panel
High voltage
control box cover
Low voltage
control box cover
Top cover
control box
Low ambient control
wiring diagram placement
Expansion control
wiring diagram placement


