-8-
www.igmtools.com
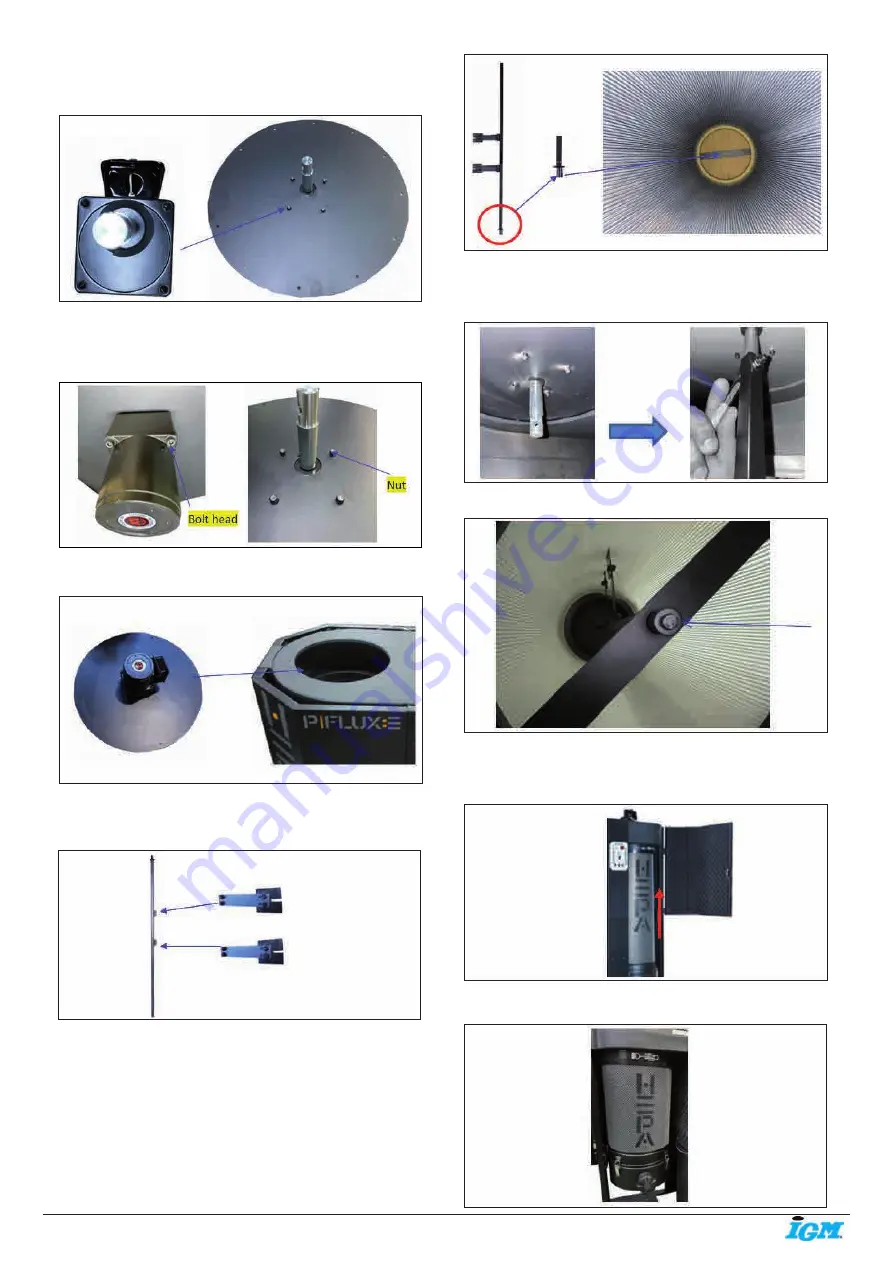
Step 14. Take the Autoclean cover plate and place over the auto clean
motor. Make sure the four bolt holes on the Autoclean cover plate match
the holes on the Autoclean motor. The junction box must be facing up as
shown in the photo.
Step 15. Take the hardware removed in step 12 to fasten the Autoclean
motor to the cover plate. Thread the bolt with the bolt head on the
Autoclean motor side (see photo). The nut is fastened and secured on the
cover plate side (see photo). Do not fasten the bolts the other way round.
Step 16. Attach the auto clean plate to the dust chute using (12) 3/16”*1/2”
sheet metal thread bolts
Step 17. Take the (2) filter cleaning arms and assemble to the filter
rotation shaft using (4) 1/4”*5/8” hex bolts, (8) 1/4” flat washers, and (4)
1/4” hex nuts
Step 18. Insert the filter rotation shaft assembly into the HEPA filter from
the top opening. It will be easier to insert while holding it at a slanted
angle. The rotation shaft has a top and bottom end. The top end has bolt
holes for the next step.
Step 19. Move HEPA filter assembly under the dust chute, and with the
help of another person holding the HEPA filter, secure the top end of the
rotation shaft to the cleaning spindle inside the dust chute using (1) 5/16”
x 1-1/2” hex bolt, (2) 5/16” x OD18 x 2t flat washers and (1) 5/16” lock nut.
Step 20. Secure and tighten the (1) 5/16”x 3/4” and (1) 5/16” x 23 x 2 flat
washer on the rotation shaft base.
Step 21. Open the canister filter shield and secure the HEPA canister filter
onto the dust chute by fastening the band clamp on the top part of the
HEPA canister filter. Make sure the band clamp is tightly fastened. It does
not matter which side the clamp faces.
Step 22. Attach the canister filter end cap to the canister filter using the (4)
latches. Cover the 4” hook up with the 4” rubber plug.


