-7-
www.igmtools.com
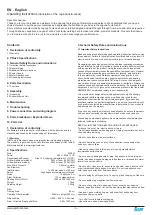
Step 5. Take the intake cylinder, cyclone barrel and cyclone funnel and
install 3 x 6mm foam tape to rims on each locations shown on the left.
- Top rim of the intake cylinder
- Top rim of the cyclone barrel
- Top and lower rim of cyclone funnel
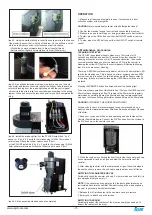
Step 6: Attach the intake cylinder to the dust chute using (4) 5/16”*5/8” hex
spring bolts. Then, attach the cyclone barrel onto the dust chute using (12)
5/16”*3/4” hex bolts and (12) 5/16”*OD18*2t flat washers followed by
attaching the cyclone funnel to the barrel using (12) 5/16”*3/4” hex bolts,
(24) 5/16”*OD18*2t flat washers and (12) 5/16” hex nuts.
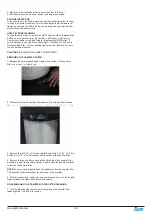
Step 7: Secure the base with (3) lower upright support panels to the
unit using (6) 5/16”*3/4” hex bolts and (6) 5/16”*OD18*2t flat washers.
Step 8: Secure the (3) upright support reinforcement plates using (12)
5/16”*3/4” hex bolts and (12) 5/16”*OD18*2t flat washers.
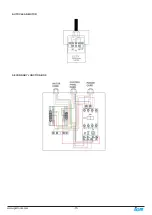
Step 9: With the help of another person, lift the unit up carefully to the
right side up with the motor on top and the wheels at the bottom.
Step 10. Secure the side canister filter shield (I) in place using (4)
1/4”*3/4” hex bolts and (4) 1/4”*OD19*2t flat washers.
Step 11. Attach the auto clean plate to the dust chute using (12) 3/16”*1/2”
sheet metal thread bolts
Step 12. Take the (2) filter cleaning arms and assemble to the filter
rotation shaft using (4) 1/4”*5/8” hex bolts, (8) 1/4” flat washers, and (4)
1/4” hex nuts
Step 13. Insert the filter rotation shaft assembly into the HEPA filter from
the top opening. It will be easier to insert while holding it at a slanted
angle. The rotation shaft has a top and bottom end. The top end has bolt
holes for the next step.


