background image

19

3.2 WALLS / RENDERED*

3.2 PAREDES / ENFOSCADAS*

* For tiled walls follow the steps on 2.1 and 2.2 / Para revestimientos cerámicos siga los pasos detallados en 2.1 y 2.2

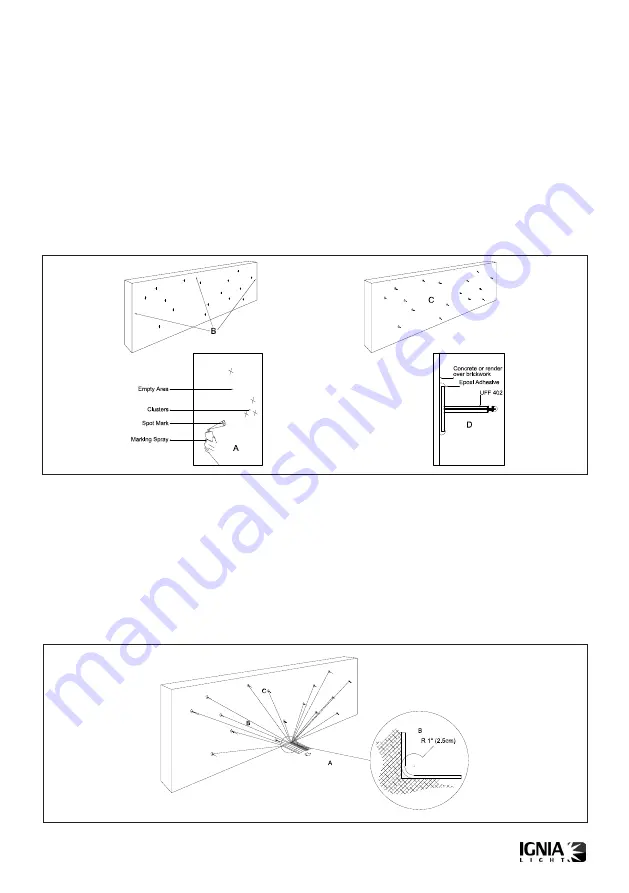
Mark on the rendered vertical surface the desired pattern of starpoints (A) or transfer from a template. Great care should 

de exercised to leave a perimeter free of points (B), as indicated on 1.0.3.

Following the procedure described on 1.0.3 apply dabs of two-part building epoxi adhesive over the marks.

Set in the epoxi adhesive (C) the UFF 402 fiber supports (D), as described on 1.0.4. It may be necessary to hold the 

supports in place with adhesive tape or other means to prevent them from moving while the epoxi cures.

Trace el patrón de puntos (A) en la superficie enfoscada o transfiera desde una plantilla. Es importante reservar el perí-

metro de la zona sin puntos (B), tal como se describe en 1.0.3.

Siguiendo el procedimiento detallado en 1.0.3, aplique una cantidad de adhesivo epoxi bi-componente sobre las marcas.

Presione sobre el adhesivo epoxi (C) los soportes UFF 402, tal como se describe en 1.0.4. Puede ser necesario anclar 

los soportes con cinta adhesiva u otros medios para inmovilizarlos hasta que fragüe el adhesivo.

From the illuminator (A) draw the fibers to the base of the wall. It’s critical for the fiber integrity and installation perfor-

mance to ensure that the fibers are never bent at 90º but gently curved (B) with a radius of minimum 1” for the standard 

HCF 201 fiber.

Distribute the fibers on the vertical surface to each support. Lay the fibers next to one another and not stacked, to mi-

nimize the thickness of the rendering over. Attach the fibers to the UFF 402 supports in the manner described on 1.0.5.

Extienda las fibras desde el iluminador (A) hasta la base del paramento. Para garantizar la integridad de las fibras y el 

correcto funcionamiento de la instalación nunca deben doblarse las fibras a 90º, sino con una suave curva (B) de radio 

no inferior a 25mm para los conductores estándar HCF 201.

Distribuya las fibras en el paramento vertical hacia cada soporte. Las fibras deben disponerse paralelas y no amontona-

das para así minimizar el grueso del enfoscado. Sujete las fibras a los soportes UFF 402, tal como se describe en 1.0.5.

Summary of Contents for STARRY SKY

Page 1: ...STARRY SKY INSTALLATION AND MAINTENANCE MANUAL MANUAL DE INSTALACI N Y MANTENIMIENTO MANUEL D INSTALLATION ET D ENTRETIEN MANUALE DI INSTALLAZIONE E MANUTENZIONE www ignialight com...

Page 2: ...ce with the specification of this manual 1 INSTALACI N La instalaci n de STARRY SKY en superficies de hormig n no tiene dificultad alguna a pesar de ser un procedimiento lento en funci n del n mero de...

Page 3: ...S Y OTROS VASOS DE HORMIG N STARRY SKY debe instalarse cuando el vertido del hormig n haya concluido y se haya retirado el encofrado pero previo al alicatado o la aplicaci n de acabados Si el hormig n...

Page 4: ...s el di metro id neo del tubo C es 40mm Para otras cantidades de fibra la tabla D lista las capacidades de otros tubos coarrugados On the vertical surface below the access point C prepare a zone to lo...

Page 5: ...unto con aerosol o pintura indeleble B Aseg rese de que los puntos est n distribuidos aleatoriamente con amplias zonas vac as C y grupos o conjuntos D Omita los puntos en un per metro de 200 a 300 mm...

Page 6: ...superficie del mismo En la solera distribuya las fibras hacia cada soporte C con precauci n para que no se monten y sobresalgan de la capa de nivelaci n Asegure cada fibra HCF 201 a los soportes UFF...

Page 7: ...over dry usually after twenty four hours A Remove the upper tie from all fiber supports B with sharp cutting pliers the small pliers used in electronics are ideally suited for this task Carefully ben...

Page 8: ...y 1 1 PISCINAS Y OTROS VASOS DE HORMIG N PIEZAS CER MICAS DE MEDIO Y GRAN FORMATO VIDRIO M RMOL Y PIEDRAS NATURALES La instalaci n de STARRY SKY en piscinas forradas de piezas cer micas excepto mosaic...

Page 9: ...herramientas de nivelaci n Las fibras C deben mantenerse libres de adhesivo Commence laying the tiles along a true edge keeping at least the first course see 1 0 3 free of fibers In the places with fi...

Page 10: ...y retire el exceso de lechada una vez que esta est bien seca Corte las fibras al ras de la soler a con una he rramienta afilada C Carefully check over that the fiber points are well set in grout with...

Page 11: ...hese inexpensive tools accurate notches and shapes can be produced in a short time 1 2 PISCINAS Y OTROS VASOS DE HORMIG N MOSAICOS Integrar fibras en revestimientos de mosaico es mucho m s f cil que e...

Page 12: ...con fibras A continuaci n coloque el panel cer mico de forma que las fibras afloren por los huecos sin loseta C Con una esp tula o form n romo elimine el adhesivo alrededor de las fibras Reserve las...

Page 13: ...ado es preciso que el adhesivo seque y frag e 24 horas Pour and work well with a squeegee the finishing slurry into the joints A ensuring that the notches around the fibers don t have any voids Clean...

Page 14: ...s or housings in ceramic tiles or natural stone slabs Fig 1 or in the joints between them Fig 2 2 OTROS PARAMENTOS HORIZONTALES SOLADOS O ALICATADOS La instalaci n en paramentos forrados de materiales...

Page 15: ...esde el emplazamiento del iluminador conduzca las fibras por una canalizaci n C adecuada ver 1 0 1 y distribuya sobre la superficie a solar D reparta las fibras para que coincidan con los puntos marca...

Page 16: ...onal sin da ar las fibras B Aunque las fibras se manchen de lechada su capacidad de transmisi n de luz permanece intacta Limpie y retire el exceso de lechada una vez que esta est bien seca Corte las f...

Page 17: ...a superficie D En este punto las fibras deben ser entre 50 y 60cm m s largas para compensar ajustes y distribuci n Set tiles in place A pulling the fibers through the space in the joints B before tamp...

Page 18: ...das C contin e colocando piezas D y limpie la obra sin mover las fibras hasta que el mortero se endurezca al tacto Once the mortar has sufficiently hardened trim the fibers flush with the wall surface...

Page 19: ...xi C los soportes UFF 402 tal como se describe en 1 0 4 Puede ser necesario anclar los soportes con cinta adhesiva u otros medios para inmovilizarlos hasta que frag e el adhesivo From the illuminator...

Page 20: ...Aunque las fibras se manchen o cubran de cemento u otro material su capacidad transmisora de luz no se ver afectada Once the surface is dry A apply paint or finish as required The fibers don t need a...

Page 21: ...ntre hiladas C contin e colocando piezas D y limpie la obra sin mover las fibras hasta que el mortero se endurezca al tacto Once the mortar has sufficiently hardened trim the fibers flush with the wal...

Page 22: ...einforcement and the base of the slab Secure each fiber to the uppermost layer of rebar or mesh ensuring the fas tened fibers are as vertical as possible Depending of the technique used for pouring th...

Page 23: ...le details of illuminator installation are described in the following pages 5 ILUMINADOR 5 1 ILUMINADOR INSTALACI N Con alimentaci n a 12VCA desde un transformador magn tico est ndar no se incluye en...

Page 24: ...nto se ha practicado en tierra de jardin es preciso la instalaci n de un encachado de piedra con 200mm m nimo de grosor B sobre tuber a drenante C hacia la arqueta de aguas residuales del jard n nunca...

Page 25: ...e del iluminador H La calidad de este empalme es cr tico para evitar futuros problemas por ingreso de humedad Si la instalaci n se efect a bajo la superficie es necesario utilizar un conector IP68 Ins...

Page 26: ...e situarse a una profundidad m nima K de 200mm Si la zona donde se ubica el iluminador es susceptible al tr fico peatonal deben instalarse las protecciones necesarias para evitar el aplastamiento de l...

Page 27: ...Operating voltage 12VAC Power drain at 12VAC 4 3W Protection grade IP65 6 INFORMACI N DEL KIT 6 1 INFORMACI N DEL KIT CONTENIDO A Conjunto de 40 conductores pticos con 1mm de di metro activo 10x6m 10...

Page 28: ...S CARACTERISTIQUES TECHNIQUES CARACTERISTICAS T CNICAS DATI TECNICI Made in EC Sacopa S A U Pol Ind Poliger Sud Sector I 17854 Sant Jaume de Llierca Spain info ignialight com www ignialight com I1089E...

Reviews: