background image

OPERATION 

IC120 ENG 

3-7 

TRAVELING THE MACHINE 

Start-travel-stop 


WARNING 

  When traveling, lower the body completely. 

  Lock the rear gate and side gates firmly. 

  Make sure that no persons are around the 

machine.  Sound the horn before starting. 


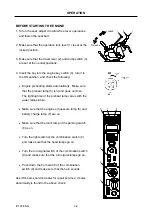
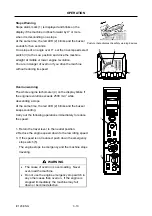
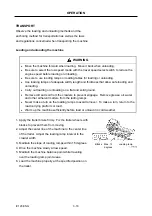
1.  Adjust the traveling speed properly with the travel 

speed select switch (1).  

 
2.  Turn the engine throttle dial (2) to increase the engine 

speed to the necessary speed. 

 
3.  Push down on the no-mark position of the parking 

switch (3) to deactivate the brake. 
Make sure that the mark lamp is off. 


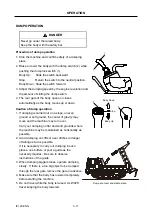
4.  Use the travel lever as shown below. 

Forward:  Push the travel lever forward. 
Stop: 

Set the travel lever to the neutral position. 

Backward:  Pull the travel lever backward. 
 

Increase the travel lever stroke to raise the speed.  
Decrease the stroke to reduce the speed. 


Summary of Contents for IC120

Page 1: ...OPERATION MANUAL IC120 SERIAL NUMBER CB003001 PUB 1 1209 ENG...

Page 2: ...tor seat 2 16 Seat belt 2 17 OPERATION BEFORE STARTING OPERATION 3 1 BEFORE STARTING THE ENGINE 3 2 ENGINE STARTING 3 3 AFTER STARTING THE ENGINE 3 3 WARMING UP THE MACHINE 3 4 STARTING WITH JUMPER CA...

Page 3: ...4 12 TRAVEL REDUCTION GEAR 4 13 Check the travel reduction oil level 4 13 Change the travel reduction oil 4 13 HYDRAULIC SYSTEM 4 14 Check the hydraulic oil level 4 14 Drain the hydraulic oil tank 4 1...

Page 4: ...4 29 AIR INTAKE AND EXHAUST SYSTEM 4 30 Clean and replace air cleaner element 4 30 ELECTRIC SYSTEM 4 31 Change the fuses 4 31 Change the fusible link 4 31 Check the battery 4 32 HANDLING IN COLD WEATH...

Page 5: ...oughly understood at first repeat reading it until abilities as an operator are obtained and developed for proper operation Further abilities as an operator outside of descriptions in this manual can...

Page 6: ...caused We have made very effort for you to prevent accidents during operation however we cannot be held responsible for predicting every kind of danger in all operating conditions It is the owner or u...

Page 7: ...glected or basic safety instructions are not observed Such accidents may be avoided by paying careful attention in advance This manual describes the basic safety instructions to be observed in daily o...

Page 8: ...l medication or intoxication WEAR PROPER WORKING CLOTHES For the sake of safety during driving wear clothes that match your body The sleeves of sloppy clothes can get caught in the machine and can cau...

Page 9: ...the operator s station When any oil or other slippery substance has got adhered to hand rails or steps wipe them off clean START THE ENGINE WHILE SITTING IN THE OPERATOR SEAT If the engine is started...

Page 10: ...engine in a well ventilated area If in an enclosed area vent the exhaust to the outside STAY SEATED WHILE OPERATING There is the danger of making wrong operations if the operating is done from a posit...

Page 11: ...load onto the sideracks DO NOT EXCEED THE WATER DEPTH LIMIT The acceptable water limit is up to the lower roller Check the water depth foundation and strength of water current and other safety factors...

Page 12: ...INE POSITION WHILE TRAVELING ON SLOPES The machine center of gravity tends to quickly change while traveling on sloping surfaces This can create hazardous situations where the machine may tip over Obs...

Page 13: ...ed on a sloping land When it is unavoidable to stop or park on a slopping land Place stopper blocks on the downhill side under both crawlers OBSERVE PRECAUTIONS WHEN PARKING THE MACHINE ON THE ROAD If...

Page 14: ...he machine to the platform using a wire rope etc Transport safely strictly following the concerned laws PRECAUTIONS AT MAINTENANCE KEEP ROUTINE MAINTENANCE Wrong maintenance not only causes damage to...

Page 15: ...y releasing the internal pressure SUPPORTING THE BODY If replacement or repair of couplings or hoses is made with the body in the raised condition there is the possibility that the body drops down Alw...

Page 16: ...danger of your hand being cut off Always carry out maintenance work with the engine switched off BE CAREFUL TO HOT ENGINE AFTER THE MACHINE STOPS Do not touch the engine or muffler right after the ma...

Page 17: ...g used for the battery liquid Take sufficient care while handling FIRE PREVENTION Do not leave burnable items such as oily rags dry leaves paper etc near the engine Since these can cause fire hazards...

Page 18: ...ic safety signs on your machine Make sure that you can read all safety signs Clean or replace these if you cannot read the words 2 4 8 1 17 10 14 20 16 15 12 12 11 22 21 13 19 18 3 21 3 18 22 22 23 6...

Page 19: ...SAFETY IC120 ENG 1 12 1 Precautions on safety D405 624 00 2 Precaution for working under the raised body 4448 816 00 3 Crawler shoe tension adjustment D405 516 00 4 Operation lock lever D407 957 00...

Page 20: ...C120 ENG 1 13 5 Traveling on a slope D406 188 00 6 Loading and unloading the machine D405 618 00 7 Under water works D406 189 00 8 Safety alarm D408 110 00 9 How to lower body in case of emergency D40...

Page 21: ...touch when hot D405 477 00 13 Sign indicates an electrical hazard from handling the cable Read manual for safe and proper handling D405 363 00 14 Sign indicates an electrocution hazard if machine is...

Page 22: ...the machine to minimize danger caused by accidents such as falling down D407 741 00 21 Sign indicates a crush hazard from falling body Read manual and follow safety instructions when holding the body...

Page 23: ...IC120 ENG CONTROLS This section describes the functions of the devices needed to operate this machine and the proper operation procedures Understand them sufficiently and operate the machine in safe...

Page 24: ...k 10 Dump cylinder 18 Oscillating link 3 Hydraulic tank 11 Safety bar 19 Travel device 4 Engine 12 Body 20 Drive sprocket 5 Radiator oil cooler 13 Rear gate 21 Headlight 6 Muffler DPF 14 Rubber crawle...

Page 25: ...CONTROLS IC120 ENG 2 2 CONTROLS AND INSTRUMENTS No Name No Name 1 Instrument panel 3 Operator seat 2 Lever box 4 Seat belt...

Page 26: ...garette lighter 7 HEST lamp 21 Wiper switch 8 Engine alarm lamp 22 Combination switch 9 Engine stopped lamp 23 Engine throttle dial 10 DPF regeneration disabled lamp 24 Engine key switch 11 DPF manual...

Page 27: ...r and other various data of the machine or engine are displayed Screen system The initial screen appears when the engine key switch is turned to the ON position The initial screen changes into the Ope...

Page 28: ...the right of the symbol and the symbol blinks if the temperature of coolant exceeds 107 C Blinks Fuel gauge 3 Indicates the residual fuel quantity E is displayed on the right of the symbol and the sy...

Page 29: ...er when the key is pressed It becomes darker when the key is pressed The length of the status display bar changes as the key is pressed Contrast 2 The contrast becomes higher when the key is pressed I...

Page 30: ...f it goes on while the engine is running the fan belt may be slack Stop the engine and check the tension of the fan belt Engine oil pressure lamp This lamp goes on if the pressure of oil for lubricati...

Page 31: ...arm lamp keeps blinking Press the DPF manual regeneration switch immediately to carry out forced regeneration If this condition is left unimproved the DPF regeneration function will be lost The buzzer...

Page 32: ...PF regeneration function Use it if rise of the exhaust temperature of the engine or increase of the idle revolution in automatic regeneration hinders works position This is the normal position The reg...

Page 33: ...s indicated blinking automatically A fault code which is a three figure number is indicated by the number of times of blinking of the engine alarm lamp and the engine stopped lamp The blinking interva...

Page 34: ...running even though the travel lever is set to the neutral position while moving down a slope Stop The engine stops when the switch is pressed Reset Turn the switch clockwise It is unlocked and the en...

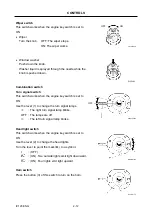
Page 35: ...itch works when the engine key switch is set to ON Use the lever 1 to change the turn signal lamps The right turn signal lamp blinks OFF The lamps are off The left turn signal lamp blinks Head light s...

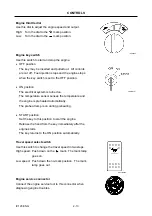
Page 36: ...stem is turned on The temperature sensor senses the temperature and the engine is preheated automatically The preheat lamp is on during preheating START position Set the key to this position to start...

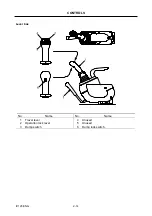
Page 37: ...CONTROLS IC120 ENG 2 14 Lever box No Name No Name 1 Travel lever 4 Unused 2 Operation lock lever 5 Unused 3 Dump switch 6 Dump lock switch...

Page 38: ...the operation lock lever Set the operation lock lever to the Lock position when starting the engine The engine will not start if the operation lock lever is set to the Release position Dump switch The...

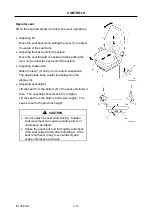
Page 39: ...to adjust suspension The appropriate body weight is displayed on the display 4 Adjusting seat height Lift the seat from the bottom 5 of the seat and lower it then The seat height becomes 60 mm higher...

Page 40: ...ate 1 into the buckle 2 securely 3 Slightly pull the belt and confirm the belt is locked 4 Press the button 3 of the buckle to unfasten seat belt WARNING ALWAYS fasten the seat belt while operating th...

Page 41: ...IC120 ENG OPERATION This section describes the proper operation procedures of this machine Always look to the safety and observe the given operation instructions and cautions to carry out works safely...

Page 42: ...of the shoes idle tumblers and sprockets Check oil leak and water leak from the engine Remove dust and foreign matters from the engine radiator and peripheral parts Check leak from and damages of the...

Page 43: ...he preheat lamp 5 is lit and goes out then The lighting time of the preheat lamp varies with the water temperature Make sure that the engine oil pressure lamp 6 and battery charge lamp 7 are on Make s...

Page 44: ...arts 3 Release the hand from the key when the engine starts The key returns to the ON position automatically 4 Set the operation lock lever to the Release position when starting operation AFTER STARTI...

Page 45: ...ture rises to approximately 20 C before starting works 1 Idle the engine for approximately 5 minutes to warm it up after starting it 2 If the hydraulic oil temperature is low push the dump lock switch...

Page 46: ...charged battery 3 Connect the clip of the black jumper cable to the negative terminal of the charged battery Connect the other clip to the upper frame of the machine with the dead battery Starting th...

Page 47: ...hours first Pay attention to the following when breaking in a new machine Warm up the machine sufficiently Do not apply heavy loads to the machine or run it at high speed Run the machine at approximat...

Page 48: ...speed select switch 1 2 Turn the engine throttle dial 2 to increase the engine speed to the necessary speed 3 Push down on the no mark position of the parking switch 3 to deactivate the brake Make su...

Page 49: ...avel lever in the right forward direction Left pivot turn and backward Pull the travel lever in the right backward direction Right pivot turn and backward Pull the travel lever in the left backward di...

Page 50: ...upper side of a slope when the body is empty This posture ensures stable driving since the center of gravity is located on the cabin side Drive the machine with the body upper side of a slope when the...

Page 51: ...he display blinks if the engine revolution exceeds 2500 min 1 while descending a slope At the same time the red LED 2 blinks and the buzzer keeps sounding Carry out the following operations immediatel...

Page 52: ...g is carried out on a slope uneven ground or soft ground the center of gravity may move and the machine may turn over Carry out dumping on flat and solid grounds where the machine may be maintained as...

Page 53: ...Tighten the plug completely after lowering the body If a trouble occurs in the engine or pump in the condition where the body is raised and it cannot be lowered it is possible to lower the body by lo...

Page 54: ...tely 4 Set the operation lock lever 2 to the locked position Stopping the engine 1 Keep the engine idling for approximately 5 minutes to lower the temperature of the engine 2 Set the engine key switch...

Page 55: ...ustain tension iron core to support it and covering rubber to them NOTICE If a crack reaches the steel cord it may be rusted and cut off by moisture When any crack is detected immediate repair is esse...

Page 56: ...CH ETC This wears down the lug and breaks the iron core The carrier might fall or topple over AVOID LOCATIONS WHERE THE CARRIER MIGHT FALL Do not let the carrier fall from locations like large stone s...

Page 57: ...eat asphalt or floorboards etc This causes serious abrasion or damage and breakage of the lug OTHER ITEMS FOR CAUTION DO NOT LET OIL SOLVENTS OR SALT ADHERE TO THE RUBBER CRAWLERS If fuel transmission...

Page 58: ...towed by another machine In such cases attach a shackle to a wire rope and attach this to the front or rear hook The carrier can now be towed 1 Start the engine 2 Select the low speed mode with the t...

Page 59: ...olid ground Remove dirt and soil from the crawlers to prevent slippage Remove grease oil water and other adherent matters from the lading ramps Never make a turn on the loading ramps to avoid turnover...

Page 60: ...ransportation Fix it firmly on the load carrying platform of the trailer with wheel blocks and wire ropes Apply wheel blocks in front of and behind the rubber crawlers to fix the machine Finally make...

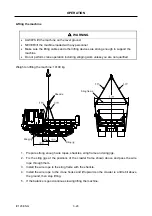
Page 61: ...qualified Weight on lifting the machine 14100 kg 1 Prepare strong enough wire ropes shackles sling frame and sling jigs 2 Fix the sling jigs at the positions of the crawler frame shown above and pass...

Page 62: ...ain the machine performances for long and prevent damages and troubles in advance This section describes the proper maintenance procedures of this machine Carry out maintenance safely and properly in...

Page 63: ...ine and pull out the key from the engine key switch Put a tag which indicates that maintenance is being carried out on the engine key switch or control lever at an easy to see position Cautions for re...

Page 64: ...the body completely 2 Raise the safety bar and set it to the bracket under the body CAUTION Do not start the engine or lower the body while the safety bars are used Such an action may cause breakage...

Page 65: ...periodically Q ty Replace interval Fuel hose between fuel tank and engine 1 Fuel hose between engine and fuel cooler 1 Fuel hose between fuel cooler and fuel tank 1 Every 2 years Hydraulic relation P...

Page 66: ...Check oil q ty refill Drain water Hydraulic oil tank Replace oil Suction strainer Clean Return filter Replace cartridge First time Line filter Replace element First time Hydraulic system Hydraulic hos...

Page 67: ...ck air cleaner clogging lamp Air cleaner Clean replace air cleaner element Air intake exhaust system Air intake exhaust dpf pipe Check leak damages Check battery liquid q ty refill Battery Clean termi...

Page 68: ...L Hydraulic oil tank Hydraulic oil Abrasion resistant Whole system 205 L Tank level 148 L Travel reduction gear Gear oil API GL 4 6 0 L Fuel tank Diesel fuel 366 L Coolant LLC Mix 50 long life coolant...

Page 69: ...he body raised Hinge pins of the body rear gate 1 2 positions Lock pins of the body rear gate 2 2 positions Control springs of the body rear gate 3 2 positions Body joint pins 4 2 positions Dump cylin...

Page 70: ...xchange it with brand new one Cutting of Steel Cords of Rubber Crawler Shoes When cutting of steel cord is detected exchange it immediately If you leave it as it is the rubber crawler shoes can be cut...

Page 71: ...ber crawlers 1 Remove dirt and soil from around the idle tumblers 2 Loosen the check valve until grease is discharged by a maximum of one turn little by little Do not loosen it when grease is discharg...

Page 72: ...lts and nuts are replaced apply the locktite to the threads and tighten them at the specified torques Traveling rated Tightening torque No Tightening position Thread size Wrench size mm N m kgf m 1 Tr...

Page 73: ...et rear M12 19 97 9 9 2 Bracket and frame rear M20 30 476 48 5 3 Engine and bracket front M12 19 97 9 9 4 Bracket and frame front M16 24 241 24 6 Hydraulic pump Tightening torque No Tightening positio...

Page 74: ...union nut Metric coarse thread heat treated bolt Metric fine thread heat treated bolt Tightening torque Bolt size Wrench size mm N m kgf m N m kgf m Hose size inch N m kgf m M8 13 23 2 3 25 2 5 1 4 25...

Page 75: ...eral side 2 Remove the level plug It is OK if the oil level is near the bottom of the plug hole 3 Refill oil through the filler port 3 if oil is insufficient 4 After check and refilling clean the plug...

Page 76: ...re 10 to 30 C Near the H level during operation Oil temperature 50 to 80 C 3 If the oil level is below the L level open the cover 2 and refill hydraulic oil through the filler port 3 Drain the hydraul...

Page 77: ...ove the flange 4 and take out the strainer 5 5 Remove adhered dust and foreign matters from the strainer and clean the strainer Do not clean the O ring with volatile solvent 6 Insert the cleaned strai...

Page 78: ...h it to the filter head 4 Tighten the filter head with the wrench Tighten it until the O ring is crushed and the top of the cartridge is brought into contact with the head 5 Tighten the air plug Repla...

Page 79: ...low the L level Wait for approximately 15 minutes after refilling and check the oil level 5 If the oil level is proper close the lubrication port firmly and close the engine cover 6 Too much engine oi...

Page 80: ...from entering Remove the filler port cap 3 Remove the drain plug slowly so that oil will not splash on you Discharge oil then 4 Check drain oil Contact IHI s sales service dealer if it contains much...

Page 81: ...er port 2 up to a point between the H and L levels of the level gauge 4 2 Run the engine idle for a mean while and check if no oil leaks 3 Check the oil level again after 15 minutes or more have passe...

Page 82: ...ne 13 Turbo 14 Outside discharge line Anti freezing solution A new machine is filled with coolant containing 50 ethylene glycol long life coolant LLC This coolant has anti freezing effect and corrosio...

Page 83: ...tank Do not remove the radiator cap 3 Open the cover remove the pressure cap 3 of the coolant tank and refill the tank with coolant up to the center of the sight glass 4 After refilling the tank attac...

Page 84: ...ion 3 Turn the shut off valve counterclockwise until it stops to open it 4 Attach the radiator cap 5 Start the engine and check if no coolant leaks Check the coolant level again when air is discharged...

Page 85: ...Use the FleetGuard coolant test kit part No CC2602 to check the DCA concentration This test kit is supplied with a manual of the usage When replacing coolant every 2000 hours or 2 years Add 1 9 liter...

Page 86: ...1 slowly to remove it 2 Loosen the drain cock 2 in the lower part of the radiator and discharge water into a vessel 3 Loosen the drain cock 3 of the cylinder block of the engine and discharge water in...

Page 87: ...he engine stops You may get burnt Wait until each part cools down 1 Check tension of the belt Apply a force of 110 N 11 kgf to the center between the pulleys and measure the degree of slackness If the...

Page 88: ...have little residual carbon Use light oil for normal diesel cars that meets the above requirements CAUTION The functions or performance of parts of the fuel injection system or the engine may be lost...

Page 89: ...r split fuel may cause a fire Wipe off spilt fuel completely Do not attempt to refill fluid from a drum or plastic container Refill it from a tank lorry to prevent water or impurities from mixing If f...

Page 90: ...he machine on a flat and rigid ground Bring the machine into the posture for checking the fuel filter and stop the engine 2 Open the drain valve 2 of the water separator by hand Turn the valve by appr...

Page 91: ...the filter head Tighten it with the filter wrench 7 Connect the wire harness of the water separator The Cummins fuel system checks if a proper in fuel water sensor is used or not If the in fuel water...

Page 92: ...ry element Do not clean the elements with strong air blow Otherwise the filter performance may be deteriorated 4 Replace the elements with new ones if they are contaminated excessively or damaged 5 Cl...

Page 93: ...A Circuit name F1 5A Radio F2 5A Monitor F3 10A Back buzzer lock lever parking travel speed selector switch F4 10A Dump F5 20A Head light blinkers F6 20A Horn cabin air conditioner F7 20A Reserve F8 5...

Page 94: ...the battery Check the liquid level Refill the battery with refill liquid up to UPPER LEVEL if it has lowered down to LOWER LEVEL Cleaning the battery terminals CAUTION Be sure to keep the engine stopp...

Page 95: ...and hydraulic oil with proper oil having viscosity appropriate for the outer temperature Refer to RECOMMENDED LUBRICATION TABLE for the specified viscosity Battery In cold seasons larger discharge cu...

Page 96: ...g Storage CAUTION If you have to operate the machine indoors to prevent rust keep good ventilation and gas poisoning by window or entrance 1 During storage operate the machine once a month to maintain...

Page 97: ...mp high pressure relief 37 3 CR CP1 CP2 Charge pump relief 2 7 MR2 P3 Pump main relief 17 7 OR Over load relief for dump lowering 5 9 Line filter Hydraulic oil tank Suction filter Return filter Oil co...

Page 98: ...20 ENG 4 36 ELECTRIC SYSTEM DIAGRAM Engine key switch contact Preheat OFF ON Start Terminal Position Engine frame Engine 1 Engine 2 Engine 3 Engine 4 Engine and power circuit Display circuit Travel an...

Page 99: ...iliary power Accessory circuit OFF ON INC SET DEC RESUME OFF ON OFF ON Light circuit Dump control circuit Air conditioner circuit Note Unless otherwise specified the wire thickness is AVSS 0 75 Color...

Page 100: ...ioner control panel 18 Fuse box 58 Air conditioner unit 19 Dummy resistance 59 Air conditioner pressure switch 20 Engine oil pressure lamp 60 Air conditioner compressor 21 Preheat lamp 61 Wiper switch...

Page 101: ...IC120 ENG SPECIFICATIONS...

Page 102: ...Ground pressure Loaded kPa 59 Fully loaded m 3 6 3 Body capacity Flat loaded m 3 3 9 A Overall length mm 6050 B Overall width mm 2840 C Overall height mm 2910 D Tumbler center distance mm 3790 E Over...

Page 103: ...RATION MANUAL Editing Publishing Office Product Support Department 236 8611 3174 3174 Showa machi Kanazawa ku Yokohama Kanagawa 236 8611 Japan All rights reserved IC120 2012 9 First Edition September...

Reviews: