background image

Meet Your Unit

P5

2

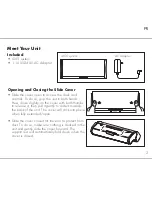
Included 

• iD55 system 
•  1 100V-240V AC Adaptor

AC adaptor

iD55 system

Opening and Closing the Slide Cover

•  Slide the cover open to access the dock and 

controls. To do so, grip the unit in both hands. 
Press down slightly on the cover with both thumbs 
to release it, then pull it gently to slide it towards 
the back of the unit. The cover will click into place 
when fully extended/open.

•  Slide the cover closed for travel or to protect from 

dust. To do so, make sure nothing is docked in the 
unit and gently slide the cover forward. The 
support rest will automatically fold down when the 
cover is closed.

Summary of Contents for iD55

Page 1: ...Model iD55 iD55 IB English Size 153mm x 120mm Printing color Black Apr 13 12 P1 Portable Stereo System with Sliding Cover for iPad iPhone or iPod Questions Visit www ihomeaudio com ...

Page 2: ...ld be placed between it and the furniture Clean your unit with a soft cloth moistened only with mild soap and water Stronger cleaning agents such as Benzene thinner or similar materials can damage the surface of the unit Table of Contents Meet Your Unit 1 2 Setting up the Unit 3 Playing your iPad iPhone or iPod Playing Audio Via Aux 4 Troubleshooting 5 Consumer Product Safety Guide 6 Warranty Info...

Page 3: ...lidate the system s warranty and void your FCC authorization to operate it This Class B digital apparatus complies with Canadian ICES 003 Cet appareil numérique de la classe B est conforme à la norme NMB 003 du Canada This device complies with Part 15 of the FCC Rules operation is subject to the following two conditions 1 This device may not cause harmful interference and 2 this device must accept...

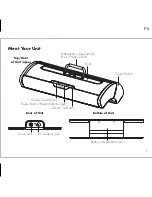
Page 4: ...oor Rear of Unit Bottom of Unit P4 Top Front of Unit open Power Button Power Indicator Light Volume Down Button Volume Up Button Dock Rubberized support rest for iPad iPhone or iPod Cover Stand Aux in Jack AC Adaptor jack Aux in DC 9V 2 5A ...

Page 5: ...oth hands Press down slightly on the cover with both thumbs to release it then pull it gently to slide it towards the back of the unit The cover will click into place when fully extended open Slide the cover closed for travel or to protect from dust To do so make sure nothing is docked in the unit and gently slide the cover forward The support rest will automatically fold down when the cover is cl...

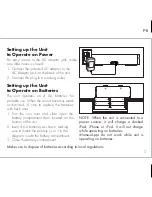
Page 6: ... the batteries with fresh ones 1 Turn the unit over and slide open the battery compartment door located on the bottom of the unit 2 Insert 4 AA batteries as shown making sure to match the polarity or to the diagram inside the battery compartment 3 Close the battery compartment P6 NOTE When the unit is connected to a power source it will charge a docked iPad iPhone or iPod It will not charge while ...

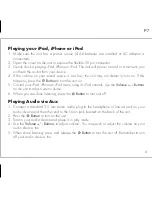
Page 7: ...ad iPhone or iPod music using its iPod controls Use the Volume Buttons on the unit to adjust system volume 6 When you are done listening press the Button to turn unit off P7 4 Playing Audio via Aux 1 Connect a standard 3 5 mm stereo audio plug to the headphone or line out jack on your audio device and the other end to the line in jack located on the back of the unit 2 Press the Button to turn on t...

Page 8: ...erly or appears to be frozen you may wish to try resetting it To do so disconnect unit from AC power remove all batteries and let the unit sit for a few minutes before replacing the batteries and reconnecting to AC power Make sure you have the latest firmware for your iPad iPhone or iPod update via iTunes if needed Make sure your device is working properly For further information and to see the la...

Page 9: ...to where it is plugged into an AC socket 6 Cleaning The unit should be cleaned only using a warm damp cloth Do not use solvents etc 7 Objects and Liquid Entry Care should be taken so that objects do not fall and liquids are not spilled into any openings or vents located on the product 8 Attachments Do not use attachments not recommended by the product manufacturer 9 Lightning and Power Surge Prote...

Page 10: ...r why the unit is being returned and the return authorization number No unit can be processed without a return authorization number 4 Write the return authorization number on the side of the shipping package and send the unit prepaid and insured to the Factory Service Center address authorized by SDI Customer Service Disclaimer of Warranty NOTE This warranty is valid only if the product is used fo...

Reviews: