background image

Astria.us.com

126753-01M

11

INSTALLATION

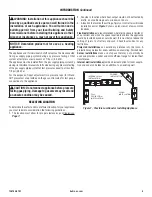
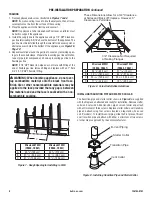
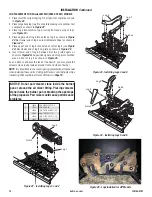
Figure 13 - Removing Front Refractory Access Panel

INSTALLING WIRELESS HAND-HELD REMOTE CONTROL MRC SERIES

NOTE:

 If using optional wireless hand-held remote control, the wall switch is no longer operational. 

Installing Receiver

1.  Remove front refractory access panel by lifting up and angling out of firebox opening 

(see 

Figure 13

)

 to expose controls.

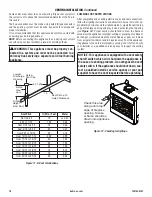
2.  Locate brown "wall switch wire" that is connected to the valve. Strip the ends of the brown wire to expose one red and one white wire. These 

wires shall be connected the remote receive box or wall switch (figures 14 & 14A).  The remote receiver can be placed either in the bottom 

of the firebox (figure 14B) or mounted in a convenient location on the wall.

3.  See remote instructions for further information.

Conduit Sleeve

Route Millivolt

Through Gas Line

To Thermopile 

and Switches

Wires (Supplied)

Wall Switch

(Not Supplied)

(Back View)

IN

TH

TP

THTP


IN

OUT

O

F F

PI

LO

T

ON

NOTE:

 If any of the original wire as 

supplied must be replaced, use 18 AWG 

TYPE CL2 (UL) 105 C (25 ft. length 

MAXIMUM) or equivalent.

Wall Switch or Remote 

Control (Not Supplied)

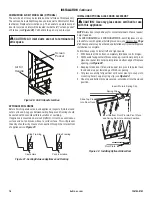
Figure 14 - Wall Switch Wiring Diagram

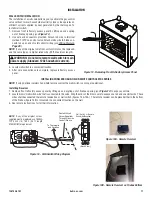
Figure 14A - Remote Receiver

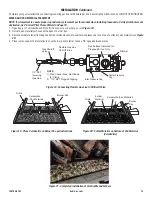
Figure 14B - Remote Receiver on Firebox Bottom

 WARNING: Do not wire remote wall switch to main 

power supply (Standard 120v household current).

WALL SWITCH INSTALLATION

The installation of a wall switch allows you to activate the gas control 

valve without normal household electricity since valve operates on 

millivolt current supplied by heat generated by the thermopile. To 

install wall switch:

1.  Remove front refractory access panel by lifting up and angling 

out of firebox opening 

(see

 Figure 13

).

2.  Use wire and connectors provided. Attach red wire to terminal 

marked TH/TP on control valve. Attach white wire to blade con-

nector on open end of safety circuit wiring

 (see Wiring Diagram, 

Page 20

).

NOTE:

 If any of the original wire from unit control must be replaced, 

use the same type or a higher rated wire (25 ft. maximum length).

3.  Locate wall switch in a convenient location.
4.  After wire connections are complete, replace refractory access 

panel.

Summary of Contents for astria Mission Mission42TMN

Page 1: ...gaz depuis un voisin Suivez les instructions du fournisseur Si vous ne pouvez rejoindre le fournisseur de gaz appelez le service des incindies L installationetl entretiendoivent treassur spar un insta...

Page 2: ...In addition to instructing you on how to install and maintain your appliance it also contains information that will enable you to obtain replacement parts or optional accessory items when needed Keep...

Page 3: ...A 70 or the Canadian Electrical Code CSA C22 1 15 Do not obstruct the flow of combustion and ventilation air in any way Provide adequate clearances around air openings into the combustion chamber alon...

Page 4: ...connection Ceramic Log Pack Shrink wrapped on cardboard Three 3 plastic bags containing volcanic stone rock pan and ember materials Rear Log Remove the two plastic quick ties from around the burner a...

Page 5: ...use as a heating appliance CAUTION Donotconnectappliancebeforepressure testinggaspiping Damagetogasvalvemayresultand an unsafe condition may be caused SELECTING LOCATION To determine the safest and m...

Page 6: ...inimum Supply Pressure 11 WC 2 74 kPa 11 WC 2 74 kPa Maximum Supply Pressure 13 WC 3 23 kPa 13 WC 3 23 kPa Orifice Size 52 50 Model 36 Model 42 Model 36 Model 42 Model 36 Model 42 A 29 737 mm 36 915 m...

Page 7: ...TOP VIEW SAFE ZONE Perpendicular Wall Figure 6 Side Clearances Top View Cross Section Mission36TMN F0859 F0861 Mission42TMN F0865 F0867 A 9 229 mm 6 153 mm B 12 305 mm 9 229 mm MANTEL CLEARANCES AND W...

Page 8: ...tom of the appliance The gas line must be installed through the lower left side access point or alternate access hole in the bottom of the appliance see Figure 16 Page 12 4 Repack insulation around th...

Page 9: ...y flue servicing a solid fuel burning appliance This appliance may be vented through a manufactured chimney system or a masonry chimney using a B vent adaptor or a chimney liner system if all are list...

Page 10: ...for Spillage Check this area along entire top edge of fireplace opening Smoke or flame should be drawn into appliance opening CHECKING FOR PROPER VENTING After completing and checking electrical gas...

Page 11: ...ny of the original wire as supplied must be replaced use 18 AWG TYPE CL2 UL 105 C 25 ft length MAXIMUM or equivalent Wall Switch or Remote Control Not Supplied Figure 14 Wall Switch Wiring Diagram Fig...

Page 12: ...2 NPT Incoming Black Iron Gas Line Flexible Gas Line 1 Provided Can Be Extended Out Either Side 7 7 Alternate Gas Supply Through Sub Floor Mission36TMN F0859 F0861 Mission42TMN F0865 F0867 A 8 5 8 21...

Page 13: ...er size pieces and lay on top of surface of pan material see Figure 20 4 Place just enough ember material to cover burner pan material Leave a 1 2 space between pieces Figure 18 Connecting Flexible Ga...

Page 14: ...between first two grate fingers as shown in Figure 25 and position upper end of log 6 into notched area on front of log 2 as shown in Figure 25 As an option to enhance the look of the hearth you may...

Page 15: ...og 6 on top of log 2B see Figure 29 As an option to enhance the look of the hearth you may place the volcanic stone provided around front and sides of burner pan NOTE It is important to ensure proper...

Page 16: ...sulation or caulking If appliance is mounted on a raised platform it must be a continuous surface and not on blocks without a solid surface This will prevent the entry of cold air by means of conducti...

Page 17: ...not attempt to adjust or clean the glass doors until the appliance has fully cooled The doors may be removed for replacement or cleaning as follows 1 Partially open door and press up on upper spring...

Page 18: ...e damper in full open position 5 Fully open glass doors if installed 6 Remove front refractory brick access panel 7 Turn gas control knob clockwise to the OFF position see Figure 36 8 Wait five 5 minu...

Page 19: ...by a qualified service person More frequent cleaning may be required due to excessive lint from carpeting bedding material pet hair etc It is imperative that the control compartments burners and circ...

Page 20: ...ndently of the burner on off wall switch it may be due to the operation of this safety limit switch First allow the appliance to cool then reset the safety switch by pressing the red reset button on t...

Page 21: ...other possible obstructions 4 Contact your gas supplier 5 Refer to section on pilot lighting 6 Have a qualified technician replace pilot line 7 Replace regulator valve see Accessories Page 28 8 Open v...

Page 22: ...nt above 2 For propane LP gas low fuel supply 3 Gas leak See Warning statement at top of Page 1 Gas leak See Warning statement at top of Page 2 Control valve defective 1 Foreign matter between control...

Page 23: ...lso visit our web site at Astria us com REPLACEMENT PARTS See Pages 24 to 27 for a complete replacement parts list Use only parts supplied from the manufacturer Normally all parts should be ordered th...

Page 24: ...2 33 34 2 28 25 35 NG LP WARNING Contact an IHP dealer to obtain any of these parts Never use substitute materials not approved by IHP Use of non approved parts can result in poor performance and safe...

Page 25: ...AR TRANSITION 6 B VENT 1 21 J3980 ASSY AIR KIT DOOR 36 1 F3457 ASSY AIR KIT DOOR 42 1 22 J6900 PLATE OUTSIDE AIR COVER 36E44 6 1 23 J3992 DEFLECTOR SMOKE 1 J4081 DEFLECTOR SMOKE 1 24 J6895 RETAINER RE...

Page 26: ...e Stacked 1 12 Refractory Left 1 13 Refractory Right 1 14 Refractory Rear 1 15 Refractory Bottom 1 16 J6379 Refractory Bottom Front White Herringbone 1 16 J6374 Refractory Bottom Front White Stacked 1...

Page 27: ...CATALOG NO DESCRIPTION QTY J4096 LOG SET 1 J4246 LOG 9 FIREPIT SPLIT 1 2 J7241 LOG REAR 22 1 3 J4242 LOG 11 75 TOP ROUND 1 4 J4243 LOG 16 TOP SPLIT 1 5 J4244 LOG 13 5 Y TOP SPLIT 1 6 J4245 LOG 11 TOP...

Page 28: ...INSTALLATION Optionalkithelpsoffsetthenegativepressureoftenexistingintoday stightlyconstructed homes Negative pressure may occur when other appliances in the home draw on air possibly leading to poor...

Page 29: ...p paint powder coat exterior BRICK LINER KIT Not Shown F1059 BL36 36 Texture Refractory Brick Liner Kit F1060 BL36H 36 Texture Refractory Herringbone Brick Liner Kit F10561 BL42 42 Texture Refractory...

Page 30: ...____________________________ ______________________________________________________ ______________________________________________________ ______________________________________________________ ______...

Page 31: ...natural or propane gas only Burning conventional fuels such as wood coal or any other solid fuel will cause damage to the Product will produce excessive temperatures and could result in a fire hazard...

Page 32: ...e uses Dealer name IHP reserves the right to make changes at any time without notice in design materials specifications prices and also to discontinue colors styles and products Consult your local dis...

Reviews: