background image

CHIMNEY INSTALLATION

INSTRUCTIONS

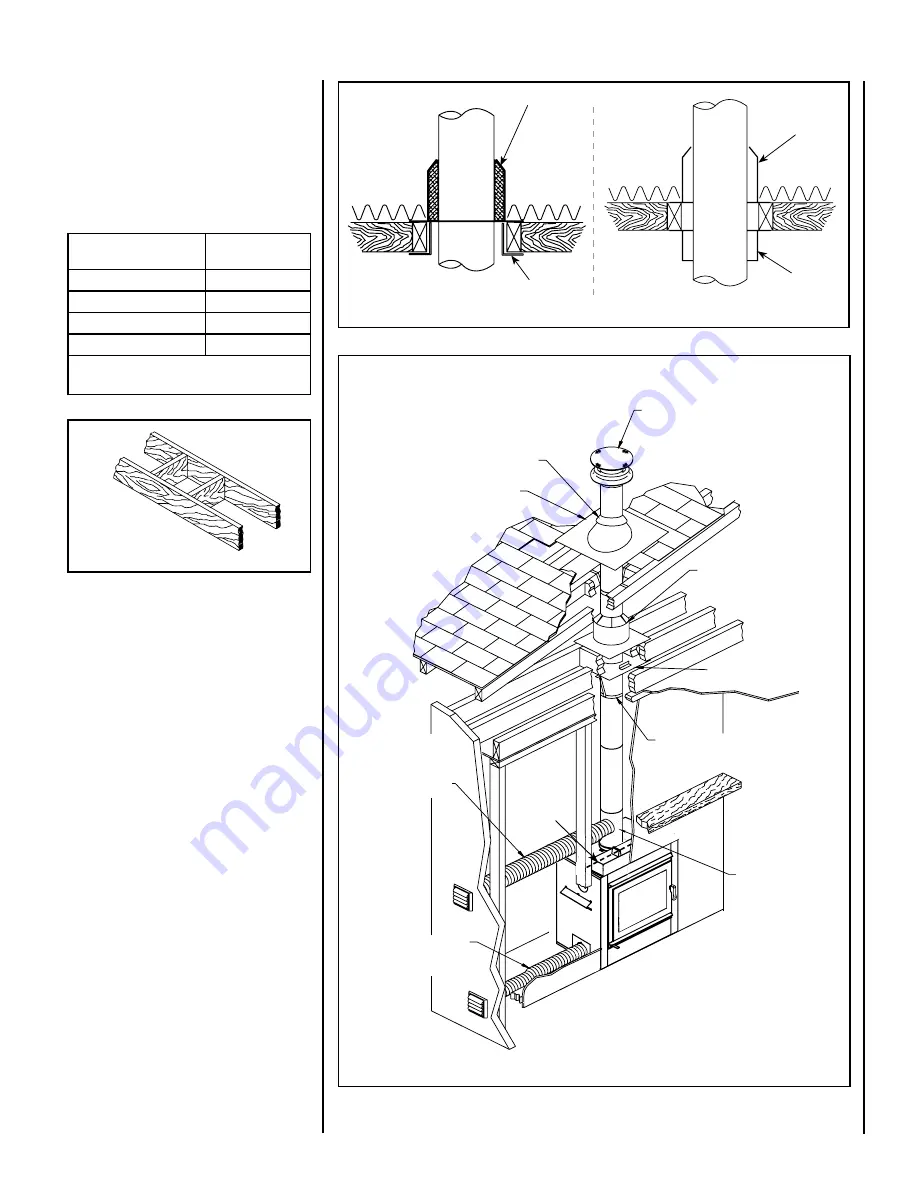
1.  Cut and frame the holes in the ceiling, floor 

and roof where the chimney will pass (see 

Figure 31

).

 Use a plumb-bob to line up the 

center of the holes.  The sizes are indicated 

in 

Table 2

 for the floor and ceiling holes and 

Table 3

 (

Page 22

)

 for the roof holes.

2.  From below, install a firestop in each ceiling/

floor separation through which the chimney 

will pass.  At the attic level, install an attic 

radiation shield from above 

(

Figure 32a

)

.

3.   For  ASHT+

*

 / 

*

 / DuraTech DTC

*


and S2100+

*

 /

*

 chimneys place 

the first chimney length on the fireplace.  

Secure it to the collar with four screws equally 

spaced around the perimeter.   With the AC 

chimney, you must use a starter section 

before installing the first chimney length


(

Figure 33

).

 Continue installing chimney 

lengths making sure to lock each length in 

place.

4. Every time the chimney passes through 

a ceiling or a wall, install the appropriate 

firestop.  When you reach the desired height, 

install the roof support. When installing a 

support, slightly lift the chimney system so 

the weight will lie on the support, not on the 

fireplace to reduce expansion noises (Refer 

to instructions included with the support).

5. Then, put the roof flashing in place and seal 

the joint between the roof and the flashing 

with roofing pitch (see 

Figures 34 and 35

)

.  

For sloping roofs, place the flashing under 

the upper shingles and on top of the lower 

shingles.  Nail the flashing to the roof, using 

roofing nails.

6.  Place the spacers and the storm collar over the 

flashing, and tighten it with the bolt supplied.  

Finally, seal the joint between the storm collar 

and the chimney, using silicone caulking.

7.  Install the chimney cap.  Once the chimney 

cap is in place, the roof flashing can be 

washed with a solvent or vinegar and then 

painted with rust-proof paint.

CHIMNEY MODEL 

*

6”

SQUARE HOLE

SIZE OPENING

ASHT+ /  

*

12-3/8” (314 mm)

DuraTech DTC 

**

12-3/8” (314 mm)

S-2100+ /  

*

14-1/8” (359 mm)

AC 

*

15 in (380 mm)

NOTE: See Table 3 for Sloped Roof Framing

Table 2 - Flat Roof Framing

Figure 33

Rain Cap

Collar

Flashing

Attic Radiation

Shield

Firestop

Universal Support

Outside Combustion 

Air Kit (included 

with fireplace)

AC Starter Section

Figure 31  - Roof Framing

AC CHIMNEY

*

 INSTALLATION

(AIR COOLED GALVANIZED CHIMNEY)

Figure 32a

Attic Radiation Shield

ASHT / S2100

/

Solid Packed Pipe 

*

AC

Air Cooled Pipe 

*

Figure 32b

Radiation Shield

Attic Radiation 

Shield

Firestop

u

Combustibles are not allowed below

 top spacers above the fireplace. Facing in 

front of fireplace must be non-combustible 

below this area.

u

Chimney Outside

Air Intake

(required when 

using AC chimney)

*

Available from Security Chimneys

®


**

Available from DuraVent

®

21

Summary of Contents for Superior Fireplaces WRT3920WS

Page 1: ...andapprovalsofthissystem and could result in an unsafe and potentially dangerous installation IHP wood burning fireplaces are designed for use as a supplemental heater They are not intended for contin...

Page 2: ...intended for use with a gas log set Do not use a fireplace insert or any other product with this fireplace unless it is specified by IHP for use with this appliance Failure to follow these instructio...

Page 3: ...length to be blown in front ofanopenflamewhenthewindow is opened Keep any combustible furniture materials or decorative pillows at least 48 1219 mm from the front fireplace opening WARNING Never leav...

Page 4: ...sthecatalyticcombustor Openingthe CAT bypass damper control increases the draft allowing the unit to achieve proper operating temperatures during a cold start up It also provides more draft to prevent...

Page 5: ...For instance a long chimney will necessitate closing the damper more To obtain the proper combustion closethedampercompletely then open it about 1 4 to 1 2 6 4mm to 13mm Two medium size pieces of woo...

Page 6: ...kesabout15 30minuteswiththeCATbypass opened to reach proper light off temperatures for the catalytic combustor Step 5 Set the primary control to the desired burn level The fireplace will automatically...

Page 7: ...ed to less than 20 Wood properly seasoned is then capable of generating the heat the stove was designed to provide Greenwooddoesnotburneasily Attemptingto burn green wood often results in a lot of smo...

Page 8: ...sweep and put the combustor back in place CATALYTIC COMBUSTOR This fireplace is designed with a catalytic com bustor which will reduce pollution emissions and creosote build up while improving therma...

Page 9: ...better seal and then retightening Catalyst Bypass linkage replacement see Figure 9B Toolsrequired 2 9 16 wrenches 2square drive bit driver Withcatalystbypassinclosedposition remove 2 baffle boards fr...

Page 10: ...ombustorProblem Thermal Cracking ThiscombustordoesNOTexperiencethermalcracking Notap plicable Appliestohoneycombcombustorsonly CombustorProblem CombustorPeeling ThiscombustordoesNOTexperiencecombustor...

Page 11: ...the ashes are cold 24 to 48 hours after the fire is out Do not leave the ashes in the house as they give off carbon monoxide and other toxic gases WARNING DisposalofAshes Ashesshould be placed in a st...

Page 12: ...e Replacement Parts Page 28 DO NOT OPERATE THE UNIT WITH CRACKED OR BROKEN GLASS Glass Cleaning TheWRT3920WSfireplaceisdesignedtokeeptheglasscleanundernormal operating conditions If the WRT3920WS fire...

Page 13: ...replace is determined by considering the location of windows doors and the traffic flow in the room where the fireplace is located allowing space in front of the unit for the hearth exten sion and the...

Page 14: ...must cover the entire width of the fireplace The combustible floor in front of the fireplace must be covered with at least a 1 2 inch of non combustible material tile marble stone etc See Figure 15 CO...

Page 15: ...phs are not to scale consult installation instructions Product designs materials dimensions specifications colorsandpricesaresubjecttochangeordiscontinu ance without notice Allframingdimensionscalcula...

Page 16: ...Side Figure 17 Figure 18 Insulated Chase Construction 7 Ft Min Attic Radiation Shield Roof Support Storm Collar Flashing Drywall or Any Rigid Material 2 x 4 1 2 Plywood 6 8 Min Firestop Floor Ceiling...

Page 17: ...mbustible Facing Drywall 2 x 3 Min Rock Board or Other Spacer Figure 22 A wall on off switch must be installed to control theblower Anoptionalheatswitchandvariable speed control are available see Page...

Page 18: ...ust be non combustible below this area u NOTES Seal the top and both sides of the roof flashing with waterproof caulk ing The gap between the vent pipe and a vertical firestop shall be sealed with non...

Page 19: ...the base of the fireplace C The fresh air must come from outside the house The air intake must not draw air from the attic basement or garage D The air intake should be installed where it is not likel...

Page 20: ...2 feet 3 7 m In altitude add 18 450 mm to the chimney for every 2 000 feet 600 m above sea level 6 All chimney installations must include at least one support Re ducing the amount of chimney weight on...

Page 21: ...the joint between the roof and the flashing with roofing pitch see Figures 34 and 35 For sloping roofs place the flashing under the upper shingles and on top of the lower shingles Nail the flashing to...

Page 22: ...b bob to line up the center of the hole Cut a hole for the chimney in the ceiling floor Frame this hole as described previously refer to section Chimney Instal lation Instructions 5 From below install...

Page 23: ...6 1 8 156 mm 11 280 mm 14 1 8 359 mm 16 7 8 429 mm 18 7 16 468 mm 23 584 mm 26 3 16 665 mm B 27 11 16 703 mm 33 1 2 851 mm 50 7 8 1292 mm 62 1 2 1588 mm 72 5 8 1845 mm 78 7 16 1992 mm 95 3 4 2432 mm...

Page 24: ...Insulated Wall Angel Wall Radiation Shield Insulated Available from Security Chimneys Available from DuraVent Security Chimneys RSM and RSMI30 RSMI45 Canada Only DuraVent 6DTC WTI and 6DTC S30 6DTC S...

Page 25: ...AND MULTIPLE TERMINATIONS For the purpose of this manual a chimney chase is considered a part of the chimney system rather than part of a building The termination must be placed a minimum of 18 460 mm...

Page 26: ...rily install the ASHT elbow on the top of the fireplace and using a level mark with an oval the location where the flue liner will enter the masonry chimney 2 In the middle of the oval drill a hole in...

Page 27: ...er EPA certification If installed this appliance no longer qualifies for EPA certification Check with local authorities having jurisdiction for requirements in your area Central Forced Air Kit Accesso...

Page 28: ...ription Part Cat No Andiron 2 pieces PR SR2875 Bottom refractory PR SR2825 Back refractory PR SR2826 Left side refractory PR SR2828 Right side refractory PR SR2827 Front refractory 2 pieces PR SR2829...

Page 29: ...nd PE Wall Band BM Supports Offset Support SO Roof Support ST Roof Brace BS2 Firestops Firestop 6BF Radiation Shield 6RS Insulated Attic Radiation Shield 6RSA2 Insulated Wall Radiation Shield 6RSM Ins...

Page 30: ...Relining A Masonry Chimney 6 Diameter Listed to ULC S635M UL 1777 and ULC S640M at 2100 F Description Cat Part No 6 Length 6 Dia 6LL6 6LL6 12 Length 6 Dia 6LL12 6LL12 24 Length 6 Dia 6LL24 6LL24 36 Le...

Page 31: ...E MANUEL D INSTALLATION LES COMPOSANTES UTILIS ES AVEC LE FOYER DOIVENT TRE HO MOLOGU ES VOIR LA LISTE DANS LE MANUEL D INSTALLATION REMPLACER LA VITRE AVEC UN VERRE C RAMIQUE DE 5mm D PAISSEUR POUR U...

Page 32: ...ct d damages repairs or inefficiency resulting from faulty installation or application of the Product IHP is not responsible for inadequate system draft caused by air conditioning and heating systems...

Page 33: ...l use with approved fuels listed in the Operation Manual provided with the product This includes burning such fireplace fuels as wood and natural or propane gas Fuel products with abnormal burning cha...

Page 34: ...See Page 28 for a complete replacement parts list Use only parts sup plied from the manufacturer Normally all parts should be ordered through your IHP distributor or dealer Parts will be shipped at pr...

Reviews: