1. System Setup
First time users are recommended to setup the system
with the CPU Unit and the CON Unit in the same room
as a test setup. This will allow you to identify and solve
any cabling problems, and experiment with your system
more conveniently.
1. Switch off all devices
CON Unit installation
2. Connect your monitor(s), keyboard and mouse to the CON
Unit.
3. Connect the CON Unit with the interconnect cable(s).
4. Connect the 5VDC power supply to the CON Unit.
CPU Unit installation
5. Connect the source (computer, CPU) with the supplied
cables to the CPU Unit. Please ensure the cables are not
strained.
6. Connect the CPU Unit to the interconnect cable(s).
7. Connect the 5VDC power supply to the CPU Unit.
8. Power the system.
To power up the system, the following sequence is
recommended: Monitor – CON Unit – CPU Unit – source.
2. Specifications
2.1 Package Contents
Your extender package contains the following items:
Basic module:
■
KVM Extender pair (CPU Unit and CON Unit) in the Draco
vario chassis
■
1x (redundancy 2x) 5VDC international power supply unit
per KVM Extender unit
■
1x (redundancy 2x) country-specific power cord
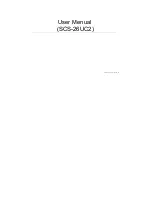
2.2 System Overview
1. Source (Computer, CPU)
2. CPU Unit
3. Interconnect cable
4. CON Unit
5. Console (monitor, keyboard, mouse)
2.3 DDC Settings
By default, the device transmits the factory preset DDC
information to the CPU. This information is suitable in most cases.
Downloading of the DDC information of the console monitor can
be performed during normal operation.
For special requirements, DDC information can be retrieved and
uploaded as a binary file to both the CPU Unit and the CON Unit.
Connect your computer with a USB mini cable to the service port
of the CPU Unit or CON Unit. The data area of the unit is now
accessible as a flash drive „Extender“.
Uploading DDC Information
Copy the binary file containing your specific DDC information
to the flash drive of the CPU Unit or CON Unit. The current DDC
information is replaced.
Retrieving DDC Information
Copy the file „DDC-EDID.bin“ on the flash drive of the CPU Unit
to your computer. To open the binary file, you have to install a
suitable software, e.g. WinDDCwrite, on your computer. Contact
your dealer for this purpose.
Reset to Factory DDC Information
Delete the file called „DDC-EDID.bin“ on the flash drive of the CPU
Unit. By deleting this file, the factory DDC Information is restored.
■
DisplayPort video cable (2.0 m, DisplayPort male-to-male)
■
USB cable (1.8 m, type A to type B)
Additional content for upgrade module Analog Audio / Serial:
■
Serial cable (1.8 m, D-Sub 9 male connector)
■
Stereo jack cable (1.6 m, 3.5 mm male connector)
Additional content for upgrade module serial (RS422):
■
Serial cable (1.8 m, D-Sub 9 male connector)
Additional content for upgrade module Digital Audio:
■
RCA cable (2.5 m, Cinch male connector)
■
TOSLINK cable (1.8 m, F05 male connector)
Additional content for upgrade module USB-HID:
■
USB cable (1.8 m, USB type A to type B)
Additional content for upgrade module PS/2:
■
2x PS/2 cable (1.8 m, 6-pole connector)
Additional content for upgrade module USB 2.0 embedded:
■
USB cable (1.8 m, USB type A to type B)
Additional content for upgrade module USB 2.0 embedded:
■
USB cable (1.8 m, USB type A to type B)
If anything is missing, please contact your dealer.
Series 483 / 490 / 493
Draco vario Extenders Series 483 / 490 / 493
Draco vario Extenders
QUICK SETUP
QUICK SETUP
QUICK SETUP