Remote Unit Configuration & Operation
23
Adjusting Video
PS/2 Mini Extender Remote units incorporate video equalization circuitry,
allowing you to compensate for the loss in image quality that occurs when
video signals are transmitted along CATx cables. At the factory, Remote units
are configured to optimize the video signals for Interconnect cables up to 25m
in length.
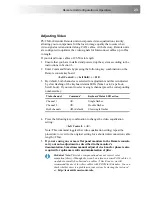
If you intend to use cables of 25-50m in length:
1.
Ensure that you have installed and powered up the system according to the
instructions in Section 3.
2.
Enter Command Mode by pressing the following key combination on the
Remote console keyboard:
<Left Control> + <Left Shift> + <F10>
3.
By default, both channels are selected for adjustment and this is indicated
by slow flashing of the keyboard status LEDs (Num Lock, Caps Lock,
Scroll Lock). If you want to select a single channel press the corresponding
numbered key:
Video channel
Command
Keyboard Status LED action
Channel 1
<1>
Single flashes
Channel 2
<2>
Double flashes
Both channels
<0>
(default)
Slow single flashes
4.
Press the following key combination to change the video equalization
setting:
<Left Control> + <E>
Note: This command toggles the video equalization setting; repeat the
procedure to revert to the original setting for a shorter interconnection cable
length (<25m).
5.
If you are using one or more flat panel monitors in the Remote console,
carry out auto-adjustment as described in the monitor’s
documentation. Sometimes manual adjust of clock and/or phase is also
required for optimum results and minimization of jitter.
Technical Note:
This video compensation does not correct color
separation (skew). Although skew can be an issue on some CATx cables, it
would not normally be observed on cables <50m. Even so, we still
recommend the use of low skew cables with PS/2 Mini Extenders. You can
check whether skew is a problem in your system by viewing the test card
at:
http://testcard.kvmextender.info
.
Summary of Contents for SDMX/D2
Page 2: ......


