background image

9

max. 10 ˚

• Moving the device:

Empty all fluid in the bath before moving device from 
one place to other place.
The device can be lifted up and moved by using the top 
handles or the bottom handles (

12

, see 

Fig. 1

).

It can also be moved on flat surface by lifting and push-
ing the front of the device. It is easy to move the device 
with the help of the wheels.
The angle of inclination should never be more than 10 º 
at any direction when move the device!

The device must not be moved 
during operation. After moving 
the device, you must wait at least 

one hour before restarting the unit.

Fig. 10

NOTICE

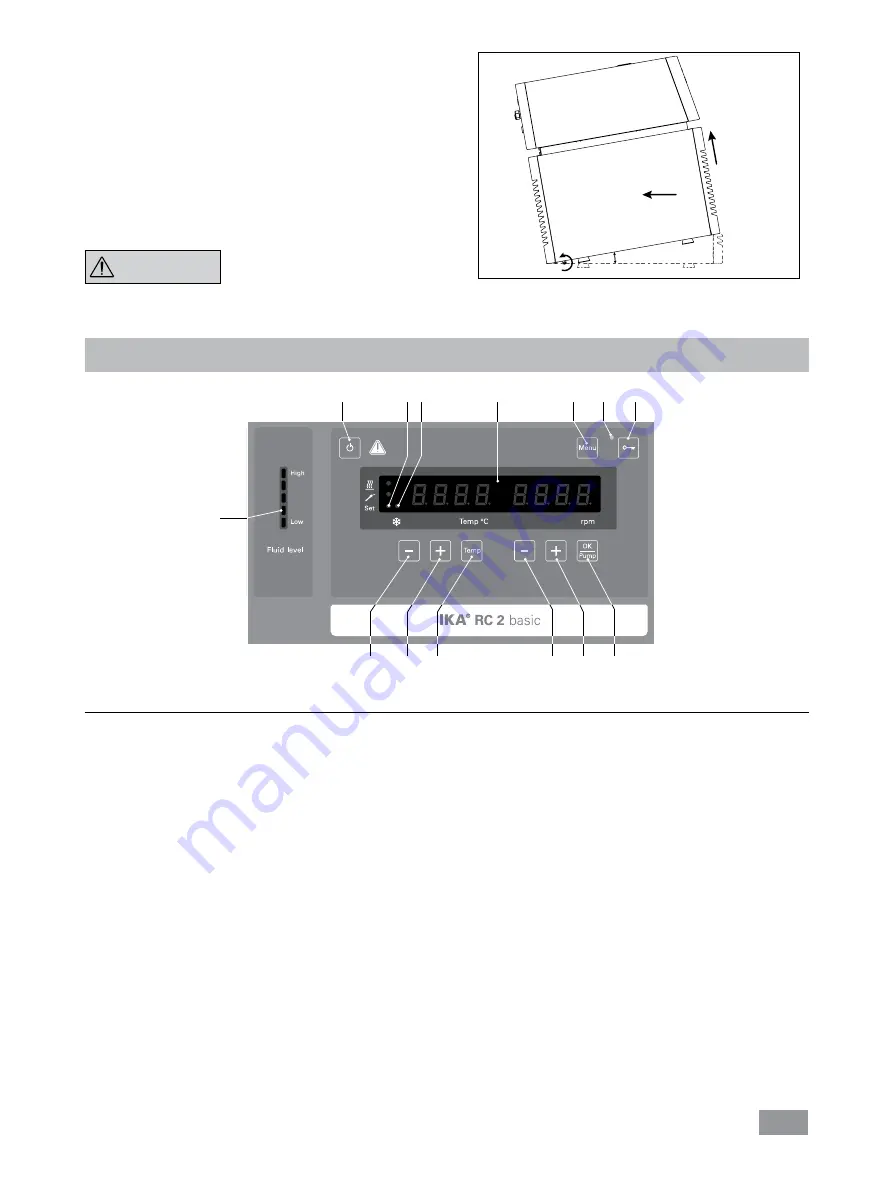
Operator panel and display

Item Designation 

Function 

ON/OFF button: 

Switch on/off the circulator.

“Temp” button:


Start/stop the refrigerating function.

“Temp (+)” button:


Increase the temperature setting.


Navigation, selecting the settings in the menu.

“Temp (-)” button:


Decrease the temperature setting.


Navigation, selecting the settings in the menu.

“OK / Pump” button: 

Start/stop the pump function.


Confirm the menu options.

“Pump (+)” button: 

Increase the pump speed setting.


Change the menu value setting.

“Pump (-)” button: 

Decrease the pump speed setting.


Change the menu value setting.

“Menu” button:


Press it once: menu option is display.


Press it once again: back to working screen.

Key button: 

Lock/unlock keys. 

LED, Key button:


Indicate the keys are deactivated.

LED display:


Display the settings and actual values.

Fluid level indicator:


Indicate the fluid level (when the fluid level is too low or too high, the bottom or the 
top LED segment change into red color).

LED, cooling:


The light LED indicate the refrigerating function is activated.

LED, set:  

The LED lights up at the same time as the set value is displayed.


A

B

F

G

H

I

E

C

D

K

L

J

O M

Fig. 11

Summary of Contents for RC 2 basic

Page 1: ...20000004342 IKA RC 2 basic RC 2_112014 Reg No 4343 01 Operating instructions EN...

Page 2: ...7 6 8 10 11 12 12 4 9 Item Designation 1 Operator panel and display 2 Mains switch 3 Power socket 4 Venting grid 5 Filling lid 6 Pump connection IN 7 Pump connection OUT 8 Overflow 9 Backflow 10 RS 2...

Page 3: ...ation for IKA fluid 8 Moving the device 9 Operator panel and display 9 Commissioning 10 Menu settings 11 Menu structure 11 Basic guide to setting the menu options 11 Operating mode MODE 11 Maximum tem...

Page 4: ...the device may still be live for some time after unplugging from the power supply Coverings or parts that can be re moved from the device must be put back on the device again to ensure safe operation...

Page 5: ...re of the chemical hazards that may be associated with the bath fluid used Observe all safety warning for the fluids Depending on the bath fluid used and the type of opera tion or toxic can arise Ensu...

Page 6: ...peration Connecting the tubings Unscrew the union nuts and stoppers using a wrench from the pump connection IN 6 see Fig 1 and OUT 7 see Fig 1 External system IKA Calorimeter Fig 5 Connect the hoses f...

Page 7: ...rning message appear on the display Meanwhile the bottom LED segment of the lights up in red color to indicate the low fluid level see Fig 8 Open the filling lid 5 see Fig 1 and fill fluid to the bath...

Page 8: ...High purity water from icon exchangers and distilled or bi distilled water are unsuitable for operation due to corrosive properties of these media High purity water and distillates are suitable as a m...

Page 9: ...se the temperature setting Navigation selecting the settings in the menu D Temp button Decrease the temperature setting Navigation selecting the settings in the menu E OK Pump button Start stop the pu...

Page 10: ...ng with Temp button C or Temp button D Change the pump speed setting with Pump button F or Pump button G In standby status activate the refrigerating function by pressing the Temp button B The pump an...

Page 11: ...nu by pressing Menu key H F Press the Temp button C or Temp button D to change the menu options F Press the Pump button F or Pump button G to change the menu value settings F Confirm the menu settings...

Page 12: ...isting control deviation A high Ti means a smaller and slower effect on the control variable Ti values that are too small can lead to instability of the controller The differential time Td s is the d...

Page 13: ...ting instructions and help section included with the software USB interface The Universal Serial Bus USB is a serial bus for connect ing the device to the PC Equipped with USB devices can be connected...

Page 14: ...MS Windows and includes graphical entry features for pump motor speed ramps for example PC 1 1 Cable This cable is required to connect RS 232 port 10 to a PC 1 2 RxD 3TxD 4 5 GND 6 7 RTS 8 CTS 9 1 Rx...

Page 15: ...ing Reduce pump motor speed Use fluid with lower viscosity Check if the pump impeller is blocked Err 06 Pump off Refrigerating off Too low liquid level Check the fluid level and buoyage Err 15 Pump of...

Page 16: ...rding to DIN 12876 1 Class III FL suitable for flammable and non flammable fluids Cooling capacity according to DIN 12876 20 C 10 C 0 C 10 C 20 C W 400 370 320 240 130 Pump speed adjustable rpm 1000 3...

Page 17: ...iv ing reasons for the claim You will be liable for freight costs The warranty does not cover worn out parts nor does it apply to faults resulting from improper use insufficient care or maintenance no...

Page 18: ...ng the details below UK Office Keison Products P O Box 2124 Chelmsford Essex CM1 3UP England Tel 44 0 1245 600560 Fax 44 0 1245 808399 Email sales keison co uk Please note Product designs and specific...

Reviews: