background image

13

ENGLISH

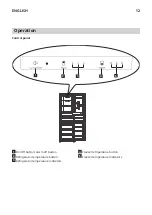
Operation

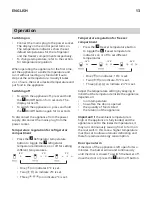
Switching on

 • Connect the mains plug to the power socket. 

The display on the control panel turns on. 

The temperature indicators show the set 

default temperatures for the refrigerator 

and the freezer compartments respectively.

 • To change temperature, refer to the section 

for temperature regulation.

When operating the appliance

 for the first time, 

set the appliance at a colder temperature and 

run it without loading any food until it auto 

stops at the set temperature. Usually it takes 

2 or 3 hours, then set a desired temperature and 

put food in the appliance.

Switching off

 •

To switch the appliance off, press and hold 

the 

1

 On/Off button for 3 seconds. The 

display turns off.

 • To switch the appliance on, press and hold 

the 

1

 On/Off button again for 3 seconds

To disconnect the appliance from the power 

supply, disconnect the mains plug from the 

power socket.

Temperature regulation for refrigerator 

compartment

 • Press the 

2

 Refrigerator temperature 

button to toggle the 

3

 refrigerator 

temperature indicators on or off for setting 

different temperatures.

8˚C

4˚C

2˚C

 • One ( ) on indicates 

8

°C is set.

 • Two (   ) on indicate 4°C is set.
 • Three (     ) on indicate 2°C is set.

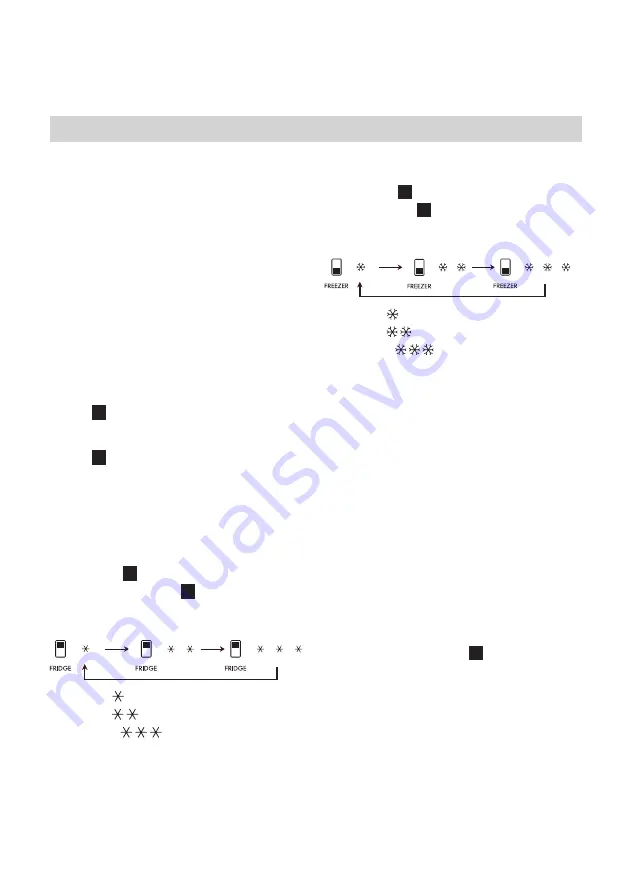
Temperature regulation for freezer 

compartment

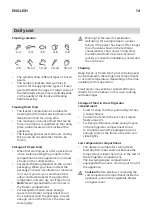
 • Press the 

4

 Freezer temperature button 

to toggle the 

5

 freezer temperature 

indicators on or off to set different 

temperatures.

-16˚C

-19˚C

-24˚C

 • One ( ) on indicates 

-16

°C is set.

 • Two (   ) on indicate -19°C is set.
 • Three (     ) on indicate -24°C is set.

Adjust the temperature setting by keeping in 

mind that the temperature inside the appliance 

depends on:

 • room temperature

 • how often the door is opened

 • the quantity of food stored

 • the location of the appliance

Important!

 If the ambient temperature is 

high or the appliance is fully loaded, and the 

appliance is set to the lowest temperatures, it 

may run continuously causing frost to form on 

the rear wall. In this case a higher temperature 

must be set to allow automatic defrosting and 

therefore reduced energy consumption.

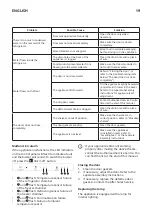
Door open alarm

If the door of the appliance is left open for two 

minutes, the buzzer will sound continuously 

until the door is closed. To switch the buzzer off, 

close the door or press the 

1

 Alarm off

 button.

Summary of Contents for 004.948.36

Page 1: ...MEDG NG GB DE...

Page 2: ...u Please record your model and serial numbers below for reference Purchase Date Model Number Serial Number Please attach sales receipt here for future reference Installation checklist Door Door seals...

Page 3: ...tieren Sie Ihre Modell und Seriennummern unten zur Referenz Kaufdatum Modellnummer Seriennummer Bitte f gen Sie den Kaufbeleg hier zur sp teren Bezugnahme bei Checkliste zur Installation T r T r dicht...

Page 4: ...ENGLISH 5 DEUTSCH 23...

Page 5: ...lnerable people safety This appliance can be used by children aged from 8 years and above and persons with reduced physical sensory or mental capabilities or lack of experience and knowledge if they h...

Page 6: ...nt circuit Do not use electrical appliances inside the food storage compartments of the appliance unless they are of the type recommended by the manufacturer Do not use water spray and steam to clean...

Page 7: ...r storing pre frozen food storing or making ice cream and making ice cubes One two and three star compartments are not suitable for the freezing of fresh food This refrigerating appliance is not inten...

Page 8: ...he mains plug after the installation Do not pull the mains cable to disconnect the appliance Always pull the mains plug UK and Ireland only This appliance is fitted with a 13 A mains plug If it is nec...

Page 9: ...the appliance Climate class Ambient temperature SN 10 C to 32 C N 16 C to 32 C ST 16 C to 38 C T 16 C to 43 C SN indicates that this refrigerating appliance is intended to be used at ambient temperat...

Page 10: ...straints Using the supplied distance holder to fix the appliance to the wall for the following advantages Refer to the separate Assembly Instructions for detailed installation Allow enough space for a...

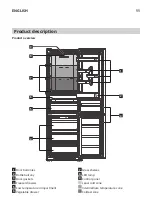
Page 11: ...rview 1 2 3 4 5 6 7 8 9 1 Door balconies 2 Bottle balcony 3 Door gaskets 4 Freezer drawers 5 Low temperature compartment 6 Vegetable drawer 7 Glass shelves 8 LED lamp 9 Control panel Least cold zone I...

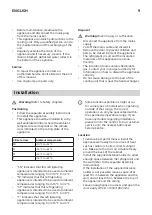
Page 12: ...LISH Operation Control panel 1 2 3 4 5 1 On Off button alarm off button 2 Refrigerator temperature button 3 Refrigerator temperature indicators 4 Freezer temperature button 5 Freezer temperature indic...

Page 13: ...3 refrigerator temperature indicators on or off for setting different temperatures 8 C 4 C 2 C One on indicates 8 C is set Two on indicate 4 C is set Three on indicate 2 C is set Temperature regulatio...

Page 14: ...the freezer compartment for air to circulate around the packages Also let enough room at the front so the door can close tightly Warning In the event of accidental defrosting for example due to a powe...

Page 15: ...e provided with a special device see the figure below placed in the lower refrigerator compartment of the appliance to indicate the coldest zone of it Hints and tips Normal operating sounds The follow...

Page 16: ...partment with your wet hands so as to prevent from being frostbitten Hints for freezing To help you make the most of the freezing process here are some important hints The maximum quantity of food whi...

Page 17: ...d wipe clean to ensure they are clean and free from debris 3 Rinse and dry thoroughly 4 If accessible clean the condenser and the compressor at the back of the appliance with a brush This operation wi...

Page 18: ...cooling fast freezing or vacation function is activated Deactivate the control mode Refer to Operation chapter The compressor operates continually Temperature is set incorrectly Refer to Operation ch...

Page 19: ...drain hole with a piece of wire The doors does not close completely The shelves are out of position Make sure the shelves are in correct position Refer to Movable shelves The door gaskets are dirty C...

Page 20: ...duct dimensions Height 1874 mm 1874 mm Width 595 mm 595 mm Depth 630 mm 630 mm Net volume Fridge 219 0 L 219 L Freezer 83 0 L 76 L Defrost system Fridge auto auto Freezer auto auto Star rating rising...

Page 21: ...ole discretion if it is covered under this guarantee If considered covered IKEA service provider or its authorized service partner through its own service operations will then at its sole discretion e...

Page 22: ...les Service to 1 make a service request under this guarantee 2 ask for clarification on installation of the IKEA appliance in the dedicated IKEA kitchen furniture The service won t provide clarificati...

Page 23: ...Bewahren Sie diese Bedienungsanleitung zur sp teren Verwendung immer in der N he des Ger ts auf Sicherheit von Kindern und hilfsbed rftigen Personen Dieses Ger t ist zur Verwendung durch Kinder ab 8...

Page 24: ...ffnungen des Ger ts frei sowohl am Geh use als auch im Inneren Verwenden Sie keine mechanischen Ger te oder andere Methoden um den Abtauprozess zu beschleunigen au er den vom Hersteller empfohlenen Be...

Page 25: ...ie 48 Stunden lang nicht benutzt wurden sp len Sie das an eine Wasserleitung angeschlossene Wassersystem durch wenn f r 5 Tage kein Wasser entnommen wurde Lagern Sie rohes Fleisch und Fisch in geeigne...

Page 26: ...ckseite des Ger tes muss an einer Wand stehen Stellen Sie das Ger t nicht an Orten auf die direkter Sonneneinstrahlung ausgesetzt sind Stellen Sie das Ger t nicht an Orten auf die zu feucht oder zu ka...

Page 27: ...n und ber hren Sie keine Gegenst nde im Gefrierfach wenn Ihre H nde feucht sind Frieren Sie aufgetaute Lebensmittel nicht erneut ein Beachten Sie die Lagerungshinweise auf der Verpackung von Tiefk hlk...

Page 28: ...n Wenn Sie Zweifel bez glich der Installation haben wenden Sie sich bitte an den Verk ufer unseren Kundendienst oder an den n chsten autorisierten Kundendienst Standort Um die beste Leistung zu erbrin...

Page 29: ...ssen Sie ausreichend Platz f r die Luftzirkulation zwischen dem Ger t und den W nden Befestigen Sie das Ger t an der Wand um ein Umkippen zu verhindern Elektrischer Anschluss Achtung Alle elektrischen...

Page 30: ...ber das Ger t 1 2 3 4 5 6 7 8 9 1 T rablagen 2 Flaschenregal 3 T rdichtungen 4 Gefrierabteilschubladen 5 Tieftemperaturfach 6 Gem seschublade 7 Glasb den 8 LED Lampe 9 Bedienfeld Am wenigsten kalte Zo...

Page 31: ...31 DEUTSCH Bedienung Bedienfeld 1 2 3 4 5 1 Ein Aus Taste Taste Alarm aus 2 K hlabteiltemperatur Taste 3 K hlabteiltemperaturanzeigen 4 Gefrierabteiltemperatur Taste 5 Gefrierabteiltemperaturanzeigen...

Page 32: ...ren ein und auszuschalten 8 C 4 C 2 C Ein zeigt an dass 8 C eingestellt sind Zwei zeigen an dass 4 C eingestellt sind Drei zeigen an dass 2 C eingestellt sind Temperaturregelung f r das Gefrierabteil...

Page 33: ...bensmittel dabei austrocknen Hinweis Lagern Sie keine Lebensmittel oder Getr nke in Glasflaschen im Gefrierfach Lassen Sie f r eine optimale Leistung ausreichend Platz im Gefrierabteil damit die Luft...

Page 34: ...s Referenz Die W nde des K hlschranks sind mit einer Reihe von Gleitschienen ausgestattet sodass die Einlegeb den aus Sicherheitsglas beliebig eingesetzt werden k nnen Achtung Um eine korrekte Luftzir...

Page 35: ...iebigen Einlegeboden stellen Obst und Gem se Gr ndlich reinigen und in eine spezielle Schublade legen Bananen Kartoffeln Zwiebeln und Knoblauch d rfen nicht im K hlschrank aufbewahrt werden wenn sie n...

Page 36: ...rastisch Sie k nnen nicht erneut eingefroren werden berschreiten Sie nicht die vom Hersteller angegebene Aufbewahrungsdauer Reinigung und Pflege Warnung Siehe Kapitel zur Sicherheit Allgemeine Warnhin...

Page 37: ...dem Verdampfer des K hlabteils entfernt Das Abtauwasser l uft durch einen Kanal in einen speziellen Beh lter an der R ckseite des Ger ts ber den Motorkompressor ab wo es verdampft Es ist wichtig die A...

Page 38: ...Ger t ist zu niedrig zu hoch Die Temperatur ist nicht korrekt eingestellt Stellen Sie eine h here niedrigere Temperatur ein Die T r schlie t nicht richtig Siehe T r schlie en Die Temperatur der Lebens...

Page 39: ...einer Fehlfunktion des Ger ts blinken die LED Anzeigen im Bedienfeld und der Summer ert nt Um den Summer auszuschalten dr cken Sie die Taste 1 Alarm aus und blinkt Ausfall des Temperatursensors im K h...

Page 40: ...automatisch automatisch Gefrierfach automatisch automatisch Sternebewertung Abtauzeit 9 Stunden 15 Stunden Gefrierkapazit t 3 89 kg 24 S 4 0 kg 24 S Energieverbrauch 232 kWh Jahr 226 kWh Jahr Ger usc...

Page 41: ...en gelten die EU Richtlinien Nr 99 44 EG und die jeweiligen rtlichen Vorschriften Ersetzte Teile gehen in das Eigentum von IKEA ber Was unternimmt IKEA um das Problem zu beheben Der von IKEA beauftrag...

Page 42: ...rantie gibt Ihnen bestimmte gesetzliche Rechte die rtliche Anforderungen abdecken oder bertreffen Allerdings schr nken diese Bedingungen in keiner Weise die landesweit geltenden Verbraucherrechte ein...

Page 43: ...rgewissern Sie sich dass Sie die IKEA Artikelnummer 8 stelliger Code und die Seriennummer 22 stelliger Code der auf dem Typenschild zu finden ist des Ger ts f r das Sie unsere Hilfe ben tigen zur Hand...

Page 44: ...Svizzera Gratuito 8am 5pm sterreich 800070613 Kostenlos 9am 5pm Belgi 080080159 Gratis 9am 5pm Belgique Gratuit 9am 5pm Danmark 70 15 09 09 Gratis man fre 09 00 20 00 l r s n 09 00 18 00 Norge 800314...

Page 45: ......

Page 46: ......

Page 47: ......

Page 48: ...Inter IKEA Systems B V 2020 AA 2230299 1...

Reviews: