background image

E-4

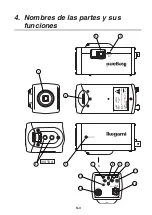
Lens mount (CS mount)

This is used to mount the lens on the camera. Many types of CS mountlens can be

attached.

Flange focal distance adjuster

Used to readjust the flange focal distance (distance between lens mounting face and

imaging area), if the camera fails to come into focus with the lens’ focus ring.

Focus lock screw

Used to lock the camera’s flange focal distance after is has been readjusted.

Holder mounting screw holes

These holes are used to fix the camera on the camera holder. They are also applicable

to general tripods.

Note

To attach the camera on a tripod or a camera holder, be sure to use mounting

screws. (1/4" -20UNC) that are shorter than 5.5 mm.

Lens selector switch

The switch has two positions, for a video iris lens and a DC iris lens.

Auto iris lens connector

Specifically used to connect the auto iris lens.

• For the video type auto iris lens

Set the lens selector switch to VIDEO position.

— Connector cable leads —

1. Red (power)

2. Not used

3. White (video)

4. Black (shielded)

* Dress the tip of the green lead to prevent a short-circuit.

• For the DC type auto iris lens

Set the lens selector switch to DC position.

— Connector cable leads —

1. Damping coil (-)

2. Damping coil (+)

3. Driving coil (+)

4. Driving coil (-)

* Connect the leads as shown above.

Refer also to the instructions of the lens.

Auto iris lens

3

2

1

4

Auto iris lens

3

2

1

4

Summary of Contents for ISD-A20

Page 1: ...kegami Tsushinki Co Ltd INSTRUCTION MANUAL MODEL OUTDOOR USE WARNING WARNING TO PREVENT FIRE OR ELECTRIC SHOCK DO NOT EXPOSE THIS APPLIANCE TO RAIN OR MOISTURE ISD A20 Color Camera e co p r o d u c t...

Page 2: ...ion manual may cause harmful interference to radio communications Operation of this equipment in a residential area is likely to cause harmful interference in which case the user will be required to c...

Page 3: ...nstall the camera in places exposed to vibrations and shocks Be very careful not to drop or shock the camera while carrying it in Do not touch the imaging device Do not orient the camera to the sun So...

Page 4: ...gnal to noise ratio The high resolution is backed up by a horizontal resolution of 480 TV lines and a vertical resolution of 400 TV lines 4 High sensitivity Various modes of automatic gain control AGC...

Page 5: ...functions A VIEW A COLOR CAMERA MODEL TYPE SER NO I K E G A M I T S U S H I N K I C O LT D M A D E I N J A PA N AC24V 50 60Hz 245mA DC12V 230mA REV I S D A 2 0 CLASS2 AC24V50 60Hz245mA DC12V230mA 6 2...

Page 6: ...a tripod or a camera holder be sure to use mounting screws 1 4 20UNC that are shorter than 5 5 mm Lens selector switch The switch has two positions for a video iris lens and a DC iris lens Auto iris...

Page 7: ...ays on in green while the camera power is on DC12V AC24V power input terminal Keep the input power at DC10 5 15 0 V or AC24V 10 This installation should be made by a qualified service person and shoul...

Page 8: ...an be displayed onscreen 2 LIGHT CONTROL The backlight compensation and spot photometry modes are selected The wide dynamic level and DC type iris lens are adjusted 3 GAIN The gain control and electro...

Page 9: ...to select the setup levels 0 IRE and 7 5 IRE 5 MONITOR Selection of monitor CRT or LCD 6 DNR Switching on and off of noise reduction 7 VIDEO STANDARD Used to switch between the video signal systems NT...

Page 10: ...x blank ID ALL CLEAR Highlight this item and press the E button The ID code is cleared ID POSITION Highlight this item and press the L or R button In this way the ID code can be positioned up or down...

Page 11: ...een appears select RET and press the E button The previous menu shows up 2SPOT As with the 1SPOT mode two photometric fields can be preset Take the same procedure as for the 1SPOT mode OFF The backlig...

Page 12: ...The flicker reduction function is enabled all the time At the AUTO and ON positions there are the following two choices FR and FL Choose from them according to shooting scenes A FR Flicker Reduce Sele...

Page 13: ...ness and ruggedness look the same in all the 3 modes 4 SLOW SHUTTER The electronic sensitivity multiplying factor can be adjusted with the L and R buttons x2 x4 x8 x16 x32 The higher the factor the hi...

Page 14: ...lock mode is selected Press the E button and the screen at right shows up PHASE With the L or R button move the marker to finely adjust the phase 90DEG With the E button the phase angle can be adjust...

Page 15: ...ing an image on screen 4 DETAIL With the L and R buttons the details can be adjusted Make the adjustment to your taste while watching an image on screen 5 SETUP With the L and R buttons the setup leve...

Page 16: ...product Read and fill out the warranty card that you have received at your dealer Keep this card in a safe place Please consult Ikegami Electronics U S A Inc or Ikegami Electronics Europe GmbH or your...

Page 17: ...ER AGC OFF LOW MID HIGH selectable 10 Electronic sensitivity up Automatic up to 32 times interlocked with AGC mode 11 White balance ATW ATWex AWC MANU selectable 12 WDR function Variable at 36 levels...

Page 18: ...ndicaciones del manual de instrucciones puede causar interferencias perjudiciales en las comunicaciones por radio El funcionamiento de este equipo en una zona residencial causar probablemente interfer...

Page 19: ...c mara en lugares expuestos a vibraciones o golpes Tenga cuidado para no dejar caer ni golpear la c mara mientras la transporta No toque el dispositivo de imagen No oriente la c mara hacia el sol Algu...

Page 20: ...alta resoluci n cuenta con el apoyo de una resoluci n horizontal de 480 l neas de TV y una resoluci n vertical de 400 l neas de TV 4 Alta sensibilidad Se encuentran disponibles varios modos de control...

Page 21: ...unciones A VIEW A COLOR CAMERA MODEL TYPE SER NO I K E G A M I T S U S H I N K I C O LT D M A D E I N J A PA N AC24V 50 60Hz 245mA DC12V 230mA REV I S D A 2 0 CLASS2 AC24V50 60Hz245mA DC12V230mA 6 2 1...

Page 22: ...el soporte Conmutador selector de objetivo Este conmutador tiene dos posiciones una para objetivo con iris de v deo y la otra para objetivo con iris DV Conector de objetivo de iris autom tico Se util...

Page 23: ...inistra alimentaci n a la c mara Terminal de entrada de alimentaci n DC12V AC24V Mantenga la alimentaci n de entrada en 10 5 15 0 V CC o 24 V 10 CA Esta instalaci n deber realizarla un electricista cu...

Page 24: ...1 CAMERA ID Se puede aceptar y visualizar un m ximo de 24 caracteres 2 LIGHT CONTROL Se pueden seleccionar los modos de compensaci n de luz de fondo y fotometr a de punto Y se puede ajustar el nivel...

Page 25: ...monitor CRT o LCD 6 DNR Encendido y apagado de la reducci n de ruidos 7 VIDEO STANDARD Se utiliza para cambiar entre los sistemas de se ales de v deo NTSC PAL 8 COLOR BAR Se utiliza para activar y de...

Page 26: ...n E El c digo de identificaci n se borra ID POSITION Haga resaltar este elemento y pulse el bot n L o R De esta forma el c digo de identificaci n podr posicionarse arriba o abajo RET Pulse el bot n E...

Page 27: ...ZONE seleccione RET y pulse el bot n E Aparece el men anterior 2SPOT Como con el modo 1SPOT se pueden preajustar dos campos fotom tricos Siga el mismo procedimiento que para el modo 1SPOT OFF La funci...

Page 28: ...ra volver a la pantalla del men principal 5 4 3 GAIN Ganancia 1 Seleccione GAIN en la pantalla del men principal Pulse el bot n E y aparecer la pantalla de la derecha 2 GAIN Con los botones L y R se p...

Page 29: ...rosidad y la imprecisi n de la imagen que dependen del movimiento parecen las mismas en los 3 modos 4 SLOW SHUTTER El factor de multiplicaci n de sensibilidad electr nica se puede ajustar con los boto...

Page 30: ...Pulse el bot n E y aparecer la pantalla de la derecha PHASE Con el bot n L o R mueva el marcador para ajustar con precisi n la fase 90DEG Con el bot n E el ngulo de la fase se puede ajustar en 0 90 18...

Page 31: ...os ajustes que usted desee mientras observa una imagen en la pantalla 5 SETUP Con los botones L y R se puede seleccionar el nivel de ajuste 0 IRE o 7 5 IRE 6 MONITOR La calidad de la imagen optima se...

Page 32: ...r cambiar entre los sistemas NTSC y PAL Cada vez que se selecciona otro sistema la configuraci n actual cambiar a la que ha sido ajustada en la f brica Seleccione RET y volver a aparecer la pantalla S...

Page 33: ...ra hacer reparaciones una vez que haya expirado el periodo de garant a consulte a su concesionario o representante de ventas ste juzgar primero si el problema puede solucionarse o no Los servicios que...

Page 34: ...89 9 9 AGC ON AGC HYPER AGC OFF LOW MID HIGH seleccionable 10 Aumento de Autom tico sensibilidad electr nica hasta 32 veces interbloqueado con el modo AGC 11 Balance del blanco ATW ATWex AWC MANU sel...

Page 35: ...8 Appearance View A VIEW A COLOR CAMERA MODEL TYPE SER NO IKEGAMI TSUSHINKI CO LTD MADE IN JAPAN AC230V 50Hz 35mA REV ISD A20 8 40 1 32UN 2B 14 55 62 2 118 2 1 4 20UNC...

Page 36: ...LL CLEAR ID POSITION ID ALL CLEAR UP DOWN ON E E RET LIGHT CONTROL BACKLIGHT CMP OFF W DYNAMIC ADJUST IRIS LEVEL ADJUST ON E 1SPOT E E ADJUST ZONE E RET SPOT ZONE E 2SPOT E ADJUST ZONE 1 E ADJUST ZONE...

Page 37: ...ON MANUAL R GAIN B GAIN E RET E RET E SETUP EXIT SAVE AND EXIT E CANCEL BACK TO PREVIOUS SETTINGS E RESET BACK TO FACTORY SETTINGS L R BUTTONS HELD DOWN E SPECIAL MENU PAGE 1 2 SPECIAL MENU PAGE 2 2 E...

Page 38: ...U S A Phone 201 368 9171 FAX 201 569 1626 Ikegami Electronics Europe GmbH Ikegami Strasse 1 41460 Neuss 1 F R Germany TEL 02131 123 0 FAX 02131 102820 Ikegami Electronics Europe GmbH U K Branch Unit E...

Reviews: