background image

11

3.  

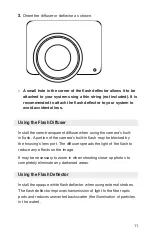
Orient the diffuser or deflector as shown.


»

A small hole in the corner of the flash deflector allows it to be 
attached to your system using a thin string (not included). It is 
recommended to attach the flash deflector to your system to 
avoid accidental loss. 

Using the Flash Diffuser

Install the semi-transparent diffuser when using the camera’s built-
in flash. A portion of the camera’s built-in flash may be blocked by 
the housing’s lens port. The diffuser spreads the light of the flash to 
reduce any effects on the image.
It may be necessary to zoom in when shooting close-up photos to 
completely eliminate any darkened areas.

Using the Flash Deflector

Install the opaque white flash deflector when using external strobes. 
The flash deflector improves transmission of light to the fiber optic 
ports and reduces unwanted backscatter (the illumination of particles 
in the water).

Summary of Contents for 6115.50

Page 1: ...ur product at ikelite com within 15 days of purchase Our product registration database is the best way for us to contact you in the event of a product update Underwater Housing for Sony Cyber shot DSC...

Page 2: ...ly before attempting to operate or dive with this product Please visit ikelite com to register your product to receive information on any updates or notices pertaining to your equipment Included in th...

Page 3: ...is the only system in the tank Most catastrophic floods happen when the user walks away from a housing while it is in the rinse tank Do not use alcohol cleaning agents spray lubricants Rain X or othe...

Page 4: ...ousing 9 Final Check 10 Entering the Water 11 Zoom Control 11 Control Dial 12 Using the Built in Flash 12 Using the Flash Diffuser 12 Installing the Flash Diffuser 12 Setting Up An External Strobe 13...

Page 5: ...5 Lubricating Control Shafts 19 Troubleshooting 21 Spare Parts 23 Limited Warranty 23 Service and Repairs 23 Contact Us 24...

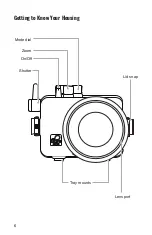
Page 6: ...6 Getting to Know Your Housing Tray mounts Lens port Shutter On Off Zoom Lid snap Mode dial...

Page 7: ...7 O Ring Lanyard mount Control dial Custom Playback Left Down Menu Up Display Right Flash Delete Center Flash pop up Movie...

Page 8: ...ned to break if stress is placed on it This is important so that the user can break free if the equipment is caught on something underwater The lanyard is not designed to support the weight of the hou...

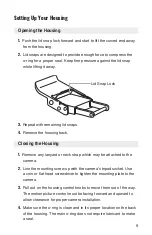
Page 9: ...ck Closing the Housing 1 Remove any lanyard or neck strap which may be attached to the camera 2 Line the mounting screw up with the camera s tripod socket Use a coin or flat head screwdriver to tighte...

Page 10: ...d Close opposing lid snaps at the same time 9 Check the o ring seal The o ring should form a uniform solid line around the back of the housing There will be a small even gap around the housing between...

Page 11: ...camera s built in flash A portion of the camera s built in flash may be blocked by the housing s lens port The diffuser spreads the light of the flash to reduce any effects on the image It may be nece...

Page 12: ...recommend entering the water without your housing to ensure that you are comfortable and your life saving equipment is in working order Once you are stable have someone pass your camera housing to you...

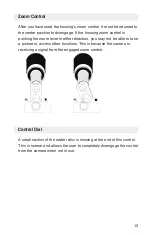
Page 13: ...zoom lever in either direction you may not be able to take a picture or access other functions This is because the camera is receiving a signal from the engaged zoom control Control Dial A small secti...

Page 14: ...on future dives 2 NEVER leave your housing in a fresh water rinse tank even if it is the only system in the tank Collisions with another person s gear can cause scratches or damage to your equipment A...

Page 15: ...atible chemical compound can damage the plastic and o rings and may result in leaking Storage 1 Clean the housing and controls thoroughly prior to storage 2 Remove the rear o ring Place in a small re...

Page 16: ...some breaking force required to move the controls initially after the housing has been in storage for long periods of time Remove controls for lubrication only if they continue to stick after applying...

Page 17: ...vent build up of salt sand or debris the push buttons should be flushed with fresh clean water after every use Depress each push button while the housing is submerged in fresh water If it is necessary...

Page 18: ...aft all of the way through until the flat of the shaft is visible on the outside of the housing 6 Align the knob set screw with the control flat 7 Tighten the set screw firmly against the flat of the...

Page 19: ...racks or tears Take the housing underwater to depth without a camera installed to ensure that the leaking has been corrected Photos are over exposed too light Adjust aperture smaller shutter speed fas...

Page 20: ...arm fresh water Depress each button several times while the housing is submerged Rinse the housing with running fresh water Lubricate the controls Button s or control s not operating Tighten the camer...

Page 21: ...Silicone lubricant 5020 Push button o ring kit 6201 03 Limited Warranty This Ikelite product is warranted against any manufacturing defects for a period of two 2 years from the original date of purch...

Page 22: ...W 33rd St Indianapolis IN 46208 USA 1 317 923 4523 service ikelite com For detailed instructions on returning your product for service including important information on international customs document...

Page 23: ...23...

Page 24: ...24...

Reviews: