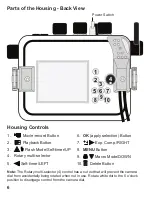
background image

13

Control Maintenance

Ikelite controls are designed to provide years of reliable service 

with minimal maintenance.

- Push button controls normally require no maintenance other than rinsing

in freshwater after saltwater use. Depress each push button in

freshwater several times to eliminate trapped saltwater. If a push button

control becomes difficult to push or if it sticks when depressed, soak the

housing in luke warm freshwater. After a few minutes, operate the push

button. If this does not correct the problem, return the housing to Ikelite

for maintenance. If you are on a trip and unable to return the housing

immediately, a push button may be lubricated by pressing and holding

the push button all the way in. Then, use your finger or other small

object to place a small amount of lube at the base of the shaft inside the

housing. Press and release the push button several times until the lube

is worked up into the o-ring.

- In the unlikely event one of the control shafts sticks or becomes difficult

to operate, you can remove the control from the housing and lubricate it,

or return the housing to Ikelite for maintenance. 

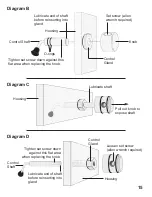
Your housing features both 

round 

and 

hex

style control glands. To

remove a control in a 

round

style gland, Diagram B, page 15, loosen

the set screw in the knob (allen wrench required); remove the knob. If

there is salt or dirt build-up on the exposed control shaft, clean the shaft.

Open the housing and gently slide the control shaft out of the control

gland. Clean and lightly lubricate the shaft and o-rings, including the

large end of the shaft. 
If there is a shutter spring on the Control Shaft, make sure it is in its
proper position. Rotate the Shaft back and forth slightly to aid installation
back into the Control Gland. 
Replace the knob with the Set Screw over the Control Flat. The Set
Screw in the knob should be tightened down against the flat area on the
Control Shaft so the knob does not turn on the shaft.

Summary of Contents for 6183.34 Nikon P340

Page 1: ...6183 34 Nikon P340 Thank you for your purchase of Ikelite equipment Please read this instruction manual completely before attempting to operate or dive with this product Please refer to the back page...

Page 2: ...ash P 8 Closing the Housing P 8 Usage P 9 Final Check P 9 Zoom Control lever type only P 9 Deflector Purpose P 10 Deflector Removal Installation P 10 Diffuser Purpose P 10 Diffuser Installation Remova...

Page 3: ...install a camera Clean the housing main o ring and retest to make sure that it is watertight Refer to the Troubleshooting section page 17 Please read your camera manual thoroughly to have a full under...

Page 4: ...to 200 and AF area mode to Manual Normal Set Autofocus mode to AF S Single AF Set Noise Reduction filter to NR Normal and Built in ND filter to OFF Set Active D Lighting to OFF and Startup zoom positi...

Page 5: ...exposure compensation back away from your subject and zoom in When using an AF35 strobe turn the strobe power down If you own a white camera a reflection of the white camera lens may appear in some of...

Page 6: ...lash Mode Self timer UP 4 Rotary multi selector 5 Self timer LEFT Parts of the Housing Back View 6 1 5 3 2 7 6 9 8 10 4 Power Switch Note The Rotary multi selector 4 control has a cut out that will pr...

Page 7: ...a is secured to the housing back Position the camera on the tray 4 Using a coin or screwdriver preferred secure the camera with the tray mounting bolt which threads into the camera s tripod socket Dia...

Page 8: ...e sides of the housing should be closed at the same time Be sure they are down far enough to engage the lock Housing Back O ring Housing Back O ring Even gap on all four sides Housing Using the Camera...

Page 9: ...d to the center position to disengage If the housing zoom control is pushing the zoom lever in either direction you may not be able to take a picture or access other functions This is because the came...

Page 10: ...ock a portion of the light from the built in camera flash This can result in a shadow in a lower corner of the picture frame The Diffuser will help eliminate the shadow In addition you can zoom in if...

Page 11: ...glass or acrylic in the lens port as a camera lens After use rinse and gently dry the outside lens port to avoid water spotting To clean use a mild soap solution or lens cleaner Do not rinse the insi...

Page 12: ...pply a thin coating of lubricant Only apply enough lubricant to make the o ring feel slick Do Not stretch the o ring This light coating of lubricant will help to keep the o ring from drying out and wi...

Page 13: ...several times until the lube is worked up into the o ring In the unlikely event one of the control shafts sticks or becomes difficult to operate you can remove the control from the housing and lubrica...

Page 14: ...osen the set screw in the knob allen wrench required remove the knob If there is salt or dirt build up on the exposed control shaft clean the shaft Open the housing and gently slide the control shaft...

Page 15: ...ft before reinserting into gland Diagram B O rings Knob Control Gland Housing Lubricate shaft Pull out knob to expose shaft Diagram C Diagram D Loosen set screw allen wrench required Tighten set screw...

Page 16: ...down on subjects as they will quite often blend into the background and be difficult to see in the photograph Shoot subjects straight on or shoot up at a slight angle using the blue water as a contras...

Page 17: ...Maintenance section pages 13 15 Return housing to Ikelite for routine maintenance Problem Solution Image is over underexposed or a corner of the image is dark Check that the camera flash or strobe is...

Page 18: ...condense any trapped moisture forming fog on the lens port Close the housing in an air conditioned room or vehicle or in front of an air conditioner The housing should not be in direct sunlight for a...

Page 19: ...mera installed and pressure test or take diving Return housing to Ikelite for evaluation Problem Solution Pictures are too blue or too green Use custom manual white balance if available Reset for each...

Page 20: ...rate external strobe adds color to restore the warmer colors filtered out by the water as well as to illuminate the subject Add a second strobe to eliminate shadows and evenly light your subjects Vide...

Page 21: ...use only Not recommended when using external strobes UR Pro Filter Lens Port Bayonet mount lenses cannot be used with this housing External Accessory Lenses Please visit www ikelite com for additional...

Page 22: ...Service Department 50 West 33rd St Indianapolis IN 46208 USA Email ikelite ikelite com Phone 317 923 4523 This Ikelite product is warranted against any manufacturing defects for a period of one 1 yea...

Page 23: ...ll products perform as intended Evidence of purchase date must be provided to obtain warranty service No prior authorization is required You may return directly to us or through your dealer Please inc...

Page 24: ...elite Underwater Systems 50 West 33rd Street Indianapolis IN 46208 USA www ikelite com Product Registration Please go to www ikelite com to register your Ikelite housing within 15 days of purchase 201...

Reviews: