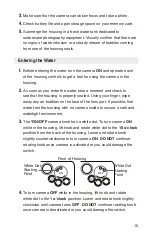
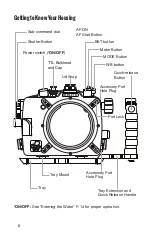
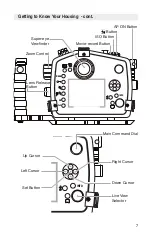
background image

8

Accessory Ports

Your housing features two 1/2-20 threaded Accessory Ports which 
may be used for attachment of factory optional or aftermarket housing 
accessories. Visit ikelite.com for an updated list of factory optional 
accessories.
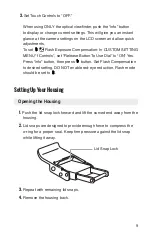
Use the following steps to replace an Accessory Port Hole Plug with 
an accessory fitting:

1.  

Remove the Hole Plug using an 11/16-inch open end wrench.

2.  

Check the accessory fitting o-ring sealing area. If an o-ring is not 

present, use the Hole Plug o-ring. Lightly lubricate o-ring with 
Ikelite Lubricant. Use ONLY Ikelite lubricant, as other manufacturer 
lubricants can cause the o-ring to swell. Check o-ring and o-ring 
sealing area. Both should be clean and free of hair, sand, or other 
debris.

3.  

Carefully screw in and tighten accessory fitting. The accessory port 

features a 1/2-20 threaded hole. Make sure your fitting is the same 
thread pattern. DO NOT cross-thread. DO NOT overtighten.

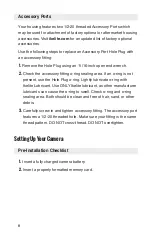
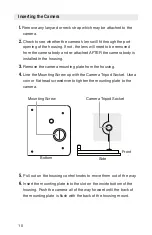
Setting Up Your Camera

Pre-Installation Checklist

1.  

Insert a fully charged camera battery.

2.  

Insert a properly formatted memory card.

Summary of Contents for 6812.5

Page 1: ...ter your product at ikelite com within 15 days of purchase Our product registration database is the best way for us to get a hold of you in the event of a product update or recall UnderwaterHousingfor...

Page 2: ...kelite com to register your product to receive information on any updates notices or recalls pertaining to your equipment IncludedintheBox Housing Aluminum tray Left Hand Quick Release Handle with rub...

Page 3: ...n the rinse tank To prevent salt build up and sticking controls submerge the empty housing in clean freshwater Operate the controls several times each while underwater to flush out any residue Do not...

Page 4: ...allation Checklist 9 Setting Up Your Housing 10 Opening the Housing 10 Inserting the Camera 11 Attaching the Hotshoe 12 Closing the Housing 13 Installing Zoom Clamp and Gear Sleeve 13 Attaching the Le...

Page 5: ...Maintenance 24 Photo Tips 27 Limited Warranty 28 Service and Repairs 29 Contact Us 29 AttachTray HandletoHousing Using a flat head screwdriver attach the Tray and Handle to your housing with the two...

Page 6: ...Button Tray Mount Tray Extension and Quick Release Handle IKELITE Power switch ON OFF TTL Bulkhead and Cap BKT button Tray Shutter Button AF ON AF Start Button Quick release Button Lid Snap Sub comman...

Page 7: ...ont MENU INFO Lv OK Fn2 Zoom Control Super eye Viewfinder AF ON Button Lens Release Button Button ISO Button Movie record Button INFO Lv Left Cursor Set Button Main Command Dial Down Cursor Live View...

Page 8: ...sealing area If an o ring is not present use the Hole Plug o ring Lightly lubricate o ring with Ikelite Lubricant Use ONLY Ikelite lubricant as other manufacturer lubricants can cause the o ring to sw...

Page 9: ...Button To Use Dial to ON Yes Press info button then press button Set Flash Compensation to desired setting DO NOT enable red eye reduction Flash mode should be set to SettingUpYourHousing Opening the...

Page 10: ...3 Remove the camera mounting plate from the housing 4 Line the Mounting Screw up with the Camera Tripod Socket Use a coin or flat head screwdriver to tighten the mounting plate to the camera Mounting...

Page 11: ...obes may be connected to the Converter using an Ikelite to Ikelite single or dual sync cord Use of two strobes requires a dual sync cord Two strobes cannot be controlled by individual Converters even...

Page 12: ...flat against the housing and the lock has engaged Close opposing lid snaps at the same time 6 Check the o ring seal and control functions The o ring should form a uniform solid line around the back o...

Page 13: ...e lens port is required for waterproof operation Never submerge the housing without a lens port attached Attaching the Lens Port 1 Lightly lubricate the o ring on the port extension base When properly...

Page 14: ...type o ring seal LOCKED Position UNLOCKED Position 3 After installing the lens and port turn the Zoom Control knob on the housing If the Zoom Control is difficult to turn the Gear Sleeve may be warpe...

Page 15: ...finger wipe away any air bubbles on the face of the lens port If possible first water test the housing with no camera inside to assure a safe and watertight environment 3 The ON OFF camera knob has a...

Page 16: ...nd to gently flush away any small bubbles that may be on the face of the lens port Bubbles will produce soft focus spots in your photo or video SettingUpAnExternalStrobe We recommend attaching an exte...

Page 17: ...r submerge the housing without either a sync cord or waterproof bulkhead cap attached 1 Remove the bulkhead cap 2 Lightly lubricate the sync cord o rings We recommend using only Ikelite silicone lubri...

Page 18: ...or improved colors when shooting video Maintenance Post Dive 1 Rinse the housing in fresh water Rotate the housing controls and press each button while submerged in fresh water to flush out any salt o...

Page 19: ...to be cleaned wipe with a clean slightly damp cloth 6 Dry the housing with a clean lint free cloth 7 Store in a cool dry place 8 Like regulators and other pressure sensitive equipment we recommend car...

Page 20: ...s properly attached Buttons are stuck Soak the housing in lukewarm fresh water Depress each button several times while the housing is submerged Apply lubricant to the button Press the button several t...

Page 21: ...s in extremely low visibility conditions SpareParts 0132 61 Main o ring 0105 Port o ring 9104 5 Waterproof bulkhead cap 0200 91 Housing body cap 5020 Silicone lubricant Maintenance Lens Port Treat the...

Page 22: ...g to lightly lubricate controls and o rings We recommend you use ONLY Ikelite lubricant on Ikelite products Other brands may cause Ikelite o rings to swell and not seal properly Lubricant is not a sea...

Page 23: ...d snaps in the open position when not using the housing for extended periods Always disassemble and clean the housing Tray Handle s before storage Over time corrosion can make components difficult to...

Page 24: ...0319 12 In the unlikely event one of the control shafts sticks or becomes difficult to operate you can remove the control from the housing and lubricate it or return the housing to Ikelite for mainte...

Page 25: ...ex style control gland These controls can be pulled out exposing the shaft Housing Lubricate shaft Pull out knob to expose shaft To lubricate the control gently pull on the knob until the stainless st...

Page 26: ...rew in the knob should tighten down against the flat area on the control so the knob does not turn on the shaft Close housing without a camera inside and water pressure test in a bathtub or swimming p...

Page 27: ...f you error in exposure it is better to have the image slightly underexposed rather than overexposed An overexposed image is missing color information which cannot be adjusted in a photo processing pr...

Page 28: ...lite Underwater Systems Attn Service Department 50 West 33rd Street Indianapolis IN 46208 USA For the separate international customs documentation form that you complete to accompany the shipment plea...

Reviews: