background image


Piling the stones  


Beware of the sharp edges of the stainless-steel mesh. Use a long-sleeved 

shirt and protective gloves during the installation and once taking the heater 

out of the cardboard box! 


1.


Wash the stones before piling. Olivine, olivine-diabase, peridotite or black volcanite stones are 

recommended stones, in sizes 2-4 inches (5-10 cm) in diameter. 

2.


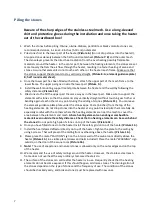
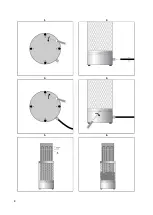
Pile stones first to the lower part of the heater 

(Picture 6.)

 (Do not drop stones into the heater!). 

Also pile stones densely between the half round metal sheet 

(Picture 7: B)

 and the outer mesh. 

The dense layer prevents the direct heat radiation from the overheating possibly flammable 

materials around the heater.  In the center part, between the heating elements, the stones are set 

more loosely that lets the air flow through the heater, resulting in a faster heating of sauna and 

stones. Assure that elements do not touch each other or the heater mesh frame. Make sure that 

the stones support the elements to stay vertically straight. 

(Picture 8: A; element guidance plate / 

B; half round metal sheet).


3.


Once the lower part has been filled with stones, attach the upper part of the mesh frame to the 

lower frame. The upper part goes inside the lower part 

(Picture 9.). 

4.


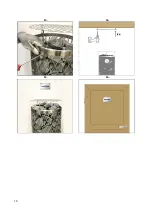
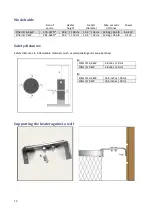
Install the wall-mounting support metal plate between the heater and the wall by following the 

safety distances (

Picture 10.) 

5.


Pile stones to the fill the upper part the same way as in the lower part. Make sure to support the 

elements with stones so that the elements stay vertically straight without touching each other or 

bending against each other at any point during the adding of stones. 

(Picture 11.)

. You can leave 

the element guidance plate plate under the stones appx. 15cm (6 inches) from the top of the 

heating elements. Do not drop stones into the heater at any point instead pile them carefully. Be 

especially careful with the corners where the heating elements are near the mesh to cover the 

area between the elements and mesh. 

A bare heating element can endanger combustible 

materials even outside the safety distances. Check that no heating elements can be seen behind 

the stones! 

Do not put a high pile of stones on top of the heater 

(Picture 12.

). 

6.


Once you have filled stones into the heater Install the safety grid on top of the heater 

(Picture 13.).


7.


Install the heat/steam deflector directly on top of the heater. Tighten the plate to the ceiling by 

using 4 screws. That will prevent the ceiling from overheating above the heater 

(Picture 14.)

8.


Please place the metal “CAUTION” sign on the interior wall of the sauna room directly above the 

heater 

(Picture 15.)

 in a visible place (screws and nails included). Place the metal “WARNING” sign 

outside, on the door of the sauna room 

(Picture 16.).


9.


Note! 

 The use of soapstone and natural stones is allowed only on the outer edges and on the top 

of the heater. 

10.


We recommend the use of safety railings around the heater. However, the stainless-steel mesh 

frame does not overheat the way ordinary steel-cased heaters do. 

11.


The surface of the stones can settle after the heater is in use. Frequently check that the heating 

elements do not become exposed. If this should happen, add more stones. The disintegration of 

the stones depends on the type of stones and the frequency of use. The condition of the stones 

should be checked yearly, and broken stones must be replaced with new ones. 


Summary of Contents for M10066NA

Page 1: ...Instructions for installation and use IKI electric heaters with a mounted unit Pillar IKI 6 6 kW M10066NA Pillar IKI 9 kW M10090NA 2 2022 ...

Page 2: ...1 ...

Page 3: ...ation is complete these instructions must be given to the owner or the person caring for the sauna The sauna heater is intended for the sole purpose of heating the sauna room to a temperature appropriate for bathing Its use for any other purpose is prohibited IKI LLC Address 5621 Dupont Ave S Minneapolis MN 55419 Email ikisaunas gmail com Phone 612 801 7126 www ikikiuas com Contact information ...

Page 4: ... ventilation 18 Gravity ventilation 19 The Sauna Room 20 WARNINGS Keep away from the heater when it is hot The stones and outer surface of the heater may burn your skin Do not throw too much water on the stones The evaporating water is boiling hot Do not let young handicapped or ill people bathe in the sauna on their own This appliance is not intended for use by persons including children with red...

Page 5: ...ipment Do not sleep in the sauna Hyperthermia occurs when the internal temperature of the body reaches a level several degrees above the normal body temperature of 98 6 ºF The symptoms of hyperthermia include an increase in the internal temperature of the body dizziness lethargy drowsiness and fainting The effects of hyperthermia include A Failure to perceive heat B Failure to recognize the need t...

Page 6: ...al must be left with the owner manager or operator of the Sauna after it is tested used by an electrician The heater volume should be suitable for the sauna room volume Model table in page 11 shows the recommended sizes for each heater power output A precondition for the given values is that the sauna room is well insulated Walls and ceiling are covered with wood panels Check that supply voltage a...

Page 7: ...e running inside the wall of the sauna is above 1000 mm from the floor it needs to endure temperatures up to 170Celsius 338Fahrenheit The use of PVC insulated cable as a connecting cable is prohibited due to thermal embrittlement Use grounding terminals provided in sauna heater and control unit to properly ground the equipment as per NEC and local regulations 4 Remove the base plate Picture 1 from...

Page 8: ...any point during the adding of stones Picture 11 You can leave the element guidance plate plate under the stones appx 15cm 6 inches from the top of the heating elements Do not drop stones into the heater at any point instead pile them carefully Be especially careful with the corners where the heating elements are near the mesh to cover the area between the elements and mesh A bare heating element ...

Page 9: ...8 2 1 4 3 6 5 ...

Page 10: ...9 12 11 8 7 10 9 ...

Page 11: ...10 14 13 16 15 ...

Page 12: ...t 3 Timer 4 Heating elements 5 Ground 6 Overheating limit control Supply wires Heater model Input kW Voltage Amps Circuit breaker A Wire Size AWG Pillar IKI 6 6 6 6 240 28 75 30 10 Pillar IKI 9 9 240 37 5 40 6 All supply wire to be 90 C copper ...

Page 13: ...b 6 6 kW Pillar IKI 9 kW 282 565 ft 43 3 110 cm 13 4 34 cm 130 kg 286 lb 9 kW Safety distances Safety distances to inflammable materials such as wall paneling and sauna benches A Pillar IKI 6 6 kW 4 inches 10 cm Pillar IKI 9 kW 4 inches 10 cm B Pillar IKI 6 6 kW 35 4 inches 90 cm Pillar IKI 9 kW 35 4 inches 90 cm Supporting the heater against a wall ...

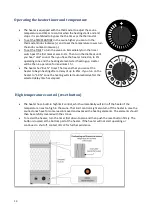
Page 14: ...tion for maximum 1 hr The heater has 8 1hr timer That means that you can set the heater to begin heating after a delay of up to 8hrs If you tun on the heater to 1 9hr zone the heating will start automatically after the selected delay time has elapsed High temperature control reset button The heater has a build in high limit control which automatically will turn off the heater if the temperature ri...

Page 15: ...ter You can adjust the feel of the heat and steam from soft to sharp by throwing water either to the side of the heater or by pouring water on top of the stones at different places Check that the heating elements do not become exposed as the stones shift about due to heat expansion The stones settle normally in the first 10 20 times when heater is used Check the condition of the stones at least on...

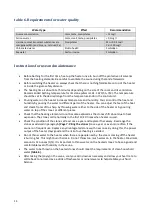
Page 16: ...the stones not water goes through without generating steam Turn the temperature lower from the controller Check that the heater output is not too high Page 12 Model table Check that the heater output is not too high Page 12 Model table Check that the sauna room ventilation has been arranged correctly If the wood panel starts to darken around the heater Check that the requirements for safety distan...

Page 17: ... installation of the replacement part must be carried out by an licensed electrician The guarantee does not cover the faulty part removal or repair costs on the field If the heater is returned to the manufacturer or retailer within 2 years from the date of purchase the importer will provide free repair work but may charge for spare parts if the warranty period has expired The guarantee is void if ...

Page 18: ...ne fractures characteristic to natural stones which do not affect the use or the safety of the heater Damages occurred during shipping must be recorded in the waybill when the product is received or within 7 days of delivery Shipping damage must also always be reported to the shipping company s last contact The damaged part needs to be stored for inspection Insurance compensates for the new part w...

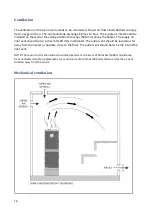
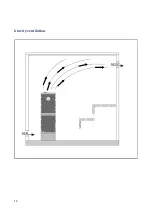
Page 19: ... the heater The supply air inlet vent should be 2 4 inches 50 100 mm in diameter The outlet vent should be located as far away from the heater as possible close to the floor The outlet vent should be twice the size of the inlet vent NOTE The sensor for the thermostat should be located at a minimum of 39 inches 1000 mm distance from undirected vent for replacement air or minimum of 20 inches 500 mm...

Page 20: ...19 Gravity ventilation ...

Page 21: ...um height 75 1900 mm As a result the volume of the sauna is decreased and a smaller heater output may be sufficient The ceiling can be lowered so that the ceiling joists are fixed at a suitable height The spaces between the joists are insulated minimum insulation 4 100 mm and surfaced as described above Because heat goes upwards a maximum distance of 47 1200 mm is recommended between the bench and...

Page 22: ...ut When the walls and ceiling are covered with panels and the insulation behind the panels is sufficient to prevent thermal flow into the wall materials the heater output is defined according to the cubic volume of the sauna Because log walls are heated slowly the cubic volume of a log sauna should be multiplied by 1 5 and the heater output should then be selected on the basis of this information ...

Page 23: ...22 ...

Page 24: ...23 Copyright IKI LLC We reserve the right to changes ...

Reviews: