background image

6

ACCESO LOCAL A LOS STREAMERS

Una vez instalada la estación RNS,
deberán configurarse y ajustarse 

(

*

)


uno

por uno

 todos los módulos streamers que

la componen. El proceso debe llevarse a
cabo en modo local, aun cuando
posteriormente se podrá acceder a cada
módulo desde cualquier PC de la LAN para
comprobar su estado de funcionamiento, o
variar su configuración y ajuste, u obtener
informes diversos.

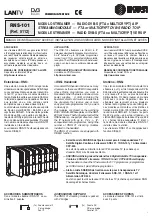
Para el acceso local a los módulos se
utilizará un PC con tarjeta de red Ethernet y
un cable ethernet CAT-5E cruzado. El PC
debe estar configurado con los siguientes
parámetros de 

Propiedades de TCP/IP

:

Dirección IP del PC : 192.168.1.1
Máscara de subred : 255.255.255.0

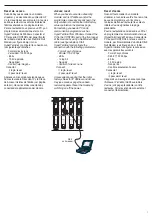
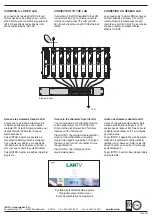
Empezar por el primer módulo. Conectar el
PC a su puerto LAN (RJ-45) de salida (ver
figura abajo). Iniciar el navegador web e
introducir la dirección IP inicial de fábrica
que tienen todos los streamers :

Dirección IP inicial : 

http://192.168.1.4

Pulsar INTRO. Aparece la pantalla de
presentación del programa de configura-
ción y ajuste (ver abajo derecha), en la que
debe introducirse la clave de acceso inicial
de fábrica:

Clave de Acceso inicial: 

admin

Pulsar INTRO. Se muestra la pantalla
inicial del programa.

IMPORTANTE

Las mencionada dirección IP inicial de cada

streamer deberá ser cambiada desde el

programa por otra cuya sección subred sea la

de la LAN. Se recomienda cambiar asimismo la

clave inicial de acceso al programa.
Las nuevas direcciones IP de los streamers y

la clave de acceso al programa de configura-

ción y ajuste deberán ser anotadas en sitio

seguro para evitar tener que hacer un reset de

acceso (ver en página siguiente) cuando se

pretenda acceder a los módulos y se

desconozcan las actuales direcciones IP de los

mismos y/o la clave de acceso al programa.

LOCAL ACCESS TO THE STREAMERS

After installing the RNS headend, you must
configure and set 

(

*

)


one after the other

the streaming modules that make up the
headend. The process will be carried out in
local mode, even if you will be able to
accede later to each module from any PC
of the LAN in order to check its operating
status, to change its configuration and
setting, or to obtain diverse reports.
For local access to the modules you must
use a PC provided with Ethernet adapter
and a crossover CAT-5E ethernet cable.
The PC must be configured with the
following parameters of TCP/IP Properties:

IP address : 192.168.1.1
Subnet mask : 255.255.255.0

Open with the first module. Connect the PC
to its output LAN port (see figure below).
Start the web browser and enter the initial
factory IP address that have all streamers :

Initial IP address : 

http://192.168.1.4

Press INTRO. The programme presentation
screen of the configuration and setting
programme appears (see below at right).
Then type the initial factory access key:

Initial access key: 

admin

Press INTRO. The initial screen of the
programme is shown.

IMPORTANT
The aforementioned initial IP address of each
streamer must be changed through the
programme into another whose subnet section
be that of the LAN. It is advisable to change as
well the initial access key for accesing to the
programme.
The new IP addresses of the streamers and the
programme access key must be noted in a safe
place in order to spare to have to do an access
reset (see on next page) when you want to
accede the modules and you don't know the
current IP addresses of them and/or the access
key of the programme.

ACCÈS LOCAL AUX STREAMERS

Une fois installée la station RNS, on devra
configurer et régler 

(

*

)


un à un

 les modules

streamers qui la composent. Le processus
sera réalisé en mode local, bien que
postérieuremet on pourra accéder à
chaque module depuis un PC quelconque
du réseau LAN pour vérifier son état de
fonctionnement, modifier son configuration
et réglage, ou obtenir renseignements
divers.

Pour l'accès local aux modules on devra
utiliser un PC avec carte Ethernet et un
câble éthernet CAT-5E croisé. Le PC doit
être configuré avec les suivants paramètres
de 

Propriétés TCP/IP

 :

Adresse IP du PC : 192.168.1.1
Masque de sous-réseau : 255.255.255.0

Commencer par le premier module.
Connecter le PC au port LAN (RJ-45) de
sortie du premier module streamer (voir
figure en bas). Initier le navigateur web et
saisir l'adresse IP initiale que ont tous les
streamers :

Adresse IP initiale : 

http://192.168.1.4

Taper INTRO. Il apparaît l'écran de présen-
tation du programme de configuration et
réglage (voir ci-dessous à droite). Saisir le
mot de passe initial d'usine :

Mot de Passe initial: 

admin

Taper INTRO. Il est montré l'écran initial du
programme.

IMPORTANT

La mentionnée adresse IP initiale de chaque

streamer doit être changée depuis le

programme par une autre dont la section sous-

réseau soit celle du LAN. De même il est

recommendable changer le mot de passe initial

d'accès au programme.
Les nouveaux adresses IP des streamers et le

mot de passe d'accès au programme doivent

être notés dans un place sûr afin d'éviter

devoir faire un reset d'accès (voir à la page

suivante) quand l'on prétende accéder aux

modules et ne l'on connaisse pas les actuelles

adresses IP de ceux-ci et/ou le mot de passe

d'accès au programme.

 *El proceso de configuración y ajuste se

explica en el manual correspondiente
disponible en http://www.ikusi.com.

* The configuration and setting process is

explained in the corresponding manual
available on http://www.ikusi.com.

* Le processus de configuration et réglage

est expliqué dans le manuel correspondant
disponible sur http://www.ikusi.com.

Pantalla de presentación del programa

Programme presentation screen

Écran de présentation du programme

+V

LNB

+12V

QPSK IN

CONTROL

+V

LNB

+12V

QPSK IN

CONTROL

+V

LNB

+12V

QPSK IN

CONTROL

+V

LNB

+12V

QPSK IN

CONTROL

Link

Act

LAN

Link

Act

LAN

Link

Act

LAN

Link

Act

LAN

RNS-101

DVB-S RADIO 

Þ

 IPTV

STREAMER

Ref. 5112

RNS-101

DVB-S RADIO 

Þ

 IPTV

STREAMER

SNS-101

DVB-S 

Þ

 IPTV

STREAMER

SNS-101

DVB-S 

Þ

 IPTV

STREAMER

SYNC

STATUS

SYNC

STATUS

SYNC

STATUS

SYNC

STATUS

LAN

LAN

LAN

LAN

CAM

CAM

CAM

CAM

POWER

+12V

5A

+24V

60mA

CFP-500

Ref. 4429

Ref. 5112

Ref. 5101

Ref. 5101

POWER SUPPLY

ethernet

CAT-5E

(crossover)

Summary of Contents for 5112

Page 1: ...E mail sales teletechnique com Web www teletechnique com ABN 34 383 278 861 Multicast streamer for IP broadband networks Up to twenty eight simultaneous satellite radio programs encoded for IP streaming over IP multicast networks Designed and manufactured by Messrs Ikusi of Spain Sold and supported by Teletechnique Beechmont in Queensland ...

Page 2: ...ugh 2x female F DC connection banana socket CAM entrance Configuration RS 232 DB 9 Ethernet output RJ 45 J General Supply voltage Vdc 12 Consumption mA 310 without CAM 480 with CAM Max DiSEqC current mA 300 Indicator leds ON STATUSJ LINK ACT Operating temperature C 0 45 Dimensions mm 230 x 195 x 32 Each module is packed with 1 F plug bridge 64 mm length for input tap line 1 DC plug bridge 53 mm le...

Page 3: ...RNS 101 Ref 5112 FTA or MultiCrypt DVB S Radio IP Streamer Common Interface Configuration and Settings User Manual Television on IP Networks ...

Page 4: ...tion and Setting of the RNS 101 Streamer Module September 2008 Revision A IKUSI Ángel Iglesias S A Paseo Miramón 170 20009 San Sebastián SPAIN Tel 34 943 44 88 00 Fax 34 943 44 88 11 www ikusi com User Manual EN ...

Page 5: ...eneral Report 12 Chapter Two RNS 101 Streamer Settings 13 DiSEqC Configuration 14 Input Settings 15 17 Output Settings 18 20 SAP SDP Channel Settings 21 CAM User Menu 22 SNMP Configuration 23 24 Chapter Three RNS 101 Streamer Status Information 25 Status Information 26 Chapter Four RNS 101 Streamer Reports 27 Input Services 28 Output Streams 29 System Logs 30 3 ...

Page 6: ... module Characteristics Input 1 DVB S transponder signal with FTA or encrypted Radio programmes Output up to 28 simultaneous IP encapsulated Radio programmes with individual multicast addresses Information filtering of DVB tables UDP RTP transmission protocols Web interface for configuration and setting Alarm information SNMP agent SAP SDP protocols which facilitate automatic service selection on ...

Page 7: ...Chapter One Configuration of the RNS 101 Streamer In this Chapter Configuration Save Restore General Report 5 ...

Page 8: ... may or may not be incorporated into the output data stream On the left of this screen are the menus that access all of the programme s functionalities Click on the General menu on the left of the screen to display a dropdown list containing the 3 options Configuration Save Restore and General Report Click on Configuration The Configuration window will appear Identification The identification card...

Page 9: ...r the postcode of the installation site if required Installer The installer s identification details can be entered here Contact Then enter their contact details telephone number email Installation date The date on which the streamer module was installed can be entered here Click on the Save button at the bottom of the window to store the information on the streamer module this information is then...

Page 10: ...by consulting the DHCP server management system IP Address Enter the IP address that you wish to assign to the streamer This address must fall within the range of local network addresses Network mask Enter the local network mask Default gateway Enter the IP address of this gateway This information is only required if you want the streamer to access Internet Primary DNS server Enter the primary ser...

Page 11: ... not know the old password i e the password used to access the current configuration session you must perform a Password Reset as explained in the Installation and Access manual Following this reset the program password will be the default password admin IMPORTANT When you perform a password reset the IP address assigned to the streamer on the Network card previous page automatically changes to th...

Page 12: ...s basic operation Figure 1 6 Update Firmware card of the Configuration window WARNING The firmware update file will have been previously stored on the PC hard drive You can download it from http www ikusi com Click on Browse and select the firmware update file from the hard drive When the file name is in the box click on Start The new firmware will be installed on the streamer and then its name wi...

Page 13: ...n Save configuration Select the option in the window and click on Start A window is displayed which allows you to select the destination folder for the data file for the current streamer configuration Restore Configuration Select this option in the Save Restore window Figure 1 7 and click on Start The Restore Configuration window is displayed Fig 1 8 Click on Browse and select the file containing ...

Page 14: ...Report window is displayed This window provides complete information on the RNS 101 module not only regarding the configuration described in the previous pages but also in relation to the current settings parameter values and operational status The information contained in this window can be printed by clicking on the Print page button at the bottom of the screen General Report ...

Page 15: ...Chapter Two RNS 101 Streamer Settings In this Chapter DiSEqC Configuration Input Settings Output Settings SAP SDP Channel Settings CAM User Menu SNMP Configuration 13 ...

Page 16: ...number of SAT inputs of the multiswitch if there is no multiswitch and the matter is to feed control an LNB choose 4 When choosing a multiple pop up box with a number of rows equal to the number chosen appears on the field below see Figure 2 2 Description of each input If there is no multiswitch and the streamer has to feed control an LNB fill the polarity band columns with the selections that app...

Page 17: ...frequency band is 950 2150 MHz known as satellite intermediate frequency or simply IF The value to enter for a particular transponder can be obtained by subtracting the transponder s frequency from the LNB local oscillator frequency The operational frequencies are the following Satellite transponder frequency band 10700 12750 MHz Local Oscillator frequency on Standard LNB s Two possible values 975...

Page 18: ... Mode Once the data is entered click on Save to conclude the input settings Transponder setting mode is selected Figure 2 5 Input window Transponder Mode LNB Standard The window adds 5 auxiliary boxes to those described above for the IF setting mode The programme itself will complete the Intermediate Frequency MHz box based on the data entered in the mentioned auxiliaty boxes as indicated next Inp...

Page 19: ...enter this value if you have selected Special LNB High LO Frequency MHz As above IF Band Select Low or High from the drop down list depending on the transponder frequency low for 10700 11700 MHz and high for 11700 12750 MHz When the selection is complete the corresponding value will automatically be calculated by the programme and displayed in the Intermediate Frequency box Input Rate MS s This pa...

Page 20: ... correct speed for its projection in real time Time To Live Is a parameter used to restrict the stream multicasting range A number between 1 and 255 is entered in this box Each time that an IP stream passes through a router the TTL is reduced by one unit The stream will be rejected by any router when the TTL value is reduced to zero QoS Quality of Service The drop down list offers five differentia...

Page 21: ... input DVB S transport stream including different details name type identifier main PID provider Highlighted in orange are those services which are already configured as IP streams seen in the display table in the Output window and highlighted in green are those which are not yet configured To add a stream to the display table select the button for the corresponding Radio program in the first colu...

Page 22: ... subscriber s set top box or reproducer if the device supports SAP SDP protocol The name that the service has on the input transport stream is the default name Channel Number Enter the order number you want to assign to the Radio program on the subscriber s set top box or reproducer if the device supports SAP SAP Group Select from the drop down menu the SAP group to which you want to link the prog...

Page 23: ... an EPG type program guide SAP Activated Check the box if you wish to transmit the program guide SAP IP address This data cannot be changed It is the IP address assigned to the streamer module on the Network tab in the Configuration window page 8 Username The name entered will be transmitted on the SAP SDP channel Group As above Time interval between SAP announcements Introduce the time interval i...

Page 24: ...accede to the Card option you must press the key 1 of the keyboard number 1 will be shown in the lower box see Figure 2 12 and next you must click on the Send button The window of Figure 2 13 appears This window besides to inform about the card serial number and the stored maturity level allows to change this level through the Change Maturity option via keyboard and Send button as explained CAM Us...

Page 25: ... Identify CFP 702 Enter a name for the CFP 702 linked to the present streamer module Minimum Alarm Duration Enter the minimum duration in seconds of an alarm event so that it be considered as such by the SNMP manager Send Traps Continuously Tick the box if you want that to an alarm event the related trap be sent repeatedly to the manager If this box is ticked the two next ones are disabled Trap Se...

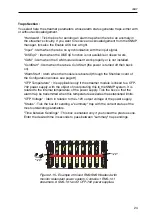
Page 26: ...tus Tick the box for sending a summary trap with the current status of the most outstanding parameters Time between Sendings This box is enabled only if you ticked the previous one Enter the desired time in seconds to pass between summary trap sendings VLNB 12V QPSK IN CONTROL VLNB 12V QPSK IN CONTROL VLNB 12V QPSK IN CONTROL VLNB 12V QPSK IN CONTROL VLNB 12V QPSK IN CONTROL VLNB 12V QPSK IN CONTR...

Page 27: ...Chapter Three RNS 101 Streamer Status Information In this Chapter Status Information 25 ...

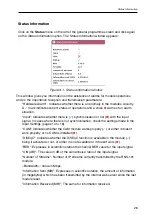
Page 28: ...onisation check the settings made in the Input Settings pages 14 to 16 CAM Indicates whether the CAM module works properly or either it doesn t work properly or no CAM is installed DiSEqC Indicates whether the DiSEqC function is available in the module being it activated or not or either it is not available or it doesn t work BER Expresses in scientific notation the channel BER value for the input...

Page 29: ...Chapter Four RNS 101 Streamer Reports In this Chapter Input Services Output Streams System Logs 27 ...

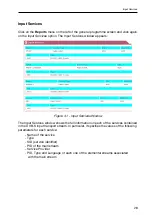
Page 30: ...the full information on each of the services contained in the DVB S input transport stream In particular it specifies the values of the following parameters for each service Name of the service Type SID service identifier PID of the main stream Service Provider PID Type and Language of each one of the elemental streams associated with the main stream Figure 4 1 Input Services Window Input Services...

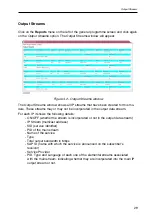
Page 31: ... shows the following details ON OFF whether the stream is incorporated or not in the output data stream IP Stream multicast address SID service identifier PID of the main stream Name of the service Type Total output bandwidth in Mbps SAP ID name with which the service is announced on the subscriber s receiver Service Provider PID Type and Language of each one of the elemental streams associated wi...

Page 32: ...0 System Logs Click on the Reports menu on the left of the general programme screen and click again on the System Logs option The System Logs window will appear Figure 4 3 System Logs window System Logs ...

Page 33: ...IKUSI Ángel Iglesias S A Paseo Miramón 170 20009 San Sebastián SPAIN Tel 34 943 44 88 00 Fax 34 943 44 88 11 www ikusi com ER 0149 1996 ...

Page 34: ...uez R D Manager DVB S RADIO IP Streamer with Common Interface RNS 101 is in conformity with Council Directive 89 336 EEC EMC Directive Standards to which conformity is declared Information Technology Equipment Radio disturbance characteris tics Limits and methods of measurement Information Technology Equipment Inmunity characteristics Limits and methods of measurement x x EN 55022 1998 EN 55024 19...

Page 35: ...et top box o un software reproductor de vídeo audio MANUAL DE CONFIGURACION Y AJUSTE Disponible en formato PDF en http www ikusi com APPLICATION The RNS 101 streamers are DVB S to IP gateways designed to broadcast in multicast on an IP network up to 28 Radio programmes issued from FTA or encrypted digital satellite reception TheIPRadiostreamscanbelistened using a set top box or a software video au...

Page 36: ...rect If it flashes green the streamer has not acquired the input signal If it is off and the STATUS led flashes red quickly firmware error STATUS If it is off the hardware works correctly It lights red while the module is carrying out an operation If it lights permanently red there is an operatigng alarm or the module is damaged INDICATEURS LED SYNC Les indications de la led SYNC doivent être cons...

Page 37: ... FEATURES PID filtering PSI SI parsing ECM and EMM transparent passthrough Regeneration of PAT and PMT tables Passthrough or blockade of CAT NIT SDT EIT and TDT tables QoS marking configurable TTL configurable Caractéristiques Entrée 1 signal de transpondeur DVB S avec des chaînes Radio en clair ou cryptées Sortie jusqu à 28 chaînes Radio simultanées encapsulées IP avec adresses individuelles mult...

Page 38: ...RTING CAM AND SMART CARD INSERTION DU CAM ET DE LA CARTE V LNB QPSK IN RNS 101 SYNC STATUS 12V CAM CONTROL DVB S RADIO Þ IP STREAME R Ref 5112 Link Act LAN TARJETA DEL OPERADOR OPERATOR S SMART CARD CARTE DE L OPÉRATEUR CAM contactos contacts contacts borde ancho thick rim bord épais V LNB QPSK IN RNS 101 SYNC STATUS 12V CAM CONTROL DVB S RADIO Þ IP STREAME R Ref 5112 Link Act LAN CAM SYNC STATUS ...

Page 39: ...ONEXION DE LA SEÑAL FI SAT CONNECTION OF THE SAT IF SIGNAL RACCORDEMENT DU SIGNAL BIS a Instalando líneas de derivación Installing tap lines En installant des lignes de dérivation 1 tap line must be created for each group of streamers that are going to use the same IF input signal satellite polarisation band The DiSEqC function will have to be compulsorilyactivatedonthestreamersthat receivethedown...

Page 40: ...e changed through the programme into another whose subnet section be that of the LAN It is advisable to change as well the initial access key for accesing to the programme The new IP addresses of the streamers and the programme access key must be noted in a safe place in order to spare to have to do an access reset see on next page when you want to accede the modules and you don t know the current...

Page 41: ...15 200 bps 8 bits 1 bit de stop Non parité Contrôle écoulement aucun Connecter i login reset ii password reset Il apparaît un message en annonçant que l Adresse IP et le Mot de Passe initials d usine voir page précédente ont été restaurés Faire reset en déconnectant et connectantl alimentation Reset de acceso Cuando hay que acceder a un módulo streamer y se desconocen su dirección IP y o la clave ...

Page 42: ... SPAIN Tel 34 943 44 88 00 Fax 34 943 44 88 11 www ikusi com 1 2 3 4 5 6 7 8 9 10 11 12 13 14 15 16 Power VLNB 12V QPSK IN CONTROL VLNB 12V QPSK IN CONTROL VLNB 12V QPSK IN CONTROL VLNB 12V QPSK IN CONTROL VLNB 12V QPSK IN CONTROL VLNB 12V QPSK IN CONTROL Link Act LAN Link Act LAN Link Act LAN Link Act LAN Link Act LAN Link Act LAN VLNB 12V QPSK IN CONTROL Link Act LAN VLNB 12V QPSK IN CONTROL Lin...

Reviews: