background image

4

General safety instructions


J

Read this entire user manual carefully before plugging in the unit.


J

Keep these instructions to hand during unit installation.


J

Follow all the instructions and safety notices when handling the unit.

Types of notices

The safety notices used in this manual and their meanings are described below:

DANGER OF DEATH OR INJURY

This safety notice indicates a potential hazard to people’s lives and/or health. Failure to 

follow these instructions can lead to severe health consequences and may even cause 
fatal injuries.


J

Do not install the unit during electrical storms. This could lead to electro-static 

discharge from lightning.


J

Do not open the unit. You may suffer an electric shock.

RISK OF DAMAGE TO THE UNIT

This safety notice indicates a potentially hazardous situation. Failure to follow these 

instructions may cause material damage to the unit.


J

Keep the unit well-ventilated at all times. Install the unit in an area free of dust. Do 
not place the unit in a place where the ventilation slots may become blocked or 

obstructed.  

Leave a distance of at least 20 cm all around the unit’s sides. We recommend insta-
lling the unit in the VERTICAL position.


J

Do not expose the unit to rain or moisture. Install in a dry location where potential 
leaks or condensation will not occur. In the event that liquid gets into the device, 

disconnect it immediately from the alternating current.


J

Keep flammable objects, candles and anything that may cause a fire away from the 
unit.


J

Connect the unit to an easily-accessible mains outlet, so that the unit can be quickly 

disconnected from the outlet in case of emergency.


J

Do not expose the unit to sources of heat (sunlight, radiators, etc).

NOTE. 

Do not expose the unit to sources of heat (sunlight, radiators, etc).

DANGER

ATTENTION

Summary of Contents for MAC-HD

Page 1: ...MAC HD REF 4493 Standalone High Definition Modulator DVB T DVB C or IP output Multiple inputs 2xCVBS HDMI HD SDI Installation user guide ...

Page 2: ...2 ...

Page 3: ...Quick guide 12 Initial set up 12 Advanced mode 12 General 13 Date and Time settings 12 Block LCD and joystick control button 12 Restoring factory settings 13 Firmware updates 13 Settings 13 Configuration of INPUT signals 14 Configuration of carrier services 14 Configuration of OUTPUT signals 15 Network configuration 16 Unit status 16 Unit information 16 Unblocking the unit 17 USB PLAYBACK Function...

Page 4: ...ituation Failure to follow these instructions may cause material damage to the unit J J Keep the unit well ventilated at all times Install the unit in an area free of dust Do not place the unit in a place where the ventilation slots may become blocked or obstructed Leave a distance of at least 20 cm all around the unit s sides We recommend insta lling the unit in the VERTICAL position J J Do not e...

Page 5: ...ndicates that users should not handle any internal parts that could affect its working order or warranty DO NOT DISPOSE OF UNIT AS NORMAL DOMESTIC URBAN WASTE This type of notice indicates that the unit should not be disposed of as unselected domestic urban waste ...

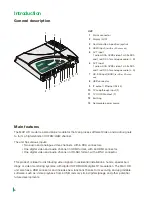
Page 6: ... systems with digital COFDM QAM digital TV modulation The MAC HD unit also has a USB connector and includes new functions thanks to its evolving and upgradable software such as video playback from a USB memory stick digital signage and other potential future developments KEY 1 Mains connector 2 Display LCD 3 Control button 5 position joystick 4 HDMI input for HD or SD channels 5 AV 1 input 1 yello...

Page 7: ...nnection with web browser Easy to configure Signal processing CVBS video input and mono stereo audio HDMI input does not process HDCP encrypted signals HD SDI Input Standard SD and HD quality signal Supported colour encoding systems PAL SECAM NTSC B W RF DVB T C output adjustable throughout the whole CATV band 47 MHz 862 MHz IP output configuration via ethernet software vers 2 0 only Looptrough fo...

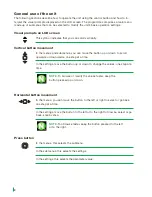
Page 8: ...or down to scroll upwards or downwards one step at a time In the settings move the button up or down to change the values one step at a time NOTE To browse or modify the values faster keep the button pressed up or down Horizontal button movement In the menus you can move the button to the left or right to select or go back one step at a time In the settings move the button to the left or to the ri...

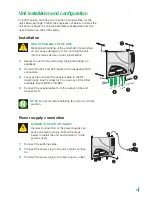
Page 9: ...he AV1 and AV2 inputs to the respective RCA connectors 3 You may also connect the coaxial cable to the RF loopthrough input connector F or use any of the other available inputs HDMI HD SDI 4 Connect the coaxial cable from the output to the unit connector F NOTE We recommend installing the unit in a vertical position Power supply connection DANGER OF DEATH OR INJURY Incorrect connection of the powe...

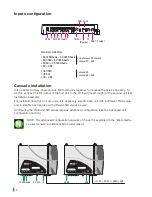
Page 10: ...th different SID values as well Configuring the TSID and SID values requires advanced configuration see the Advanced unit configuration section NOTE The advanced configuration process of the unit is explained in the Web interfa ce user manual available at http www ikusi tv HDMI USB SD SDI 1 CVBS Audio TV AV SD SDI HDMI USB TV Possible combinations SD CVBS Audio SD CVBS Audio SD HDMI SD CVBS Audio ...

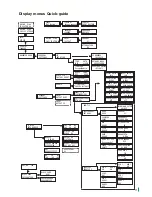
Page 11: ...XX DVB T C ONID 08442 COFDM QAM OUTPUT ON OFF VID 1 AUD 1 ON ON VID 2 AUD 2 ON ON SUPPLIER IKUSI Channel 21 BANDWIDTH 8 MHz LCN 1 001 LCN 2 001 NID 00001 MODE NIT LCN Europe model FREQUENCY 474 000 MHz INTER GUARDE 1 32 SID 1 00001 SID 2 00001 TSID 00004 INSER TDT TOT ON OFF ATTENUATION 00 CONSTELLATION 64 QAM COFDM MODE 2K CODE RATE 7 8 RF OUPUT ON NAME 1 XXX NAME 2 XXX SERVICE 1 SERVICE 2 NETWOR...

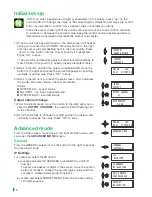
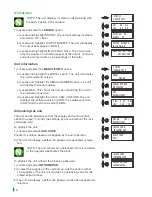
Page 12: ...you reach the start screen which displays the model firmware version channel and status Status SYSTEM OK correct status NO INPUT no input signal detected SYSTEM NOK incorrect status Output channel change 1 From the start screen move the button to the right until you lo cate the OUTPUT CHANNEL the cursor will start flashing next to the channel 2 Scroll horizontally to change from digit position to ...

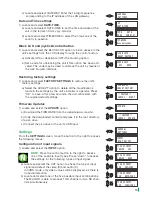
Page 13: ...ngs 1 Locate and select FACTORY SETTINGS to restore the unit s factory settings a Select the ACCEPT option to delete all the modifications made in the settings by the unit s installer or operator Press OK to save After a few seconds the unit will restart with the original default settings Firmware Updates 1 Locate and select the UPDATE option a Download the FIRMWARE from the website www ikusi tv b...

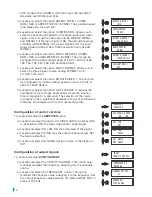
Page 14: ...he codification time for those applications where the reaction time is important i e cameras The selection of the mode low latency has a significant decrease in terms of codification efficiency and images with much movement quality Configuration of carrier services 1 Locate and select the SERVICES option a Locate and select the option CH VIDEO AUDIO Activate ON or deactivate OFF the input video an...

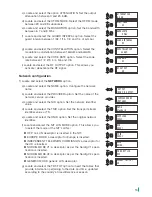
Page 15: ...lect the NID option Set the network identifier value d Locate and select the TSID option Set the transport stream identifier value or TS e Locate and select the ONID option Set the original network identifier f Locate and select the NIT LCN MODE option This allows you to select the mode of the NIT s LCNs OFF no LCN descriptor is inserted in the NIT EUROPE MODE a descriptor for Europe is inserted I...

Page 16: ... V HW and the start up system V BS Unblocking the unit The unit can be blocked so that the display and control button cannot be used to modify the settings by anyone without the lock code password To unblock the unit 1 Locate and select LOCK CODE 2 Enter the unlock password assigned by the unit operator 3 The unit will display whether the password is accepted or rejec ted NOTE The unit will remain...

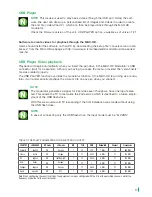
Page 17: ...HD is working as a modu lator it will automatically playback the video ts file on any pen drive you connect NOTE The modulator generates a signal for 2 services even though we have one input selec ted This allows the TV to memorize the 2nd service which is destined to a future emplo yment of the USB flash drive With this we would avoid TV rescanning if the first installation was made without using...

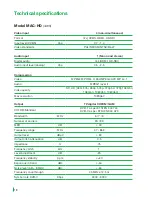
Page 18: ...20p 1080i50 1080i60 1080p50 1080p60 Max resolution 1080p60 Output TV digital COFDM QAM COFDM Standard DVB T as per ETSI EN 300 744 DVB C as per ETSI EN 300 429 Bandwidth MHz 6 7 8 Number of carriers 2K 8K MER dB 40 Frequency range MHz 47 862 Output level dBμV 80 Output pitch attenuation dB 0 5 Impedance Ω 75 Frequency pitch kHz 1 Level adjustment dB 25 Frequency stability ppm 30 Espurious in band ...

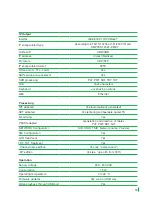
Page 19: ... 5 positions Web Ethernet Processing NIT adapted Yes automatically generated SDT adapted Yes entering configurable name TS Monitoring Yes PSI SI adapted Generation and insertion of tables PAT PMT SDT NIT NETWORK Configuration NID ONID TSID Network name Provider SID Configuration Yes LCN Treatment Yes TDT TOT Treatment Yes Channel name edition Yes ex camera pool EIT edition Yes ex open 9h from 18h ...

Page 20: ...defects and shall repair the receiver or replace it for another corresponding to the state of technology at that time The warranty does not cover any faults or defects due to misuse or non fulfilment of the information given in this installation manual All complaints other than those indicated are not included in the warranty More specifically the warranty does not cover services provided by the a...

Page 21: ...04 108 CE EMC Directive Standards to which conformity is declared Luis Rodríguez Navarrete R D Director AV COFDM Autonomous Modulator MAC HD EN 50083 2 2007 Cabled distribution systems for television and sound signals Part 2 Electromagnetic compatibility for equipment is in conformity with EN 60728 11 2005 Cabled Distribution Systems for Television and Sound Signals Part 11 Safety Requirements EN ...

Page 22: ...22 Safety Instructions ...

Page 23: ...23 ...

Page 24: ...MAC HD EN Pº Miramón 170 20014 San Sebastián SPAIN Tel 34 943 44 88 00 Fax 34 943 44 88 20 television ikusi com www ikusi tv ...

Reviews: