HALLEY BKA 2000
Operating manual - English
16
6.2
Cutting operations
To work in complete safety, pay special attention to the following recommendations:
•
Always work with dry hands.
•
Check that the machine is properly earthed.
•
Use the protective goggles, even if the cutting tool is fitted with a protective shield.
•
Start the motor only when all the operations with the carriage have been carried out
(securing keys, etc.).
•
Keep hands away from the cutting tool when in motion.
1) After having connected the machine to the mains, press the main switch (A) (fig. 5, page 8).
2) move the clamp unit towards the cutter unit using the lever (F).
3) for cutting the keys, use one of the sides of the clamp according to the type of key (chap. 6.3, page
16). Turn the clamp to the desired side; proceed as follows:
a) loosen the clamp fastening knob (I) by turning it anticlockwise until the pins protrude from the
guide.
b) turn the clamps (L) and (M) and position them as desired.
c) tighten the clamp fastening knob (I) until the clamps are fastened.
6.3
Key cutting
1) Position the sample key into the left clamp (L) and fasten it; position the key blank into the right (M)
and fasten it.
2) turn the machine on using the switch (A).
Important: move the carriage by raising the knob (C), this makes it move towards the cutter with
the key tilted thus aiding the cut, using the lever (F).
3) carry out the cut.
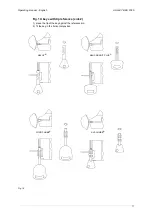
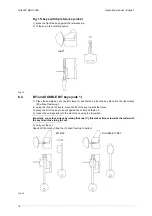
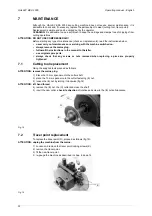
4) there may be different types of key to cut and therefore different references. The keys are to be
positioned in the clamps in the way described in fig.14,fig.15, fig.16 and fig.17.
Fig. 13
1
2
SIDE 2
Key-cutting:
- ABLOY®
- ABUS GRANIT / PLUS®
- AVA CHUBB®
- FORD CHUBB®
- IFAM®
- LUMA®
SIDE 1
Key-cutting:
- BIT KEYS
- DOUBLE BIT KEYS
- PUMP KEYS


