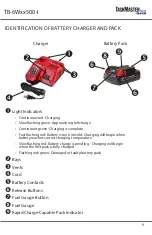
background image

12

TB-6Wxx500-I

BATTERY PACK

FUEL GAUGE

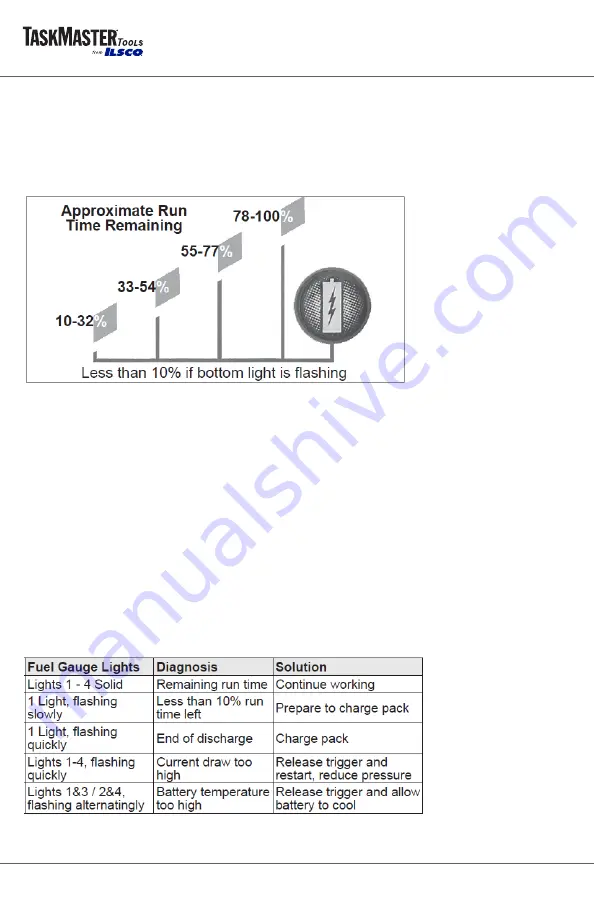
Use the Fuel Gauge to determine the battery pack‘s remaining run time. Press the Fuel Gauge 

button to display the lights. The Fuel Gauge will light up for 2-3 seconds. When less than 10% of 

charge is left, 1 light on the fuel gauge will flash slowly. 

NOTE: If the Fuel Gauge doesn‘t appear to be working, place the battery pack on the charger and 

charge as needed.

Compared to NiCd battery pack types, MILWAUKEE Li-Ion battery packs deliver fade-free power 

for their entire run time. The tool will not experience a slow, gradual loss of power as you work. To 

signal the end of discharge, 1 light on the fuel gauge will flash quickly for 2-3 seconds and the tool 

will not run. Charge the battery pack.

NOTE: Immediately after using the battery pack, the Fuel Gauge may display a lower charge than it 

will if checked a few minutes later. The battery cells recover some of their charge after resting. 

BATTERY PACK PROTECTION

To protect itself from damage and extend its life, the battery pack‘s intelligent circuit monitors 

current draw and temperature. In extremely high torque, binding, stalling, and short circuit 

situations, the battery pack will turn OFF the tool if the current draw becomes too high. All the fuel 

gauge lights will flash. Release the trigger and restart. Under extreme circumstances, the internal 

temperature of the battery could become too high. If this happens, the fuel gauge lights will flash 

in an alternating pattern and the tool will not run. Allow the battery to cool down. 

Summary of Contents for TaskMaster TB-6W 500-I Series

Page 1: ...xx500 I Read and understand all of the instructions and safety information in this manual before operating or servicing this tool TASKMASTER TOOLS 4730 Madison Road Cincinnati OH 45227 www ilsco com P...

Page 2: ...nd Parts List 22 Head Assembly Breakdwon and Parts List 23 Thank you for buying a TASKMASTER TOOL Our mission is to bring product innovation and exceptional customer service to the marketplace This to...

Page 3: ...oning Your first reconditioning is on us Call us after about 20 000 cycles To Find a TASKMASTER PRO Service Partner Call ILSCO for assistance in solving tool performance issues or for any of your serv...

Page 4: ...ection used for appropriate conditions will reduce personal injuries Do not overreach Keep proper footing and balance at all times This enables better control of the battery operated tool in unexpecte...

Page 5: ...y be ejected from the battery avoid contact If contact accidentally occurs flush with water If liquid contacts eyes additionally seek medical help Liquid ejected from the battery may cause irritation...

Page 6: ...6Wxx500 I Crimping Jaw Head Release Lever Release Button USB Interface Maintenance Status Light Carrying Loop Battery Pack Battery Release Buttons Battery Status Light Advance Trigger Label IDENTIFICA...

Page 7: ...7 TB 6Wxx500 I KIT INCLUDES 1 Battery Powered Tool 2 Milwaukee Batteries 1 Milwaukee Charger 1 USB Cord 1 Shoulder Strap 1 Case...

Page 8: ...m ion Charging time 60 min approx Hydraulic oil Shell Tellus S2 V 15 Operating temperature range 4 to 122 F Dimensions 20 in x 3 1 in x 5 2 in L x H x W Weight 8 1 lbs including battery Connector Rang...

Page 9: ...is complete Fast flashing red Battery is too hot cold Charging will begin when battery reaches correct charging temperature Slow flashing red Battery charge is pending Charging will begin when the fi...

Page 10: ...fully discharged battery pack with an internal temperature in the normal range will charge in about 30 to 185 minutes depending on the battery pack Heavily cycled batteries may take longer to charge...

Page 11: ...parts MOUNTING TO THE WALL Use the wall mount guides to mark the hanging points To reduce the risk of injury always unplug the charger and remove the battery from the charger before performing any ma...

Page 12: ...ckly for 2 3 seconds and the tool will not run Charge the battery pack NOTE Immediately after using the battery pack the Fuel Gauge may display a lower charge than it will if checked a few minutes lat...

Page 13: ...umentation requirements for shipping Li Ion batteries is dependent upon whether the particular batteries is dependent upon whether the particular batteries are rated greater than or less than 100 Wh G...

Page 14: ...ty goggles and keep fingers away from crimping head ATTACH HEAD 1 Turn lever clockwise or counter clockwise so it sits at 12 00 position 2 Pull straight out 3 Slide crimping jaw into body 4 Slighty sq...

Page 15: ...ng gently Do not press the side buttons when pulling the cartridge SHOULDER STRAP Be sure to use the shoulder strap when using and or transporting the tool ADVANCE TRIGGER AND RELEASE BUTTON 1 The cri...

Page 16: ...the connector between the dies 4 Press the advance trigger and advance the ram so that the connector is held between the dies and insert conductor into the terminal 5 Press the advance trigger until t...

Page 17: ...pe the crimping head jaws free of metal shavings Wipe down all steel parts with WD 40 Store the tool in a non humid environment The tool should provide many years of service when given the proper main...

Page 18: ...e OK and interval of maintenance passed due red flashing Operating value at limit contact customer service red light Operating value faulty or hardware malfunction request assistance orange light Temp...

Page 19: ...ore recommended Hard Drive 200 MB 1 GB recommended Screen resolution 1024 x 768 or higher at least 65 535 colors Other CD ROM USB 2 0 How to Download Software 1 Go to www Ilsco com 2 Click the Technic...

Page 20: ...20 TB 6Wxx500 I TOOL PARTS BREAKDOWN 1 2 3 4 5 6 7 2 8 2 3 9 10 11 12 13 15 16 17 18 14...

Page 21: ...Body Assembly 1 5 713336 Locking Screw 1 6 715330 Housing Front 1 7 714155 Housing Screw 5 8 715253 Release Button 1 9 710771 LED Cap 1 10 710825 Compression Spring 1 11 710806 Advance Trigger 1 12 7...

Page 22: ...on Qty 1 706001 Compression Spring 2 2 715138 Unlocking Pin 2 3 715136 Compression Spring 1 4 715137 Cylindrical Roller 1 5 715128 Jaw 2 6 715139 Hexagonal Nut 2 7 715132 Bracket 2 8 704052 Locking Ri...

Page 23: ...149 Locking Lever 1 4 715115 Protective Sleeve 1 5 715146 Roll 2 6 715144 Coiled Spring Pin 1 7 715145 Pillar 1 8 101660 Needle Roller 1 9 710822 Compression Spring 1 10 715143 Base 1 11 706470 O Ring...

Page 24: ...18 Version 2 TASKMASTER TOOLS 4730 Madison Rd Cincinnati OH 45227 Phone 800 776 9775 513 533 6200 www ilsco com ILSCO CANADA 615 B Orwell St Mississauga ON L5A 2W4 Canada Phone 800 665 2607 905 274 23...

Reviews: