background image

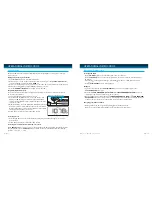
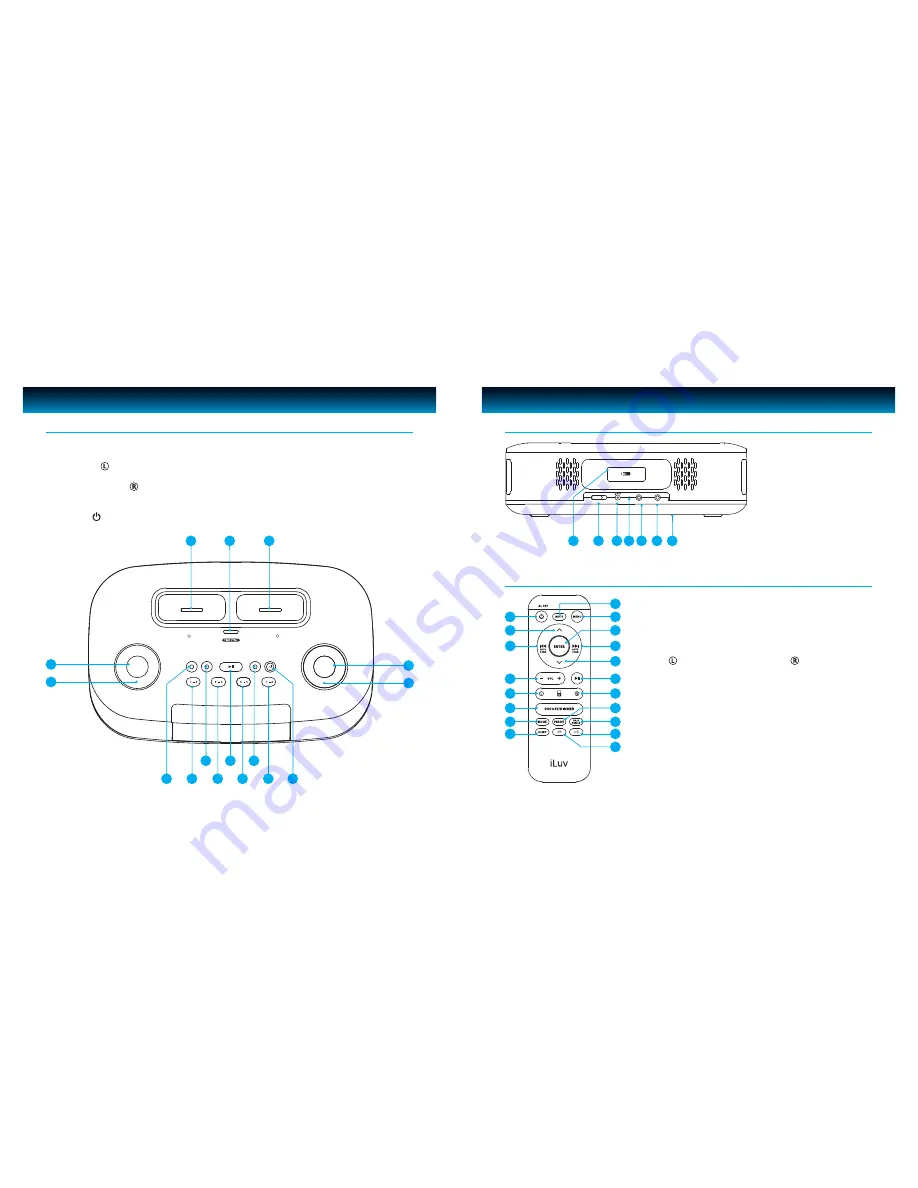
GETTING STARTED

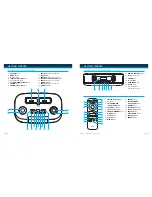
1.  VOLUME Knob

2. 

MODE

 Button

3.  iPod Dock 

4.  SELECT/TIME SYNC

 Button

5.  iPod/iPhone Dock 

6.  SET BASS/TREBLE TIME

 Button

7.  SEARCH Knob

8. 

POWER   /AL OFF

 Button

Location of Controls on the Main Unit

AL1

AL2

SLEEP

AL OFF

AUTO SCAN

SELECT

1   -   2

3   -   4

5   -   6

7   -   8

SNOOZE I DIMMER

SET

BASS/TREBLE

TIME

MODE

VOLUME

SEARCH

iPod

R

iPod/iPhone

9.  PRESET

 Number (7- 8) button

10. 

SLEEP

 Button

11.  PRESET

 Number (5 - 6) button

12. 

PLAY/PAUSE (AUTO SCAN)

 Button

13.  PRESET

 Number (3 - 4) button

14.  ALARM 2

 Button

15. 

PRESET

 Number (1- 2) button

16.  ALARM 1

 Button

3

4

5

7

6

1

2

15

11

9

13

12

10

14

8

16

GETTING STARTED

17.  REMOTE CONTROL

 Holder

18. 

 DST

 Switch [(-1)/(+1)]

19.  POWER Jack

20.


FM ANTENNA

21.

  HEADPHONE Jack

22. 

 AUX IN Jack

23. 


Back up battery 


Compartment Cover

Location of Controls on the Main Unit 

– CONTINUED 

1.  POWER/AL OFF

 Button

2.

  UP

 Button

3.  SKIP BACKWARD 


/AUTO SCAN 

Button

4.  /-

 Button

5.

  iPod   Select

 Button

6.  SNOOZE/DIMMER

 Button

7.  MODE

 Button

8.

  SLEEP

 Button

9.  MUTE

 Button

10.

  MENU

 Button

Location of Controls on the Remote Control

11.  ENTER

 Button

12.

  SKIP FORWARD 


/AUTO SCAN 

Button

13.  DOWN

 Button

14.  PLAY/PAUSE

 Button

15.

  iPod   Select

 Button

16.  PRESET

 Button

17.  BASS TREBLE

 Button

18.

  SHUFFLE

 Button

19.  REPEAT

 Button

AUX IN

PHONES

DAYLIGHT SAVING TIME

FM ANT.

REMOTE CONTROL

DC 10V, 2A

-1

+1

1
2

3

4

5

6
7
8

10
11

12

14

15

16
17
18

9

13

19

17

19 20 21 22 23

18

iLuv | 6

iMM173 |  V12M12_IM_EN_05082009

5 | iLuv

Summary of Contents for IMM173

Page 1: ...Model iMM173 Instruction Manual Stereo System for Your iPhone and iPod English ...

Page 2: ...o iPod iPhone FM radio or buzzer Sleep to iPod iPhone FM radio Radio FM stereo PLL tuning digital tuning technology Programmable presets for 8 radio stations Compatible with any iPod with dock connector Excluding 1st 2nd and 3rd generation iPod Only one dock supports iPhone Getting Started Power Source Protect your Furniture Installing the Remote Control Battery Location of Controls on the Main Un...

Page 3: ...iture However certain types of oil based furniture polishes wood preservatives or cleaning sprays may cause the rubber feet to soften and leave marks or a rubber residue on the furniture To prevent any damage to your furniture we strongly recommend that you purchase small self adhesive felt pads available at hardware stores and home improvement centers everywhere and apply these pads to the bottom...

Page 4: ...ED 17 REMOTE CONTROL Holder 18 DST Switch 1 1 19 POWER Jack 20 FM ANTENNA 21 HEADPHONE Jack 22 AUX IN Jack 23 Back up battery Compartment Cover Location of Controls on the Main Unit CONTINUED 1 POWER AL OFF Button 2 UP Button 3 SKIP BACKWARD AUTO SCAN Button 4 VOLUME Button 5 iPod Select Button 6 SNOOZE DIMMER Button 7 MODE Button 8 SLEEP Button 9 MUTE Button 10 MENU Button Location of Controls on...

Page 5: ...ource Turning the System ON In any source mode press POWER AL OFF button on the unit or on the remote control and the clock will appear on the display Be aware that the dim alarm setting will still be functional at standby mode To turn off alarm sound press the POWER AL OFF button on the unit or remote control Turning the System Off Press the MODE button on the unit or on remote control to select ...

Page 6: ...nd time The current year will flash as shown on this page The year will blink first at the bottom of the LCD splay Rotate the SEARCH knob until the current year appears Press the SET button to set and confirm Repeat these steps to set the day and time Press the SET button to confirm If no knob or button is pressed for 10 seconds the setting will return to the current clock time and exitclock mode ...

Page 7: ...the SNOOZE DIMMER button during normal operation to adjust the brightness of LCD display 2 Dimmer grade 0 11 levels with display bar 3 Press and hold SNOOZE DIMMER button for dimmer grade quick change Dimmer setting The Alarm 1 and Alarm 2 functions can be set with the unit turned ON or OFF 1 Press and hold ALARM 1 or ALARM 2 button on the top panel of the unit for three 3 seconds The alarm time w...

Page 8: ...preset station will play Press the 1 2 button again to select P2 preset station 2 Follow this procedure for each of the radio presets Selecting preset radio stations with remote control When PRESET button of remote control is pressed the stored FM preset radio should sound right away Repeatedly press the PRESET button to listen to other stored FM stations with following cycle P1 P2 P3 P8 Using the...

Page 9: ...ttons to select and then press the ENTER button to enter Menu and Enter Press the REPEAT button on remote control while your iPhone iPod music is playing 1 Press the REPEAT Button once on remote control during iPhone iPod music is playing Current track will repeat 2 Press the REPEAT Button twice on remote control during iPhone iPod music is playing All tracks will repeat Repeat OPERATIONAL INSTRUC...

Page 10: ...eration iPod Use the line in jack AUX Mode for the first or second generation of iPod Your iPod is not charged even though it is in the dock a Your iPod might not be properly docked Take your iPod out of the dock and remove any obstructions on the connector from the dock and on your iPod Place your iPod back into the dock b Your iPod is frozen or locked up Check whether your iPod operates correctl...

Page 11: ...12 Use only with the cart stand tripod bracket or table specified by the manufacturer or sold with the apparatus When a cart is used use caution when moving the cart apparatus combination to avoid injury from tip over 13 Unplug this apparatus during lightning storms or when unused for long periods of time 14 Refer all servicing to qualified service personnel Servicing is required when the apparatu...

Page 12: ...the FCC Rules These limits are designed to provide reasonable protection against harmful interference in a residential installation This equipment generates uses and can radiate radio frequency energy and if not installed and used in accordance with the instructions may cause harmful interference to radio communications However there is no guarantee that interference will not occur in a particular...

Page 13: ...ss B limits for radio noise emissions from digital apparatus as set out in the Radio Interference Regulations of Industry Canada These limits are designed to provide reasonable protection against harmful interference in a residential installation This equipment generates uses and can radiate radio frequency energy and if not installed and used in accordance with the instructions may cause harmful ...

Page 14: ...d on the apparatus Dispose of used batteries properly Follow the local regulation for the battery disposal Use this apparatus in the moderate climates It is recommended not to use this apparatus such in a lighting storm SPECIFICATIONS Radio frequency FM 87 5MHz 108MHz Connectivity 3 5mm stereo headphone jack 3 5mm aux in jack Power jack FM antenna Power Requirement AC100V 240V 60 50Hz Adapter Powe...

Page 15: ...pecifications may differ slightly from that supplied Designed in New York USA Made in China 2009 jWIN Electronics Corp All rights reserved No portion of this printed material or product enclosed herewith including design shape or graphics may be reproduced or transmitted in any form without the expressed written consent of jWIN Electronics Corp by any means electronic or mechanical including photo...

Reviews: