27
INSTALLER
IMPORTANT SAFETY WARNINGS
The installation and extraordinary maintenance operations
must be carried out by qualified personnel, authorized by
the Manufacturer, having the necessary product
knowledge, and in compliance with the regulations in
force in the Country of use regarding the types of systems
involved and safety in the workplace.
Before connecting the device to the mains, please check
that all connection data on the product label (voltage
and frequency) match those of the mains (Refer to
chapter “How to read product label” on page 27 for
further information on the data plate). Please note that
any incompatibility could lead to serious damage to the
device, so always contact a qualified electrician before
installing your hood; check that the systems comply with
the regulations in force in the Country of use; always
compare the system data with that printed on the data
plate;
check all the components for integrity and functionality: in
case of fault, stop the installation and contact the
distributor.
Do no connect the product to the power main before any
other step of the installation is completed;
Any interventions, tampering or modifications not
expressly authorised, not complying with the content of
this manual, will void the warranty, and may also cause
immediate danger or dangerous situations that may
result in injury or even death.
During the installation of the equipment, anyone not
responsible for carrying out installation
activities must refrain from transiting or stationing in or
nearby the installation area.
Being potentially hazardous, packaging materials must
be kept out of reach of children or animals, and must be
correctly disposed of, in accordance with local
regulations.
During the installation activities, always use the required
personal protective equipment (e.g. safety shoes) and
act with the due level of care and attention.
Summary of Contents for AGK Series
Page 2: ......
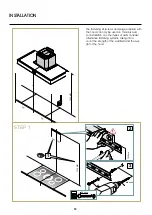
Page 19: ...19 INSTALLER STEP 3 OK 2 1 INSTALLATION ...
Page 20: ...20 STEP 4 STEP 5 1 1 ø8 mm ø 05 16 2 NON FORNITA 2 3 INSTALLATION ...
Page 21: ...21 INSTALLER STEP 6 STEP 7 1 3 4 2 2 3 1 ø8 mm ø 05 16 40 mm 137 64 INSTALLATION ...
Page 22: ...22 STEP 8 STEP 9 INSTALLATION ...
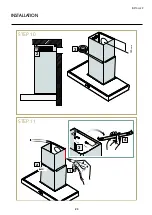
Page 23: ...23 INSTALLER INSTALLATION STEP 10 STEP 11 150 mm 3 3 4 2 1 2 ...
Page 24: ...24 INSTALLATION STEP 12 STEP 13 2 3 4 1 ø8 mm ø 05 16 40 mm 137 64 ...
Page 25: ...25 INSTALLER INSTALLATION STEP 14 1 STEP 15 2 ...
Page 26: ...26 INSTALLATION STEP 16 2 1 ...
Page 32: ......

