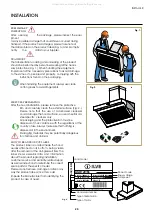
background image

27

INSTALLER

IMPORTANT SAFETY WARNINGS

The installation and extraordinary maintenance operations 
must be carried out by qualified personnel, authorized by 
the Manufacturer, having the necessary product 
knowledge, and in compliance with the regulations in 
force in the Country of use regarding the types of systems 
involved and safety in the workplace.
Before connecting the device to the mains, please check 
that all connection data on the product label (voltage 
and frequency) match those of the mains (Refer to 
chapter “How to read product label” on page 27 for 
further information on the data plate). Please note that 
any  incompatibility could lead to serious damage to the 
device, so always contact a qualified electrician before 
installing your hood; check that the systems comply with 
the  regulations in force in the Country of use; always 
compare the system data with that printed on the data 
plate;
check all the components for integrity and functionality: in 
case of fault, stop the installation and contact the 
distributor.
Do no connect the product to the power main before any 
other step of the installation is completed;
Any interventions, tampering or modifications not  
expressly  authorised,  not  complying  with  the  content  of 
this manual, will void the warranty, and may also cause 
immediate danger or dangerous situations that may 
result in injury or even death.
During the installation of the equipment, anyone not 
responsible for carrying out installation
activities must refrain from transiting or stationing in or 
nearby the installation area.
Being potentially hazardous, packaging materials must 
be kept out of reach of children or animals, and must be 
correctly disposed of, in accordance with local 
regulations.
During the installation activities, always use the required 
personal protective equipment (e.g. safety shoes) and 
act with the due level of care and attention.

All manuals and user guides at all-guides.com

Summary of Contents for AGQ Series

Page 1: ...HOODS AGQ AGQ60 AGQ70 AGQ90 AGQ100 AGQ120 AGQ150 USER Use and Maintenance INSTALLER Installation manual cod EI33960340000EN 08 2021 EN All manuals and user guides at all guides com ...

Page 2: ...All manuals and user guides at all guides com ...

Page 3: ...SAFETY WARNINGS INSTRUCTIONS FOR USE CLEANING AND MAINTENANCE PERIODS OF INACTIVITY ORDINARY MAINTENANCE replacement of the spotlight IMPORTANT SAFETY WARNINGS INSTALLATION IMPORTANT SAFETY WARNINGS INSTALLATION INSTALLER 14 31 All manuals and user guides at all guides com ...

Page 4: ...rting using the hood quickly and without difficulty We therefore recommend that you read it carefully before use and that you store it carefully for futurereference We remain at your full disposal for any further information that you may require or if you have any problems in understanding any contents of this booklet ILVE S p a Via Antoniana 100 35011 Campodarsego PD Italy tel 39 049 9200990 fax ...

Page 5: ...se injuries or death Read the instruction manual Useful advice and information Reference to another chapter The Manufacturer reserves the right to make improving modifications to the equipment or accessories at any time Partial reproduction without th Manufacturer s authorization is forbidden The measure ments given are indicative and not binding ICON ATTENTION All manuals and user guides at all g...

Page 6: ...s supplied by ILVE S p a Il presente apparecchio può essere utilizzato dai bambi ni a partire dagli 8 anni e da persone con ridocce capa cità fisiche sensoriali o mentali oppure con mancanza di esperienza e di conoscenza se sitrovano sotto ade guata sorveglianza oppure se sono stati istruiti circa l uso dell apparecchio in modo sicuro e se si rendono conto dei pericoli correlati The equipment is o...

Page 7: ...ent e g gloves safety footwear etc after the surfaces of the hood have COOLED DOWN always wear appropriate personal protective equipment i e gloves safety footwear etc Failure to follow the instructions or the use of unsuitable cleaning devices may pose a risk of fire and or damage to the hood or the surrounding objects so the Manufacturer couldn t be held responsible egular daily cleaning and mai...

Page 8: ...ed on at least a couple of minutes before starting to cook to promote the suction of fumes and steam After finishing cooking leave the hood in operation for an extra few minutes in this case it may be appropriate to activate the Timer function which automatically switches the hood off after 10 minutes The page that follows shows how to use the control panel What speed should I use The unit operate...

Page 9: ...peed for 5 minutes and after that automaticalty returns to the third speed TIMER FUNCTION By pressing the TIMER push button while the hood is working the clock symbol will start flashing Once the timer is set the hood will continue working for about 10 minutes and then it will automatically switch off The timer can be switched off at any moment by pressing its push button In this case the hood wil...

Page 10: ...led light for half a second Coupling with the remote control of the hood When enabling the hood in the tirsi 7 seconds push the ON OFF button on the remote control for two seconds In this way the remote contrai will be coupled and activated After the tirsi 7 seconds the programming of the hood will be tinished and the coupling will be protected tram external signals which are noi coupled REMOTE CO...

Page 11: ...d abrasive or sharp tools e g abrasive sponges scrapers steel brushes etc water sprays The INSIDE and the OUTSIDE of the hood should be cleaned solely by using a damp cloth with little neutral soap It is also possible to use a steel specific cleanser paying attention to the instructions written on the canister or bottle To conclude the cleaning operation rinse using a clean wet sponge or cloth and...

Page 12: ...imum temperature is 70 C 158 F higher temperature can cause darkening in the metal please note that this DOES NOT impair the operation of the filter For their removal see Fig 5 ACTIVE CARBON FILTERS These filters cannot be washed or regenerated and should therefore be replaced every 3 to 4 months depending on the hood usage Damp environments high temperature soiled anti grease filters and the use ...

Page 13: ...stainless steel surfaces At first use accurately clean the equipment reconnect the power supply ALWAYS MAKE SURE THAT THE APPLIANCE IS DISCONNECTED FROM THE NETWORK 1 2 Remove the metal filters 3 Push the spotlight from the inside to the outside 4 disconnect and replace the entire spotlight PROCEDURE TO FOLLOW ORDINARY MAINTENANCE replacement of the spotlight 1 2 All manuals and user guides at all...

Page 14: ...oo short have a qualified electrician install an outlet near the appliance WARNING TO REDUCE THE RISK OF FIRE USE ONLY METAL DUCTWORK WARNING TO PROVIDE PROTECTION AGAINST ELECTRIC SHOCK CONNECT TO PROPERLY GROUNDED OUTLETS ONLY WARNING there shall be adequate ventilation of the room when the range hood is used at the same time as ap pliances burning gas or other fuels not applicable to appliances...

Page 15: ...facturer its ervice agent or similarly qualified persons in order to avoid a hazard Before installing the equipment carefully read the safety instructions page 6 and the indications provided from page 14 IMPORTANT SAFETY WARNINGS All manuals and user guides at all guides com ...

Page 16: ...00 AGQ120 150 1000 AGQ150 150 1000 INSTALLATION 6 0 0 7 0 0 9 0 0 1 0 0 0 1 2 0 0 1 5 0 0 m m 5 0 0 m m Min 730 mm Max 1070 mm 360 mm ø150 200 mm ø150 200 mm 700 760 911 1000 1216 1511 mm 6 0 0 m m Min 810mm Max 1130mm 440 mm 220 240 V 50 Hz 360 mm All manuals and user guides at all guides com ...

Page 17: ...7 INSTALLER ø8 mm UTENSILI NECESSARI CONTENUTO IMBALLO ø 05 16 40 mm 137 64 45 mm 149 64 x2 x2 10 mm 025 64 x 2 INSTALLATION NECESSARY TOOLS PACKAGE CONTENT All manuals and user guides at all guides com ...

Page 18: ...onsider alternative fastening systems taking into a count the strength of the wall itself and the wei ght of the hood INSTALLATION STEP 1 x2 2 3 1 1000 mm 45 mm 149 64 ø8 mm ø 05 16 1000 MM 40 23 64 min 1000 MM 40 23 64 min 1000 MM 4023 64 min 1000 MM 4023 64 min 1000 mm 1000 MM 40 23 64 min All manuals and user guides at all guides com ...

Page 19: ...19 INSTALLER INSTALLATION STEP 2 STEP 3 2 1 1000 MM 4023 64 min 1000 MM 4023 64 min All manuals and user guides at all guides com ...

Page 20: ...20 INSTALLATION STEP 4 STEP 5 1 2 1 ø8 mm ø 05 16 1000 MM 40 23 64 min 1000 MM 40 23 64 min All manuals and user guides at all guides com ...

Page 21: ...21 INSTALLER INSTALLATION STEP 6 STEP 7 1 3 4 2 ø8 mm ø 05 16 40 mm 137 64 All manuals and user guides at all guides com ...

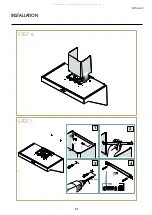
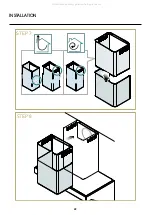
Page 22: ...22 INSTALLATION STEP 7 STEP 8 All manuals and user guides at all guides com ...

Page 23: ...23 INSTALLER INSTALLATION STEP 9 STEP 10 2 1 150 mm 5 29 32 min 3 2 1 3 4 All manuals and user guides at all guides com ...

Page 24: ...24 INSTALLATION STEP 11 2 3 4 1 ø8 mm ø 05 16 40 mm 137 64 STEP 12 All manuals and user guides at all guides com ...

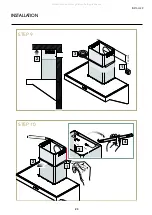
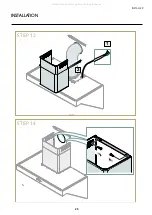
Page 25: ...25 INSTALLER INSTALLATION STEP 13 1 2 STEP 14 All manuals and user guides at all guides com ...

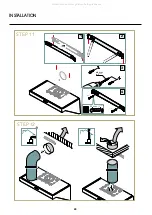
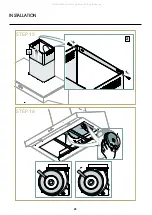
Page 26: ...26 INSTALLATION STEP 15 STEP 16 2 1 All manuals and user guides at all guides com ...

Page 27: ...ata with that printed on the data plate check all the components for integrity and functionality in case of fault stop the installation and contact the distributor Do no connect the product to the power main before any other step of the installation is completed Any interventions tampering or modifications not expressly authorised not complying with the content of this manual will void the warrant...

Page 28: ...t be easy to reach even after installation of the equipment Should this not be the case a general switch must be installed in order to disconnect the hood from the power supply in case of need The maximum weight of any objects placed on top of the hood or attached to the same should not exceed 2 kg 4 4 lb The air must not be discharged into a flue that is used for exhausting fumes from appliances ...

Page 29: ...film must be disposed of in accordance with the regulations of the country of use Always make sure that nothing is disposed of in the environment Packaging materials may be potentially dangerous for children and animals HOW TO READ PRODUCT LABEL The product label is located inside the hood usually attached on its bottom being visible after the removal of the anti grease filters The label shows ess...

Page 30: ... The equipment must only be installed by responsible and experienced adults without physical impairment and in perfect psychological and physical con dition During installation anyone and any objects not involved in the assembly operations must be kept away from the area Before starting the assembly operations make sure that all the necessary tools are available and in good working order ELECTRIC ...

Page 31: ...lity Make sure that the flue is in perfect working order and that a square concrete or round metal static wind break ventilation tower with useful output section not less than double the diameter of the flue UNI 7129 is instal led at the top of the flue itself Comply with all air discharge regulations The drain chimney of the building should be dedicated to the hood only so under no circu mstances...

Page 32: ...All manuals and user guides at all guides com ...

Reviews: