background image

Cooking Table

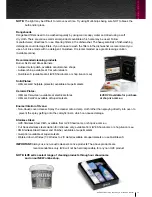
CARING AND CLEANING FOR YOUR LAVA STONE BBQ

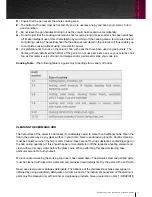
Before cleaning, disconnect the appliance from the mains. Cleaning must be carried out when the 

appliance is cold. Remove all the removable parts. Remove the grid, lift the heating element and take 

away the hob bed with lava stones. Stainless steel parts must be cleaned with water and detergent, then 

dry with a soft cloth carefully. Under no circumstances use corrosive or abrasive detergent, this could 

damage the appliance. Stainless steel, brass or copper parts must be treated by using the proper 

products, thus keeping the brightness for a long time. 

Control Panel and aluminum parts must be cleaned  by means of degreasing detergent.

To clean the Lava Stones, you can wash them gently in hot soapy water and then allow them to dry well 

before re-use. Alternatively, you can put them into a stocking, place them on the top basket of your 

dishwasher and use a hot wash cycle with NO powder.

Buil

t-in cooktops

15

ILVE Built-in Cooktop Operating &  Installation Manual  

Summary of Contents for built-in cooktop

Page 1: ...Built in Cooktop Operating Installation Recipe Manual ...

Page 2: ......

Page 3: ...OPEN 24 7 ILVE ACCESSORIES ONLINE SHOP For a wide range of coffee machines pods and other ILVE accessories at the click of a button shop ilve com au ...

Page 4: ...roducts online at warranty ilve com au registration Just follow our simple online registration process Please ensure that you always keep your proof of purchase in order for your warranty to remain valid should you ever need to use it As always you can contact us on 1300 MY ILVE 694 583 ...

Page 5: ...iWarranty REGISTER YOUR WARRANTY ONLINE NOW GO TO warranty ilve com au registration ...

Page 6: ...wonderful benefits of ILVE s dynamic cooking systems We present detailed information on each of the advanced cooking systems built into ILVE appliances Once you have read this section you will be able to choose the most appropriate settings for your appliance when cooking different types of food We ask you to read the instructions in this booklet very carefully as this will allow you to get the be...

Page 7: ...ate 16 Cooktop Installation Instructions 18 Installation Gas Supply 20 Installation Electrical Supply 21 Adaptation to Different Types of Gas 22 Installation Instructions 24 Ancillary Service Information 26 Guarantee 27 Cleaning Care Maintenance 29 ILVE Cooktop Recipes 30 Warranty Information 36 Trouble Shooting Guide 38 contents Built in cooktops ...

Page 8: ...rity rules The hotplate must be installed by an authorised person The hotplate must be grounded Save these instructions for the local inspectors use TO THE INSTALLER After connecting the gas supply turn on the gas and check for leaks at all joints with soapy water or other approved methods UNDER NO CIRCUMSTANCES USE A NAKED FLAME IN CHECKING FOR LEAKS NOT FOR USE IN MARINE CRAFT CARAVANS OR MOBILE...

Page 9: ... This appliance is not intended for use by persons including children with reduced physical sensory or mental capabilities or lack of experience and knowledge unless they have been given supervision or instruction concerning use of the appliance by a person responsible for their safety Children should be supervised to ensure that they do not play with the appliance Never place unsteady or deformed...

Page 10: ...up to 10 seconds after ignition to allow the safety to lock in Check that the gas has been lit if the burner fails to ignite repeat the above process If the burner still fails to ignite a match or lighting device can be used but care must be taken Keep igniters dry If the problem persists contact Eurolinx Pty Ltd or their appointed agent for service DO NOT TOUCH HOT SURFACES ALLOW HOB TO COOL BEFO...

Page 11: ...size of burner Never use pots that are too small or too large For wok cooking it is recommended that a domestic size wok no larger than 400mm in diameter be used Always use the small pot trivet for pots with a base smaller than 100mm Use a strong flame to bring liquids to boil seal meat and generally for all food which must be cooked rapidly i e when using a wok Use a low flame for sauces or stews...

Page 12: ... about 10 minutes at the most and wait for the plate to heat up Once this period has elapsed the plate is ready to start cooking By adjusting the flame there is no limit to your culinary imagination If you turn the knob to minimum you can do slow cooking or types of cooking in which you want to maintain the organic properties of the foods Higher temperatures are suitable for cooking meat fish and ...

Page 13: ...ate with a flat spatula For heavy build up a scourer may be required Quickleen S is recommended as a great cleaning solution Available online KNOB POSITION TYPE OF COOKING B egg s in 2 minutes B sliced eggplant 0 5cm thick from 9 to 13 minutes B sliced potatoes from 5 to 7 minutes B sliced courgettes from 3 to 5 minutes B fish portions of about 200g in 15 minutes B steak in 3 minutes A T bone stea...

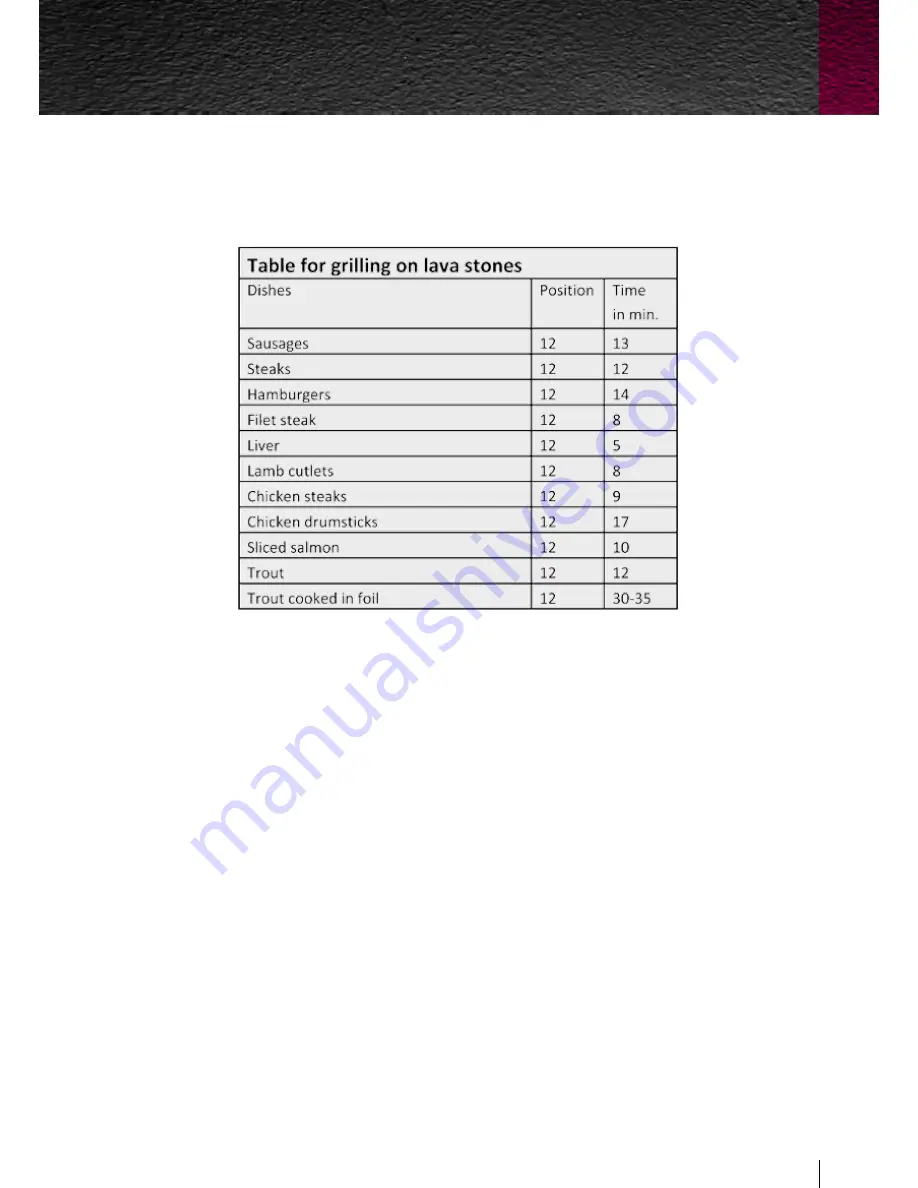
Page 14: ...knob to the desired setting between 1 and 12 the indicator light will be illuminated indicating that the appliance is working When the knob is turned to the 0 position the appliance is turned OFF and the indicator light will go out Important To grill we recommend pre heating the grill element and lava stones for approximately 10 minutes on position 12 this allows the lava stones to reach the requi...

Page 15: ...nces use corrosive or abrasive detergent this could damage the appliance Stainless steel brass or copper parts must be treated by using the proper products thus keeping the brightness for a long time Control Panel and aluminum parts must be cleaned by means of degreasing detergent To clean the Lava Stones you can wash them gently in hot soapy water and then allow them to dry well before re use Alt...

Page 16: ...e is to increase the safety of the appliance because when it is lit it indicates that the cooking area is still very hot The residual heat warning light stays lit even after the cooking area has been switched off to warn you that it is still hot Important The ceramic hob cooking surface remains hot for a long time after use Do not touch the hob with your hands or let children near it The residual ...

Page 17: ...ariety of foods CLEANING THE CERMANIC HOB The flat surface of the ceramic hob makes it considerably easier to clean than traditional hobs Clean the hob in the same way as any glass surface in your home Never use abrasive products Routine cleaning must be carried out when the hob is cold Caution take care not to drop substances containing sugar on the hob during operation If this should happen imme...

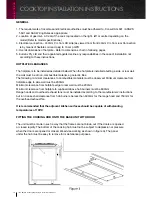
Page 18: ...s to combustible materials must be observed Minimum clearance from hotplate edge to side wall must be 200mm Minimum clearance from hotplate edge to rear wall must be 200mm Minimum clearance from hotplate to cupboard above hob burners must be 600mm Range hoods and overhead exhaust fans must be installed according to the manufacturers instructions but in no case shall clearance from hob burners be l...

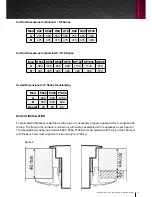
Page 19: ...d on the appliance as per Figure 2 For Freestanding cooking hob models P665 P965 P1265 must be installed with the top of the hob level with the bench and must support a minimum weight of 100 kg Mod P665 P965 P1265 A 600 900 1200 B 650 650 650 Height 85 85 85 Mod H30 H360 H60 H70 H38 H39 HF40 A 270 555 555 555 755 835 360 B 475 475 475 475 475 475 490 Mod HP45 HP65 HP95 HP75 HP125 HP1230 XLP90 A 38...

Page 20: ...checked visually for any abrasion defect or kinking and replaced or repositioned to prevent abrasion kinking and permanent deformation if necessary Always ensure that a restraining chain if fitted be correctly fitted so that strain is not placed on the household plumbing It is recommended that an isolating valve and union be fitted to enable simple disconnection for servicing These are to be in an...

Page 21: ...ection BEFORE CONNECTING THE PLUG INTO THE POWER SOCKET FOLLOW THESE INSTRUCTIONS The electrical supply for the upright cooker must be a 240 volt 50 Hz The fuse and electrical wiring of the home premises must support the load of the appliance The hotplate must be earthed Connect the hotplate to a properly earthed and rated power socket as appropriate The flexible cord of the appliance must not be ...

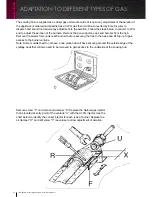
Page 22: ...the base and lift top up to gain access to the burner venturie Note Some models that do not have a one piece hob will have securing around the outside edge of the spillage bowl that will also need to be removed to gain access to the underside of the cooking hob Remove screw F and remove air damper R Replace the Natural gas injector that is located at entry point of the venturie U with the ULPG inj...

Page 23: ... the injector to increase the air Once the correct aeration is achieved tighten screw F to fix the position BURNER NATURAL GAS Inj Mj h Kpa ULPG Inj Mj h Kpa DUAL WOK 1 60 0 68 14 2 2 1 00 0 86 040 11 5 2 2 75 SINGLE WOK 1 70 13 8 1 00 0 92 11 00 2 75 LARGE 1 40 10 0 1 00 0 82 9 00 2 75 MEDIUM 1 10 6 2 1 00 0 68 6 00 2 75 FISH TEPANYAKI 1 60 12 5 1 00 0 85 10 00 2 75 Built in cooktops 23 ILVE Buil...

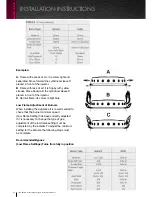
Page 24: ...Adjustment of Burners When installing the appliance it is recommended to check that the burner minimum speed Low Flame Setting has been correctly adjusted If it is necessary to change the type of gas adjustment of the low flame setting must be completed by the installer To adjust the minimum setting for the burners the following steps must be complete Recommended Bypass Low Flame Settings Turns fr...

Page 25: ...rrect when the low flame measures approximately 3 or 4 mm For ULPG the adjustment screw should be tightened all the way When changing quickly from maximum to minimum flow and vice versa make sure that the flame does not go out ENSURE THE MINIMUM FLAME WILL NOT BE EXTINGUISHED BY AIR DRAUGHTS Check that the igniter for each burner successfully ignites the gas and that the burner remains alight If a...

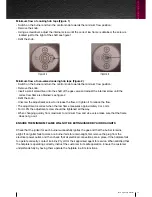
Page 26: ...e rear of the centre spillage bowl Care must be taken to ensure that no damage occurs to the spark ignition leads igniters or thermocouples if fitted Disconnect all ancillary gas piping Remove the two securing screws from the positioning brackets at the front and also the securing bracket near the gas inlet point to the burner compartment The gas manifold may then be extracted Replacement is a rev...

Page 27: ...td 48 50 Moore Street Leichhardt NSW 2040 T 1300 MY ILVE 694 563 F 02 8569 4699 ACN 001 473 347 SERVICE All Service calls must be booked though ILVE s Service and Warranty Department Service must only be completed by Ilve Authorised Service Agents Phone 1300 85 64 11 Updated 14 09 2011 guarantee Built in cooktops 27 ILVE Built in Cooktop Operating Installation Manual ...
Page 28: ...th use To clean simply scrub with QuicKleen S Available online or soak in white vinegar for two hours to remove food splatter Aluminium skirts The aluminium skirt from the base of the burner may be washed in warm soapy water using a gentle scouring pad to remove any burnt on food splatter A commercial product such as Autosol which is designed for cleaning aluminium can be used following makers ins...

Page 29: ...ble at supermarkets Ceramic Plates Hillmark Cera clean available at electrical stores Hillmark CeraPol available at Supermarkets Enamel Interior of Ovens Non Caustic oven cleaner Spray the cleaner onto a damp cloth rather than spraying directly into oven to prevent the spray getting onto the catalytic liners which can cause damage Stainless Steel ILVE Stainless Steel Cloth available from ILVE Show...

Page 30: ...ed Trout with Dill Lemon Marinated Seafood Skewers Fettuccine with Chilli Garlic Australian Breakfast Tepanyaki More recipes are available on the ILVE operating Instructions DVD available for purchase at shop ilve com au ...

Page 31: ... clove Extra virgin olive oil Salt and pepper Cut and trim vegetables place in deep bowl and mix in rosemary leaves garlic and extra virgin olive oil and mix well Pre heat teppanyaki plate on high for 10 minutes Brush steak and chicken with extra virgin olive oil and season to task with salt and pepper then add to the teppanyaki plate Once the steak and salmon require turning add the vegetables to...

Page 32: ...late up for 10 minutes then spray plate with extra virgin olive oil Place sausages on teppanyaki plate and cook for 5 minutes turning as needed Add bacon mushroom tomatoes and cook for a further 5 minutes Add eggs onto the plate and remove all food from the teppanyaki plate when the eggs have cooked ILVE Cooking Tip To avoid splatter and trap heat use ILVE s teppanyaki dome cover accessory ...

Page 33: ... large saucepan of salted water to the boil Cook fettuccine uncovered until just tender then drain Heat oil in a large frying pan add chilli and garlic frying gently for 2 minutes Add drained pasta to chilli and garlic mix toss gently to combine Divide pasta among serving bowls and top with grated parmesan ILVE Cooking Tip For variations of this dish add seafood meats cream or tomato sauces accord...

Page 34: ...oaked in water Cut salmon into cubes peel prawns and cut tentacles off octopus leaving on tails Mix together oil lemon parsley or dill and pepper to taste in a bowl making marinade Add seafood and marinate for about 15 minutes Heat teppanyaki plate or grill plate to hot Place skewers on heated plate and cook for approximately 5 minutes turning frequently Serve immediately ILVE Cooking Tip Do not o...

Page 35: ...to a perforated tray into fish kettle Carefully pour in 1 2 cups of water or stock in fish kettle and lower tray with trout carefully into fish kettle cover with lid Steam the fish with a gentle simmer for approximately 10 15 minutes Test fish after 10 minutes by using a fork to flake the thickest part of the trout It is ready when it flakes easily ILVE Cooking Tip Check fish with point of knife b...

Page 36: ...is defective by a factor other than a defect arising in the manufacture of the ILVE product including but not limited to a damage through misuse including failure to maintain service or use with proper care neglect accident or ordinary wear and tear including deterioration of parts and accessories and glass breakage b use for purpose for which the ILVE product was not sold or designed c use or ins...

Page 37: ...of the ILVE product ii paying the cost of replacing or repairing the defective part of the ILVE product iii replacing the ILVE product or iv paying the cost of replacing the ILVE product e Our goods come with guarantees that cannot be excluded under the Australian Consumer Law You are entitled to a replacement or refund for a major failure and for compensation for any other reasonably foreseeable ...

Page 38: ...should be turned off at power point and left to dry out Removing all knobs and using a hair dryer on the control panel will assist the drying out process All the igniters spark at the same time when lighting This is normal and how they are designed to operate The knob is loose on shaft Knob retaining spring clip has come out This does not require a service technician and can be replaced by the cus...

Page 39: ...twitter com ILVE_appliances youtube com ILVEappliances livewithilve com You can now find us on iWarranty REGISTER YOUR WARRANTY ONLINE NOW GO TO warranty ilve com au registration NOTES Built in COOKTOPS ilve com au 39 ILVE Operating Manual ...

Page 40: ...urdays 10am 4pm WA by appointment only on Saturdays ilve com au NSW ACT Head Office 48 50 Moore Street Leichhardt F 02 8569 4699 VIC TAS SA 1211 Toorak Road Camberwell F 03 9809 2155 QLD 1 42 Cavendish Road Coorparoo F 07 3397 0850 WA NT Unit 10 55 Howe Street Osborne Park F 08 9201 9188 New Zealand PO Box 11 160 Sockburn Christchurch F 03 344 5906 ...

Reviews: