background image

60

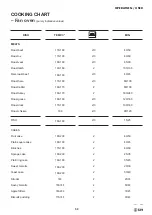
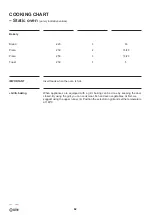
COOKING CHART

– Fan oven 

(purely indicative values)

4

3

2

1

5

DISH

Bread

Pizza

Toast

TEMP. C°

180-200

250

185-195

3

3

2

MIN. 

45

10/20

7

Insert foods when the oven is hot.

When appliances are equipped with a grill, baking can be done by keeping the door 

closed. By using the grill, you can cook meat, fish and even vegetables. At first, we 

suggest 

using the upper runner (4). Position the selector on grill and set the temperature at 

180°C.

IMPORTANT

«Grill» baking

Summary of Contents for MAJESTIC Series

Page 1: ...EN cod EI33960020000EN IT18 2018 AU11 2019 PRO LINE PROFESSIONAL PLUS MAJESTIC SERIES GAS INDUCTION COOKTOP WITH ELECTRIC OVEN FREESTANDING COOKERS USER OPERATING INSTALLATION MANUAL ...

Page 2: ...d owner of an ILVE cooking appliance Thank you for purchasing ILVE and welcome to the exciting world of cooking the ILVE way This instruction manual has been specially created to inform you of the full range of features your ILVE appliance has to offer and serves as an introduction to the wonderful benefits of ILVE s dynamic cooking systems We present detailed information on each of the advanced c...

Page 3: ......

Page 4: ......

Page 5: ...OPEN 24 7 ILVE ACCESSORIES ONLINE SHOP For a wide range of Genuine ILVE accessories at the click of a button shop ilve com au ...

Page 6: ...vice offering you can now register your ILVE products online at https support eurolinx com au form warrantyregistration Just follow our simple online registration process Please ensure that you always keep your proof of purchase in order for your warranty to remain valid should you ever need to use it As always you can contact us on 1300 856 411 ...

Page 7: ...endations for cleaning the cooktop PROBLEM SOLVING General problems COOKING CHART Ventilated convection oven Static oven 8 15 16 16 17 18 21 23 31 36 42 49 49 50 51 52 53 54 56 57 59 63 64 64 64 65 66 67 67 70 70 73 75 75 97 99 101 CONTENTS INFORMATION To be reminded to the user INSTALLATION Installation of the cooker Room ventilation Positioning of the appliance between furniture How to install t...

Page 8: ...lied to the oven door frame and is visible with the door open These warnings refer to different models of appliances Make sure you identify the model you own see the data plate These warnings are valid for the countries mentioned on the data plate Before using the cooker read the instructions booklet carefully It contains very important information regarding safety during installation use and main...

Page 9: ...upplementary ventilation such as opening a window or increasing the power of the hood if present Do not block ventilation or heat dissipation openings The supply cable if fitted is supplied without a plug To connect It please refer to the paragraph electric connection in the installation guide It is recommended to not use adapters multiple outlet plugs or extensions If the supply cable is damaged ...

Page 10: ...nce or carrying out maintenance disconnect the power supply by removing the plug from the socket or switching off the switch In case of breakdown or malfunction switch off the appliance Do not attempt any repairs these must only be performed by an authorised service centre Always request original parts Failure to comply with these instructions may compromise the appliance s safety Never place unst...

Page 11: ...gas supply and call After Sales Service for advice Do not use a steam cleaner to clean the inside parts of the oven Don t use any abrasive detergent or sharp device to clean the oven glass door This may cause damage or breakage Don t modify the appliance Fire danger do not store items on the cooking surfaces In case of fire never attempt to extinguish a flame fire with water but turn the appliance...

Page 12: ...nything e g aluminium foil oven liner cooking tray as a build up of heat can irreparably damage the enamel coating Avoid placing heavy items on the oven floor as this too can damage the enamel Do not rest heavy items or lean on the door as this can damage the hinge and or hinge sockets Open and close the door with reasonable force only First use When using the oven for the first time let it work e...

Page 13: ...be placed on the hob as they can become overheated Damaged or unsuitable pots could ruin the surface of the hob Do not use abrasive substances to clean the appliance Avoid dropping heavy objects on the hob Place pots on the hob gently Do not place empty pots on the hob Sugar synthetic materials or aluminium objects should not come into contact with the cooking zones Do not use or store flammable m...

Page 14: ...t the pot is in the middle of the cooking zone Ideally the bottom of the pot should cover the entire cooking zone The magnetic field produced by the induction hob could affect the proper working of pacemakers Detailed information should be obtained from your doc tor Avoid placing synthetic materials or aluminium objects in contact with the cooking zone IMPORTANT SAFETY WARNINGS Models with glass c...

Page 15: ...d for about 5 seconds so that upon its release the flame remains alight in case of unsuccessful ignition repeat the operation IMPORTANT Lighting the burners Symbol Function off maximum minimum index INSTRUCTIONS FOR USE First system start up of the hob Position the flame divider b correctly To do this align the 4 teeth c of the flame divider with the recess d of the aluminium Cup a b a b c d ...

Page 16: ...d small flame Turn the know past this point of resistance towards the small flame The auxiliary inner ring will light and the outer ring will extinguish To adjust the auxiliary burner to a min imum rotate the knob counter clockwise To turn the outer burner back on rotate the knob clockwise up to the desired value Recommended pans ac cording to burner size Dual wok burner ignition Symbol Function o...

Page 17: ... burner s maximum power for no more than 10 minutes we recommend cooking foods with reduced power keep at least a distance of 150 mm from the side wall to the grill pan s rim do not position the grill pan on more than one burner at the same time Gridiron Correct Be careful wrong Be careful wrong INSTRUCTIONS FOR USE Use of a grill pan ...

Page 18: ...he burners BE CAREFUL always check that the burners are properly positioned with a uniform flame that is not noisy RIGHT WRONG Positioning of the burners BURNERS Medium Large Dual Ring Fish burner Always check that the screws below the burner are fixed ...

Page 19: ...CTIONS FOR USE Positioning placement of the burners BE CAREFUL always check that the burners are properly positioned with a uniform flame that is not noisy RIGHT WRONG Positioning of the burners BURNERS Medium Large Dual Ring ...

Page 20: ...ned while still warm using the products normally used in the kitchen for metal surfaces Rub with a wire pad following the direction of the satin finish Dry well immediately If you want to give the plate a better appearance after cleaning apply a coat of a specialist cleaning paste cream If you do not intend to use the hotplate for long periods after normal cleaning apply a thin film of liquid para...

Page 21: ...which is useful both for cooking and for cleaning the plate It is recommended to clean the plate thoroughly at the end of each cooking session With the plate hot and the flame at minimum remove the cooking residue using the scraper provided fig 15 Pour a little water onto the plate and still using the scraper continue cleaning the plate Once the water has completely evaporated repeat the same oper...

Page 22: ...cooking area The bottom of the pan must be thick and flat Its diameter must be as similar as possible to that of the cooking ring The surface of the hob and the bottom of the pan must be kept clean Do not wet or overheat the heating plates Avoid sudden changes in temperature on the ceramic hob For example do not pour cold water onto the hot hob Do not leave the pan handles sticking out as they cou...

Page 23: ...ou remove the pot during operation the area is switched off Pot recognition lasts 9 minutes if after this time no suitable pot is used the area is switched off The area s display changes from absent pot to If the cooking area when turned off is still very hot the display shows the symbol H The heat up or quick heat function is available on each cooking area This means that for a well defi ned time...

Page 24: ...isplay If a control is turned with the child lock on L L appears on the display The display shows information of the two cooking areas Fig 11 Each cooking area has its own maximum continuous working time This depends on the set power level In case the limitation of the duration of operation is reached the relative area is switched off Child lock function Display fig 11 Limitation of the duration o...

Page 25: ...Cooking area ø 260mm 2600W Booster 3700W E ø175 Cooking areaa ø 175mm 1400W Booster 2000W F ø215 Cooking area ø 215mm 2300W Booster 3000W G ø265 Cooking area ø 265mm 2300W Booster 3000W 2 2 2 2 2 1 1 1 2 2 1 1 2 2 2 2 2 2 2 2 1 1 1 1 1 1 1 1 1 1 1 1 1 1 1 1 1 1 9 85 13 85 13 85 13 85 15 85 15 85 15 15 16 10 15 85 10 60 14 50 14 50 14 50 16 60 16 60 15 90 16 85 16 60 1 1 1 2 2 Modelli PI06 MI06 PI0...

Page 26: ...ic bottom are suitable this can be verified with a magnet The following pots should not be used copper stainless steel aluminium glass wood ceramics The knob does not show any numbers the power level will be visible on the display Turn the relevant knob clockwise On the hob display the set power level will appear from 1 to 9 A cooking area is switched off by turning the respective knob counter clo...

Page 27: ...he container is removed during the operation the area is switched off The duration of pan recognition is 10 minutes if no suitable container is used on the cooking area during this time the area is switched off The indication on the display changes from the pan absent symbol to If the cooking area is still very hot even though it is switched off the symbol H appears on the display The Heat up func...

Page 28: ... peating the same operation The letters O F appear on the display If a knob is turned when the key lock function is active the letters L L L L appear on the display The child lock function is activated with the knobs in position 0 by turning the controls 1 and 2 simultaneously in an counter clockwise direction 4 zones models only 5 or 6 zones models only INSTRUCTIONS FOR USE Use of the induction h...

Page 29: ... UP mode A display is associated with each cooking area Set power level 1 9 Food heating 42 65 U Booster P Heat up A Residual heat H Pan absent or not suitable U External error E Fault F Knob permanent rotation A maximum time of continuous operation is associated with each cooking area This depends on the selected power level If the limit of the duration of operation is reached the respective area...

Page 30: ...ed in an area at the time of activating the Booster function the heat up function will be interrupted During operation if a cooking zone overheats too much the power is reduced automat ically and the display shows the new level just edited At this point it is only possible to decrease the power level As soon as the temperature of the cooking zone falls below the critical value it will possible to ...

Page 31: ...ch switches off the electric power The resetting of the thermostat according to the decrease in the temperature of the oven is automatic The oven can be used again when cooled down In case the safety thermostat acts because of a defect of the components you are requested to call the After Sales Service Choose one of the 9 cooking functions by turning the selector S and adjust the temperature 50 C ...

Page 32: ...tat at 180 C Intensive cooking Is the quick and intense cooking function for various dishes best for baked fish braised vegetables spits duck chicken etc Multiple fan cooking It is the function that allows simultaneous cooking of different dishes without the smells blending you can cook lasagne pizza croissants and brioches tarts cakes etc Quick Start This function speeds up your oven s pre heatin...

Page 33: ...rticularly pastries biscuits meringues desserts puff pastry fruit cakes etc and other foods Upper element Especially suitable for browning and to add the finishing touches of colour to different dishes We suggest this setting when cooking hamburgers pork cutlets steaks sole cuttlefish etc Grill baking A suitable setting for grilling au gratin and roasting quickly and well meat in general fillet T ...

Page 34: ...it every minute Follow the Setting the clock procedure in the next paragraph By pressing the and buttons simultaneously you enter the Manual operation You can set the temperature using the thermostat knob T and select the function using the selector S The clock function is activated by simultaneously pressing cooking duration and end buttons The time is then set by adjusting the keys Any previousl...

Page 35: ...e oven and the pan symbol will turn off Select the timer function button and set the desired time with the buttons The bell symbol will stay on while the set time is counting down When the time comes to an end the buzzer will sound The buzzer operates at the end of the cooking duration and timer function and remains active for 7 minutes The buzzer can be stopped by pressing any button The intensit...

Page 36: ...dary oven icon 3 If flashing the display shows the temperature and cooking duration settings of the secondary oven only in the double oven If lit the timer is on If flashing time has elapsed Flashes while the timer is being set If lit the oven is working in delayed start mode During the delayed start it stays on If lit the oven is working in automatic end of cooking mode It flashes during the dela...

Page 37: ...er sounds together with the symbol flashing To stop the buzzer and the flashing simply press any button Turn the oven on Select a cooking function from those available With knob T select the desired temperature After 4 seconds after the last setting the oven operates for an indefinite time and the selected temperature remains on the display Turn the oven on Press button the display shows End Set t...

Page 38: ...t from Celsius to Fahrenheit by pressing the t knob for 8 seconds The oven light remains on for 1 minute when the oven is turned on and again for 1 minute at the end of preheating Whilst waiting for a delayed start the oven light is off The oven light can always be turned on by pressing knob T and turns off automatically after 1 minute During cooking you can always leave the light on by pressing t...

Page 39: ...ntine steaks grilled fish and also grilled vegetables Cooking with the electric grill must be made with the thermostat at 180 C Fan grill cooking Particularly fast and deep with significant energy savings this function is suitable for many foods such as pork chops sausages pork or mixed spits game gnocchi alla romana etc Cooking with the electric grill must be made with the thermostat at 180 C Int...

Page 40: ...econds and the probe symbol fl ashes Next the probes default temperature 75 C appears on the display By turning and then pressing the adjustment button select the end of cooking temperature from the 2 limit values of 40 and 100 C the food s internal temperature After 4 seconds from the last setting the set value is memorized and the probe symbol stays on Turn on the oven select the cooking functio...

Page 41: ...Game Game meat Back Rare fillet Medium Well done fillet Lamb Stuffed roasts Poultry Fish Temperature C 40 45 50 55 60 65 80 85 65 70 80 85 80 85 75 80 70 65 70 70 75 70 75 75 80 80 85 75 80 60 70 40 45 50 55 60 65 80 85 70 75 85 90 85 90 COOKING CHART INSTRUCTIONS FOR USE 5 button electronic programmer E3 Inside food temperature C NOTE Probe must be in the middle of the roast and not close to the ...

Page 42: ...legend Knob present in some models It allows to set and confirm the functions of the TFT in addition to the Touch display Home Light Timer Exit Terminate Clock Confirm Settings Switch off Break Start C F Screen lock Settings Settings Meat probe OFF ...

Page 43: ...ngs Choice of degree scale C or F Time settings Exit the settings page Allows you to lock the screen To unlock touch on the display for 10 seconds Setting a timer Increase or decrease the time Confirm once you have set the desired time An audible signal will indicate the end Confirm and return to the home page PM 11 48 AM 10m Allows you to set the volume of the beep and choose a sound when touchin...

Page 44: ... Set the cooking time and the programmed start 4 Cavity selection only for multiple cavity models 1b Confirm the cooking function 3d Confirm the cooking function 3a Set the cooking time 3c Set the start time 3b Shows the time of the cooking time 2a There are two options for setting the temperature Scrolling the bar With or 2b Confirm the temperature 1a Choose dry wet cooking NOTA Possible only in ...

Page 45: ...splay will switch to the preheating mode PREHEATING PHASE There are four levels that allow you to monitor the pre heating process The red part will gradually increase to fill the display PREHEATING TERMINATED When the set temperature is reached the display will turn red to indicate the end of the preheating phase and the start of the cooking phase If a cooking time has been set the oven will autom...

Page 46: ...ke advantage of this feature place the dish in the centre of the oven before starting the ECO function With the ECO function cooking times can be adapted to slow cooking as braised meats white meats baked pasta delicate pastry This cooking cycle is not recommended for frozen food To select Eco cooking turn selector knob S to 8 and when ON appears on the display hold down the programmer s key for a...

Page 47: ...e for finishing cooking particularly pastries biscuits meringues desserts puff pastry fruit cakes etc and other foods Upper element Especially suitable for browning and to add the finishing touches of colour to different dishes We suggest this setting when cooking hamburgers pork cutlets steaks sole cuttlefish etc Grill baking A suitable setting for grilling au gratin and roasting quickly and well...

Page 48: ...o remove baking trays and to take a closer look at how cooking is progressing The telescopic runner kit includes 2 lateral runners which slide on ball bearings The runners can be removed for cleaning as shown in the pictures below Repeat the operations backwards to repositions the grills turn spit only on some models Telescopic runners only in certain models Pul down the part highlighted in red to...

Page 49: ...ove the lamp protection glass and replace the bulb The new bulb must naturally be suitable for use at high temperatures Loosen whit a flat head screwdriver Remove the glass cover Pull out the light Replace and close again Procedure to follow CLEANING AND MAINTENANCE Replacing the bulb 1 2 3 4 ...

Page 50: ...leaning it is useful to dismantle the door following these instructions open the door move the hook C to the hinge zone d following the steps below Zone C Zone D Procedure to follow CLEANING AND MAINTENANCE Door removal 1 2 3 4 ...

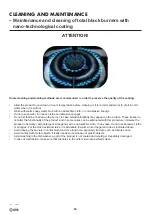
Page 51: ...o dismantle the oven door or alternatively to set it in the intermediate click position ATTENTION every procedure must be done with the door removed and placed on an suitable surface in order to not damage the door s facade Before carrying out any cleaning operations disconnect the appliance from the mains and close the gas valve The cooktop must be cleaned after it has been cooled down Unscrew th...

Page 52: ...dust Moving the pan may scratch the glass Immediately remove residual sugar jam and jelly to prevent damaging the glass COOKTOP CLEANING METHOD Clean the details with warm water and non abrasive detergent Dry with a soft microfibre cloth To maintain the characteristics of the enamelled surfaces it is necessary to regularly clean them with soapy water Remove the grills and wash them with warm water...

Page 53: ...ONENT Steel surfaces Enamelled surfaces OVEN CLEANING METHOD It is recommended to clean the oven after every use Dirt is cleaned more easily avoiding to let it burn several times at high temperatures Remove every removable part and clean it separately with hot water and non abrasive detergent The cavity is cleaned with a soft cloth soaked with a solution made of soapy Rinse and dry Immerse in a so...

Page 54: ...ases can be eliminated with this procedure immerse the product in hot water with detergent wipe gently with a natural fibre cloth in any case do not use abrasive cloths or sponges For the most resistant stains it is advisable to warm white vinegar and rub as indicated above Avoid leaving the burners in contact with food for a long time especially if acidic such as tomato sauce Avoid contact with m...

Page 55: ...if you must touch them use wooden or plastic utensils Avoid washing in the dishwasher the underside of the burner is not coated and would get irreparably damaged In case of malfunction make sure that the holes in the outer crown are perfectly dry and clean Annual service by an authorised person is recommended or if any of the following conditions are noticed Incomplete ignition appreciable yellow ...

Page 56: ...ith induction The diameter of the bottom of the pot is too small The safety system is in operation The pot is empty and the bottom has overheated This is not a malfunction The fan continues to function to protect and cool down the electronics The automatic ventilation will stop automatically Problem The appliance and the hob do not switch on The U symbol appears on the display The E symbol appears...

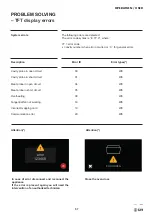
Page 57: ...uit Meat probe in open circuit Meat probe in short circuit Overheating Tangential fan not working Incorrect mapping card Communication error Attention PROBLEM SOLVING TFT display errors WE WE WE WE WE WE WE WE 00 01 04 05 08 16 19 20 error 123456 AVVISO PROBLEMA DOOR OPEN AVVISO PORTA APERTA CON COTTURA IN CORSO In case of error disconnect and reconnect the appliance If the error is present again ...

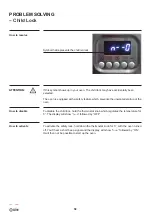
Page 58: ... disable the child lock hold the thermostat knob which regulates the temperature for 5 The display will show n o followed by OFF To activate the safety lock hold down the thermostat knob for 5 with the oven turned off You ll hear a short beep signal and the display will show n o followed by ON It will then not be possible to start up the oven How to resolve ATTENTION How to disable How to activate...

Page 59: ...weet biscuits Yeast cake Strudel Savoy biscuits Apple fritters Biscuits pudding TEMP C 170 180 170 190 160 180 140 160 180 190 170 180 160 170 160 170 160 180 170 180 180 160 180 180 200 180 190 170 180 190 200 160 180 180 200 190 200 160 150 180 180 200 170 180 2 3 2 3 2 3 2 2 3 2 3 2 2 2 3 2 3 2 3 2 3 2 2 2 2 2 2 2 2 2 2 2 MIN 40 50 40 60 65 90 100 130 40 45 80 100 80 100 160 240 120 160 100 160...

Page 60: ... 10 20 7 Insert foods when the oven is hot When appliances are equipped with a grill baking can be done by keeping the door closed By using the grill you can cook meat fish and even vegetables At first we suggest using the upper runner 4 Position the selector on grill and set the temperature at 180 C IMPORTANT Grill baking ...

Page 61: ...ches Sponge cake Plain ring cake Sweet biscuits Yeast cake Strudel Savoy biscuits Apple fritters Biscuits pudding TEMP C 225 250 225 225 230 250 250 250 225 250 250 200 225 225 175 200 175 200 220 250 180 200 200 220 250 180 180 200 200 220 200 220 2 3 2 3 2 3 2 2 3 2 3 2 2 2 3 2 3 2 3 1 2 2 2 2 2 2 2 2 2 2 2 2 MIN 60 80 50 60 60 80 40 50 50 60 40 50 40 50 50 60 60 70 45 60 40 45 15 25 35 40 50 60...

Page 62: ... 20 5 Insert foods when the oven is hot When appliances are equipped with a grill baking can be done by keeping the door closed By using the grill you can cook meat fish and even vegetables At first we suggest using the upper runner 4 Position the selector on grill and set the temperature at 180 C IMPORTANT Grill baking ...

Page 63: ...has all the expected accessories Verify the correct use of the appliance use of the oven thermostat ignition of the burners Fill out the warranty form Suggest that a periodic maintenance service has to be carried out at least every two years In case of gas leaking close the gas supply and disconnect the appliance from the mains Call the authorised assistance service Maintenance must be carried out...

Page 64: ...ns in compliance with the regulations and standards in force This is a type A appliance which does not need to be joined to an exhaust system for combustion waste but must be installed under a hood or other smoke extraction system in compliance with the standards in force The knowledge and consultation of the standards are a key factor for a qualified technician Indicatively the amount of air nece...

Page 65: ... kPa when approximately 50 of the burners are on high flame the appliance test point is located on the regulator ULPG the supplied test point adaptor must be fitted to the appliance inlet connection Gas pressure must be adjusted to 2 75 kPa the appliance test point is located on the test point adaptor Gas leakage and operation of the appliance must be tested by the installer before leaving Check b...

Page 66: ...aust fan the minimum clearance is 750 mm B Where the distance from the periphery of the nearest burner to any vertical com bustible surface or vertical combustible surface covered with toughened glass or sheet metal is less than 200 mm the surface shall be protected to a height C of not less than 150 mm above the hob for the full dimension width or depth of the cooking surface area Where the gas c...

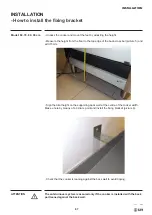
Page 67: ...mm Sign the total height on the supporting back wall at the centre of the cooker width Make a hole by means of a 6 diam point and install the fixing bracket picture 6 Check that the cooker is leaning against the back wall to avoid tipping The anti turnover system is assured only if the cooker is installed with the back part leaned against the back wall INSTALLATION How to install the fixing bracke...

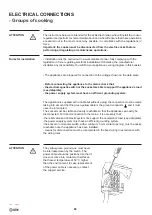
Page 68: ...e the power supply system must have an efficient grounding system The appliance is supplied with a cable but without a plug the connection must be made taking into account that the green yellow cable is the ground conductor and it must never be interrupted The socket must be visible and easily reachable so that the appliance can easily be disconnected For direct connection to the mains it is neces...

Page 69: ...0V a c 1P N 1 phase N 3 x 6 H07RN 50 60Hz 400V a c 3P N 3 phase N 5 x 4 H05RR 50 60Hz ATTENTION Data concerning the power cable Mod P I06 Mod LBI09 HNF NT P I09 M I09 Mod PDI09 Mod MDI10 Mod PDI10 ELECTRICAL CONNECTIONS Cookers with induction top 230V a c 1P N 50 60 Hz 400V a c 3P N 50 60 Hz 230V a c 1P N 50 60 Hz 400V a c 3P N 50 60 Hz 230V a c 1P N 50 60 Hz 400V a c 3P N 50 60 Hz 1 phase N 3 pha...

Page 70: ... fig 1 and replace them with those for the new gas according to table number 2 on page 20 DCC Dual burners unscrew the 2 screws P and remove cover C fig 2 unscrew injectors U using a 7 mmspanner fig 3 fig 4 and replace them with those for the new gas according to table number 1 below 13 ADJUSTMENT Replacement of the injectors for models 2 1 3 4 U U U ...

Page 71: ...move the grill and the burners from the hob Unscrew injectors U using a 7 mm spanner fig 8 fig 10 and replace them with those for the new gas according to table number 3 ADJUSTMENT Replacement of the injectors for models K 1 2 U U ...

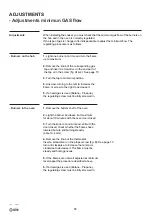
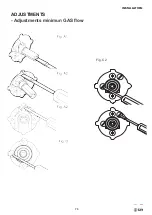
Page 72: ...the right to decrease it 5 If a liquid gas is used Butane Propane the regulating screw must be fully screwed in 1 Remove the bottom shelf of the oven 2 Light the burner and leave it at maximum for about 10minutes with the oven door closed 3 Turn the knob to minimum and still with the door closed check whether the flames have lowered but are still burning steadily about 3 4 mm 4 Remove the knob of ...

Page 73: ...INSTALLATION 73 ADJUSTMENTS Adjustments minimun GAS flow Fig C2 ...

Page 74: ...or Size mm ULPG consumption 2 75kPa MJ h Dual Wok 1 75 0 80 17 1 10 0 50 20 Wok 1 9 18 1 12 18 Large 1 55 12 5 0 92 12 5 Medium 1 18 7 5 0 68 7 Fish 1 55 12 5 0 95 13 Tepanyaki Plate medium and large burner 1 18 1 55 7 5 12 5 0 68 0 92 7 0 12 5 Simmer Plate large 1 55 12 5 0 92 12 5 ...

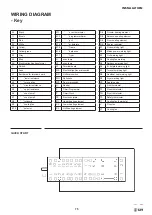
Page 75: ...ie MP Door microswitch N Neutral P Timer Programmer P Timer Clock PE Electric hotplate R1 Upper heating element R2 Lower heating element R3 Grill heating element R4 Circular heating element R5 Barbecue heating element R6 Fryer heating element RE Energy regulator S1 Oven warning light S2 Mains power warning light S3 Grill warning light S4 Cooling fun warning S5 Barbecue warning light S6 El hotplate...

Page 76: ...76 HOB GAS BASIC INDUCTION HOB AREA 5 WIRING DIAGRAM ...

Page 77: ...INSTALLATION 77 WIRING DIAGRAM P09I E3 INDUCTION HOB AREA 4 ...

Page 78: ...78 INDUCTION HOB AREA 5 INDUCTION HOB AREA 6 WIRING DIAGRAM ...

Page 79: ...INSTALLATION 79 WIRING DIAGRAM P 06 07 30 08 09 E3 K L 06 09 MP ...

Page 80: ...80 WIRING DIAGRAM P 06 07 30 08 09 H3 P 06 07 30 08 09 G3 ...

Page 81: ...INSTALLATION 81 WIRING DIAGRAM M 07 30 09 E3 M 07 30 09 H3 ...

Page 82: ...82 WIRING DIAGRAM M09I E3 M09I H3 ...

Page 83: ...INSTALLATION 83 WIRING DIAGRAM KD LD 09 10 MP LD 09 10 G3 ...

Page 84: ...84 WIRING DIAGRAM M12I H3 M12 E3 ...

Page 85: ...INSTALLATION 85 M12 H3 M12I E3 WIRING DIAGRAM ...

Page 86: ...86 M15 E3 M15 H3 WIRING DIAGRAM ...

Page 87: ...INSTALLATION 87 MD10 E3 MD10 H3 WIRING DIAGRAM WIRING DIAGRAM ...

Page 88: ...88 MD10I E3 MD10I H3 WIRING DIAGRAM WIRING DIAGRAM ...

Page 89: ...INSTALLATION 89 MD12I E3 MD12I H3 WIRING DIAGRAM ...

Page 90: ...90 MD12 E3 MD12 H3 WIRING DIAGRAM ...

Page 91: ...INSTALLATION 91 WIRING DIAGRAM WIRING DIAGRAM P12 IE3 P12 IH3 ...

Page 92: ...92 WIRING DIAGRAM WIRING DIAGRAM P12 E3 P12 H3 ...

Page 93: ...INSTALLATION 93 P15 PD12 E3 P15 PD12 H3 WIRING DIAGRAM ...

Page 94: ...94 PD 09 10 I E3 PD 09 10 E3 WIRING DIAGRAM ...

Page 95: ...INSTALLATION 95 PD LD 09 10 H3 PD LD 09 10 I H3 WIRING DIAGRAM ...

Page 96: ...96 PD12I E3 PD12I H3 WIRING DIAGRAM ...

Page 97: ...97 OPERATION USER NOTES ...

Page 98: ...98 NOTES ...

Page 99: ... apply if an ILVE product is defective by a factor other than a defect arising in the manufacture of the ILVE product including but not limited to a damage through misuse including failure to maintain service or use with proper care neglect accident or ordinary wear and tear including deterioration of parts and accessories and glass breakage b use for purpose for which the ILVE product was not sol...

Page 100: ...g or repairing the defective part of the ILVE product ii paying the cost of replacing or repairing the defective part of the ILVE product iii replacing the ILVE product or iv paying the cost of replacing the ILVE product e Our goods come with guarantees that cannot be excluded under the Australian Consumer Law You are entitled to a replacement or refund for a major failure and for compensation for...

Page 101: ...request and ensure any matter is attended to promptly For after sales enquiries please contact us at customercare eurolinx com au or 1 300 85 64 11 option 1 For spare parts contact us at spares eurolinx com au or 1 300 85 64 11 option 2 Technical support is available to authorised and licensed service providers only by contacting us at tech support eurolinx com au Allother technical enquiories sho...

Page 102: ......

Reviews: