background image

14

Inspect and tighten all parts of the elliptical crosstrainer
regularly. Replace any worn parts immediately.

For smooth
operation of
the elliptical
crosstrainer,
the incline
frame should
be kept clean.
Using a soft
cloth and mild
detergent,
clean dust and
other residue
from the incline
frame where the wheels make contact with it. Other
parts of the elliptical crosstrainer can also be cleaned
in this manner. 

Never use abrasives or solvents.  

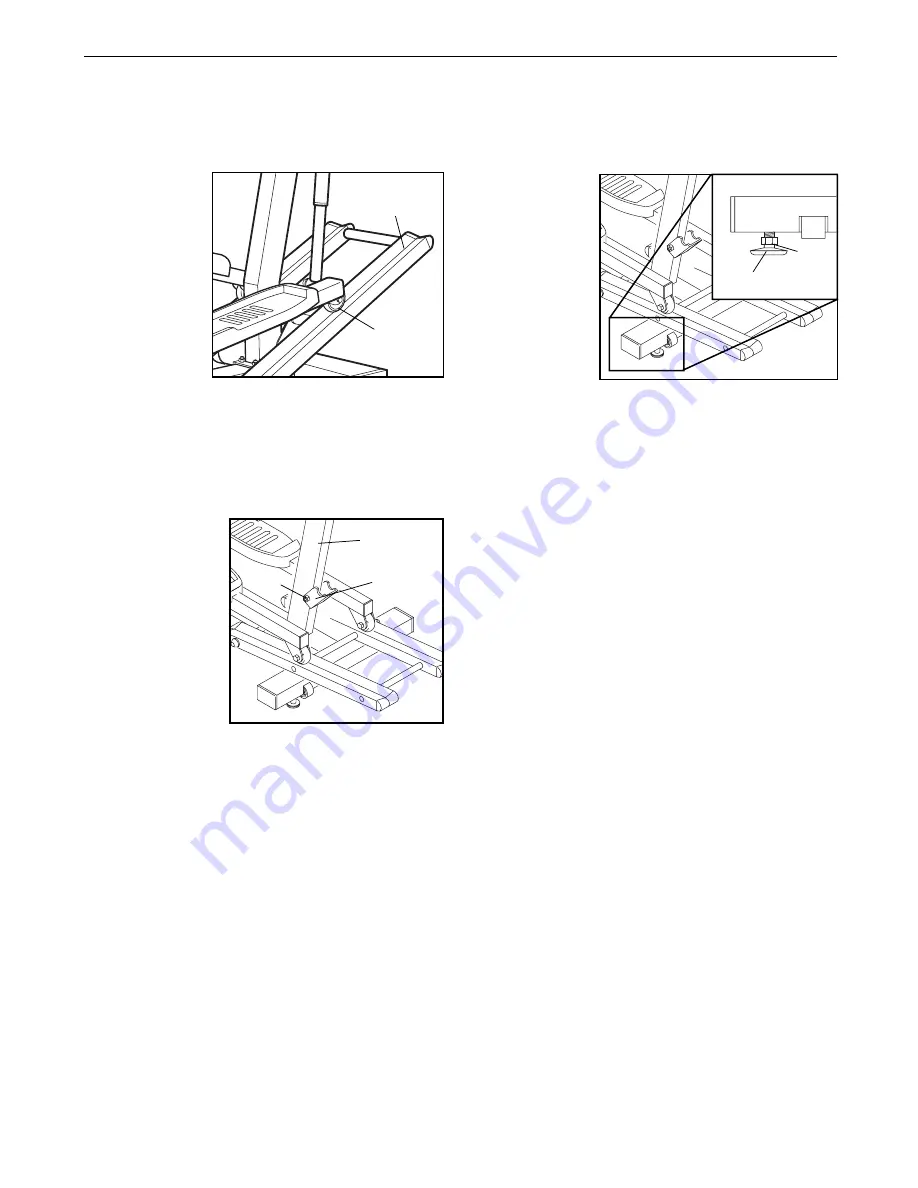
LUBRICATING THE INCLINE BRACKET

The incline
bracket and the
bolt on which it
pivots should be
regularly lubricat-
ed. Apply a small
amount of the
included lubricant
to the bolt and
between the
bracket and the
upright.

HOW TO LEVEL THE ELLIPTICAL CROSS-
TRAINER

If the elliptical
crosstrainer
does not sit
flat on the
floor, one or
both of the
leveling pads
should be
adjusted.
First, loosen
the jam nut on
each leveling
pad. Next,
turn the leveling pads as needed until the elliptical
crosstrainer is level. When the leveling pads are prop-
erly adjusted, firmly retighten the jam nuts.

PULSE SENSOR TROUBLE-SHOOTING

¥ Avoid moving your hands while using the pulse sen-

sor. Excessive movement may interfere with heart
rate readings.    

¥ Do not hold the metal contacts too tightly; doing so

may interfere with heart rate readings.

¥ For the most accurate heart rate reading, hold the

metal contacts for about 15 seconds.

¥ For optimal performance of the pulse sensor, keep

the metal contacts clean. The contacts can be
cleaned with a soft clothÑnever use alcohol, 
abrasives, or chemicals. 

MAINTENANCE AND TROUBLE-SHOOTING

Incline
Frame

Incline

Bracket

Bolt

Upright

Wheel

Pad

Jam

Nut

Summary of Contents for Image 2.2E

Page 1: ...plete customer satisfaction If you have questions or if there are missing or damaged parts we will guarantee complete satisfac tion through direct assistance from our factory TO AVOID UNNECESSARY DELAYS PLEASE CALL DIRECT TO OUR TOLL FREE CUSTOMER HOT LINE The trained techni cians on our customer hot line will provide immediate assis tance free of charge to you CUSTOMER HOT LINE 1 800 999 3756 Mon...

Page 2: ...3 BEFORE YOU BEGIN 4 ASSEMBLY 5 HOW TO USE THE ELLIPTICAL CROSSTRAINER 10 MAINTENANCE AND TROUBLE SHOOTING 14 CONDITIONING GUIDELINES 15 PART LIST 18 EXPLODED DRAWING 19 HOW TO ORDER REPLACEMENT PARTS Back Cover LIMITED WARRANTY Back Cover 2 ...

Page 3: ...racy of heart rate readings The pulse sensor is intended only as an exercise aid in determining heart rate trends in general 10 When you stop exercising allow the pedals to slowly come to a stop 11 Keep your back straight when using the ellip tical crosstrainer Do not arch your back 12 If you feel pain or dizziness while exercis ing stop immediately 13 The elliptical crosstrainer is intended for i...

Page 4: ...E If you have additional questions please call our Customer Service Department toll free at 1 800 999 3756 Monday through Friday 6 a m until 6 p m Mountain Time excluding holidays To help us assist you please note the product model number and serial number before calling The model number is IMEL08900 The serial number can be found on a decal attached to the IMAGE 2 2E see the front cover of this m...

Page 5: ...f a part is not in the parts bag check to see if it has been pre assembled 5 1 Hold the Rear Stabilizer 65 against the saddle on the rear of the Frame 1 Make sure that the Stabilizer is turned so the square holes are facing away from the Frame Attach the Stabilizer with two M10 x 105mm Carriage Bolts 27 and two M10 Nylon Locknuts 26 1 26 26 1 27 65 2 2 Turn the Resistance Control 57 counterclockwi...

Page 6: ...olt 25 and an M10 Nylon Locknut 26 Do not overtighten the Nylon Locknut the Incline Bracket must pivot easily 24 25 26 2 4 Align the two holes in the front of the Upright 2 with the two welded bolts on the front of the Frame 1 Carefully push the Reed Switch Wire not shown into the Upright until there is no slack Next pivot the Upright 2 about halfway to the vertical position while guiding the meta...

Page 7: ...ng the springs in the battery clip Attach a Plastic Tie 53 to the battery clip as shown Attach the Console 87 to the Console Base 49 with four M4 x 16mm Screws 35 making sure that the indicated wires are extending from the Console Base 49 Be careful not to pinch the wires 7 35 Wires Battery Clip Batteries 87 49 53 6 5 V shaped Groove 29 Grease 81 81 30 30 58 58 1 Tubes Tubes 6 Slide an M8 Split Wa...

Page 8: ...l Arm not shown in the same way 21 81 82 79 81 44 44 77 80 10 3 Grease 9 Identify the Left Pedal Arm 3 which has an ÒLÓ sticker on it Be careful not to confuse the Left Pedal Arm with the Right Pedal Arm not shown look at the position of the round tube in the inset drawing to identify the Left Pedal Arm Next identify the Left Pedal 41 which has the letter ÒLÓ molded onto the bottom Turn over the L...

Page 9: ...onto one end of the Axle 19 Insert the Axle through one of the Upper Body Arms 7 and then through the Upright 2 Slide the other Upper Body Arm 7 onto the Axle Tap another 5 8Ó Axle Cap 85 onto the Axle 19 2 12 21 Lube 4 7 85 7 7 85 11 Apply a small amount of grease to the axle on the left Crank Arm 6 Slide a Nylon Washer 11 and the Left Pedal Arm 3 onto the axle on the left Crank Arm 6 Note It may...

Page 10: ...your exercise you may choose to turn the pedal disks in the opposite direction To dismount the elliptical crosstrainer wait until the pedals come to a complete stop Important The elliptical crosstrainer does not have a freewheel the pedals will continue to move until the flywheel stops When the pedals are stationary step off the highest pedal first Then step off the lowest pedal HOW TO ADJUST THE ...

Page 11: ...you reach specific exercise goals by pacing your exer cise You can choose from a sta mina building Interval program an Aerobic pro gram and a spe cial Fat Burn pro gram As you exercise seven monitor modes will provide continuous exercise feedback The monitor modes are described below SpeedÑThis mode shows your exercising pace in kilometers or miles per hour see HOW TO SELECT KILOMETERS OR MILES on...

Page 12: ...ay will appear for two seconds the console will then be ready for use Note If batteries were just installed the power will already be on Select one of the three pacer programs or the manual mode To select one of the pacer programs repeatedly press the pro gram button The program indicator will show which program you have selected To select the manual mode press the program button until the program...

Page 13: ...e reading continue to hold the contacts for about 15 seconds Make sure that your hands are positioned as described above and that you are not moving your hands excessively or squeezing the metal contacts too tightly Turn off the power To turn off the power simply wait for about six minutes If the pedals are not moved and the console buttons are not pressed for six minutes the power will turn off a...

Page 14: ...ER If the elliptical crosstrainer does not sit flat on the floor one or both of the leveling pads should be adjusted First loosen the jam nut on each leveling pad Next turn the leveling pads as needed until the elliptical crosstrainer is level When the leveling pads are prop erly adjusted firmly retighten the jam nuts PULSE SENSOR TROUBLE SHOOTING Avoid moving your hands while using the pulse sen ...

Page 15: ...uscles and on the lungs to oxygenate the blood For aerobic exercise adjust the intensity of your exercise until your heart rate is near the middle of your training zone WORKOUT GUIDELINES Each workout should include three important parts 1 a warm up 2 training zone exercise and 3 a cool down Warming up Warming up prepares the body for exercise by increasing circulation delivering more oxygen to th...

Page 16: ...lles Stretch With one leg in front of the other reach forward and place your hands against a wall Keep your back leg straight and your back foot flat on the floor Bend your front leg lean for ward and move your hips toward the wall Hold for 15 counts then relax Repeat 3 times for each leg To cause further stretching of the achilles tendons bend your back leg as well Stretches Calves achilles tendo...

Page 17: ...17 NOTES ...

Page 18: ...ight Pedal Cover 43 6 M4 x 16mm Flange Screw 44 4 Spacer 45 2 Wheel 46 2 3 8Ó x 1 3 4Ó Button Head Screw 47 1 Left Side Shield 48 1 Right Side Shield 49 1 Console Base 50 1 Reed Switch Wire 51 1 Extension Wire 52 1 Reed Switch Bracket 53 6 Plastic Tie 54 1 Reed Switch Clamp 55 1 Magnet 56 2 Pulse Grip 57 1 Resistance Control Cable 58 3 M8 Split Washer 59 2 Bumper 60 1 Upright Cap 61 2 3 4Ó Axle Ca...

Page 19: ...5 32 32 31 75 58 80 49 35 31 66 16 26 13 12 15 14 26 28 63 4 42 43 43 44 44 78 78 76 61 63 76 74 9 9 6 83 40 33 33 67 67 17 17 38 68 70 89 34 36 80 38 39 37 48 71 73 73 35 35 77 35 56 35 47 2 7 7 18 19 20 21 21 22 22 23 23 23 25 26 26 57 59 59 81 81 79 79 80 80 82 82 85 85 60 72 84 51 35 87 35 35 86 35 55 89 53 81 81 58 81 10 88 73 73 69 14 11 11 26 26 27 27 65 75 ...

Page 20: ...t extend to any product or damage to a product caused by or attributable to freight damage abuse misuse improper or abnormal usage or repairs not provided by an ICON authorized service center products used for commercial or rental purposes or products used as store display models No other warranty beyond that specifically set forth above is authorized by ICON ICON is not responsible or liable for ...

Reviews: