Selenio
TM
BNP User Guide, Release 3.7.1
79
- Messaging System Configuration
2.
Anytime you wish to make changes to an actively playing or loaded
Messaging Zone
, you must
stop the active crawl, make the desired changes, apply the changes to load them onto the BNP’s
memory, and start or restart the crawl.
3.
If you wish to change an actively playing
Messaging Zone
from one type to another (e.g., from an
Operator Message
to an
Advanced Message
), follow these guidelines:
•
Click the
Enable Status Update
button and check the current status of the
Messaging Zone
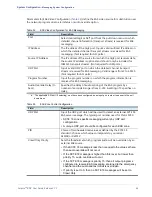
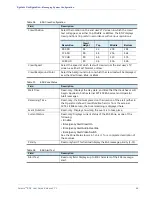
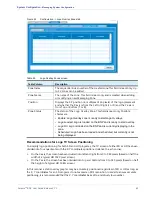
(see Table 31 on page 61 for a description of status messages).
•
If the current status of either
Operator
or
Advanced
Messaging
is
ON
, stop the crawl by clicking
Stop
in the active zone’s subtab.
•
Make any changes to the desired subtab (
Operator
or
Advanced
).
•
Click
Apply
to load the new message to the BNP’s memory.
•
Click the
Start
button to begin playing the message.
•
If the
Enable Status Update
button has been clicked, the new status will be appear as
[Operator
Messaging Text
or
Advanced Messaging]
On
in the
Current Status
field.
4.
If you wish to change a loaded but not actively playing
Messaging Zone
from one type to another
(e.g., from an
Operator Message
to an
Advanced Message
), follow these guidelines:
•
Ensure the
Enable Status Update
button has been clicked.
Note:
Use caution when opening multiple windows with the
Enable Status Update
option activated as
multiple GUI queries can place additional processing load on the BNP.
•
Confirm the current status of the
Messaging Zone
is
not
ON
(see Table 31 on page 61 for a
description of status messages).
•
Make any changes to the desired subtab (
Operator
or
Advanced
).
•
Click
Apply
to load the new message to the BNP’s memory.
•
If the
Enable Status Update
button has been clicked, the new status will be appear as
[Operator
or
Advanced] Messaging Loaded
in the Current Status field.
Logo Overlay Zones
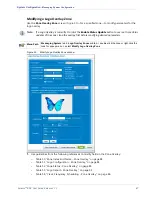
In addition to EAS and operator messaging, the BNP Messaging System Logo Overlay option supports
inserting graphic overlays into any MPEG-2 program being processed. Graphic overlays are based on
importing static graphic Portable Network Graphics (PNG) files. You can preview the imported PNG
files before starting the overlay insertion, but once the graphic has been saved and uploaded to the
BNP, you can only see the name of the last file uploaded.
The location of the logo insertion is user configurable with positioning anywhere on the display screen
defined by (x,y) screen coordinates based on pixels relating to program resolution (e.g., SD and HD).
Additionally, the BNP will support alpha channel transparency inherent in the PNG file’s creation. Logo
overlay files can be created with PNG alpha channels to control transparency effects supported by the
BNP during the insertion of the overlay.
Alpha Channel Transparency
In general, a graphics file consists of three layers, or channels: RGB for red, green, and blue. Another
type of channel may be added to a graphics file to allow for the configuration of transparency in the
pixels when the RGB colors are merged, or layered, one on top of the other. This is known as an
alpha
channel
. Alpha channels define the importance of each pixel in the layering process so that certain
portions of the image can either be completely or partially masked. This allows for rectangular-shaped

