Selenio
TM
BNP User Guide, Release 3.7.1
193
- Changing the SNMP Community String
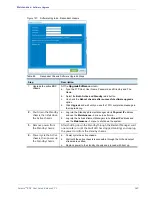
Checking Hardware Capacity Status
Use the
Hardware Capacity for Current System
section of the
License Manager
window to view
hardware capacity information—which is defined as the maximum number of licenses and bandwidth
that the system can currently support, as based on the hardware currently installed in the BNP. In the
License Manager screen
, capacity information is provided in the following rows:
•
Total Installed
—the number of licenses residing in the compact flash and the resulting potential
bandwidth available in each license category. This number of licenses shown in this display may
exceed your current hardware capability.
•
Available License
—based on either the installed licensed bandwidth or hardware capacity
bandwidth, whichever is less. In this display,
Used Bandwidth
+
Available Bandwidth
equals either
the Total Installed licensed bandwidth or the Hardware Capacity, as depending on which is lower.
•
Used License
—indicates the bandwidth actually in operation.
Flash Portability
One of the advantages of the BNP's licensing structure is flash portability. In the unlikely case that your
system suffers a catastrophic failure and you need to replace the hardware, remove the compact flash
from the old BNP chassis and install it into the new hardware. The new system should now operate just
like the old system as long as the hardware in the new system can support the same configuration. For
example, if the failed system used two processor cards with two ASI cards, your new system would
need to have the same hardware to support an identical configuration.
Changing the SNMP Community String
SNMP community strings control read and write access to BNP configuration. To
read
the BNP’s
configuration, an SNMP Network Manager must provide a community string that matches the BNP’s
Read Community String
. To
change
the BNP’s configuration, the SNMP Network Manager must
provide a string that matches the BNP’s
Write Community String
.
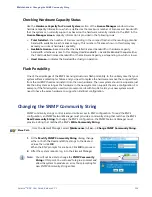
Menu Path
From the
Element Manager
, select
Maintenance
(Alt
m
)-
-> Change SNMP Community String.
1.
At the
Modify SNMP Community String
dialog, change
either or both the Read and Write strings to the desired
values, then click
OK
.
When the BNP prompts for a reboot. Click
OK
to proceed.
2.
After the system reboots, log in to the
Element Manager
.
Note:
You will not be able to change the
SNMP Community
String
at this point. You will need to log in as normal and
allow the system to produce an error, thus prompting for
new SNMP Community String entries.

