background image

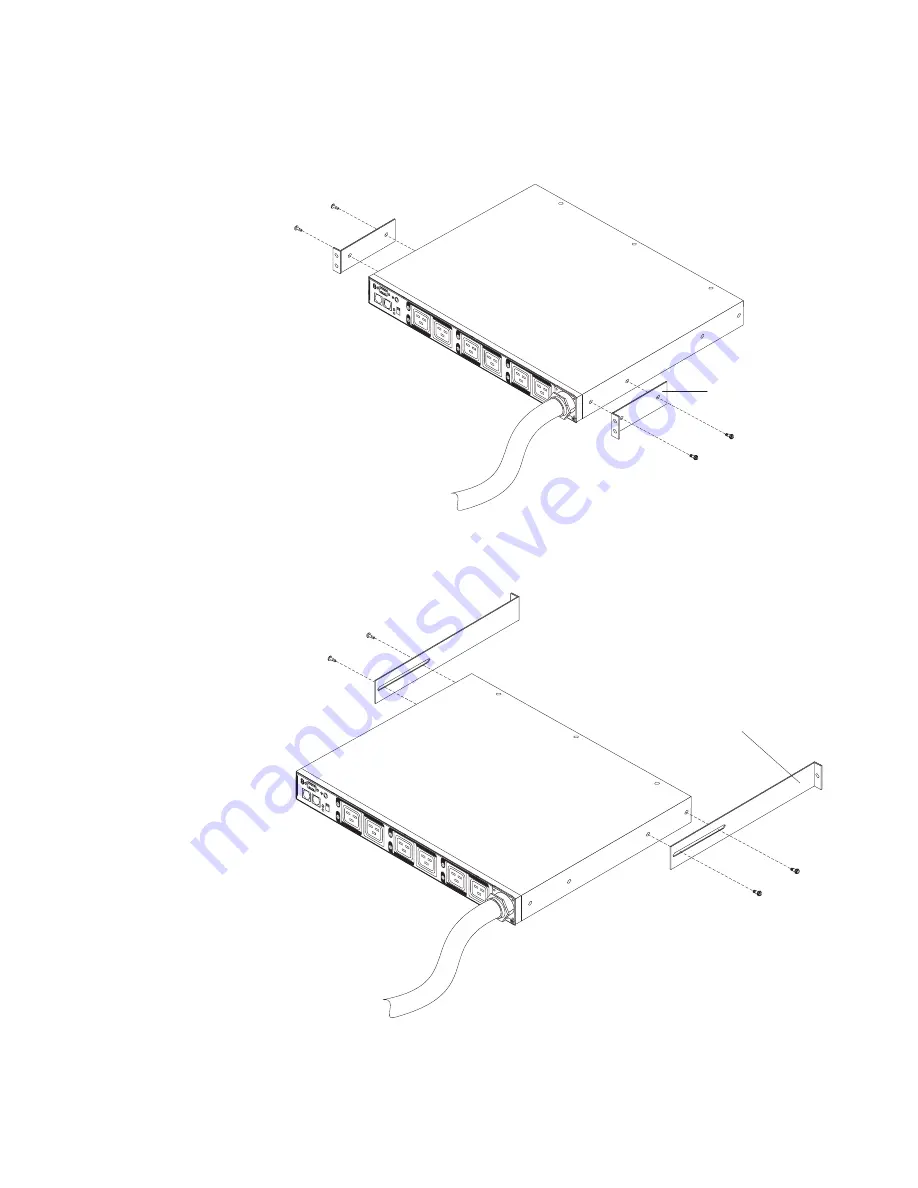
To install the PDU horizontally in a rack cabinet, complete the following steps:

1. Align the short mounting brackets with the holes in the front of the PDU and

attach the brackets to the PDU with two M3 flat-head screws per bracket. Use
the screws that come with the rack-mounting kit.

LA

N

3

4

1

2

5

6

Short mounting bracket

2. Align the long mounting brackets with the holes in the rear of the PDU and

attach the brackets to the PDU with two M3 pan-head screws with captive lock
washers per bracket. Use the screws that come with the rack-mounting kit.

LA

N

3

4

1

2

5

6

Long mounting bracket

3. Hold the PDU at a slight angle and carefully insert it into the 1 U mounting

space in the rack cabinet. Pushing in slightly on both of the long mounting
brackets helps clear the brackets from the rack flanges.

Chapter 3. Installing the PDU horizontally in a rack cabinet

21

Summary of Contents for DPI C13 3-phase PDU+

Page 1: ...DPI C13 PDU DPI C13 3 phase PDU DPI C19 PDU and DPI C19 3 phase PDU Installation and Maintenance Guide ...

Page 2: ......

Page 3: ...DPI C13 PDU DPI C13 3 phase PDU DPI C19 PDU and DPI C19 3 phase PDU Installation and Maintenance Guide ...

Page 4: ...endix B Notices on page 59 and see the Important Notices and Warranty Information documents that comes with the PDU Fourth Edition March 2013 Copyright IBM Corporation 2006 2013 US Government Users Restricted Rights Use duplication or disclosure restricted by GSA ADP Schedule Contract with IBM Corp ...

Page 5: ...necting an environmental monitoring probe 26 Chapter 5 Monitoring the power status 27 Using the IBM DPI Configuration Utility 27 Using HyperTerminal 27 Configuration Utility menu choices 31 Setting the IP address 32 Using the web interface 33 Starting the web interface 33 Environment status and configuration 34 Modifying the basic settings 36 Changing the network information 42 History and event l...

Page 6: ...églementation d Industrie Canada 62 Australia and New Zealand Class A statement 63 European Union EMC Directive conformance statement 63 Germany Class A statement 63 VCCI Class A statement 64 Japan Electronics and Information Technology Industries Association JEITA statement 64 Korea Communications Commission KCC statement 65 Russia Electromagnetic Interference EMI Class A statement 65 People s Re...

Page 7: ...n Ennen kuin asennat tämän tuotteen lue turvaohjeet kohdasta Safety Information Avant d installer ce produit lisez les consignes de sécurité Vor der Installation dieses Produkts die Sicherheitshinweise lesen Prima di installare questo prodotto leggere le Informazioni sulla Sicurezza Les sikkerhetsinformasjonen Safety Information før du installerer dette produktet Antes de instalar este produto lei...

Page 8: ...tatement are in the IBM Systems Safety Notices document under D005 Be sure to read all caution and danger statements in this document before you perform the procedures Read any additional safety information that comes with the server or optional device before you install the device DANGER Overloading a branch circuit is potentially a fire hazard and a shock hazard under certain conditions To avoid...

Page 9: ...DANGER Hazardous voltage current or energy levels are present inside any component that has this label attached Do not open any cover or barrier that contains this label L001 Safety vii ...

Page 10: ...evidence of fire water or structural damage v Disconnect the attached power cords telecommunications systems networks and modems before you open the device covers unless instructed otherwise in the installation and configuration procedures v Connect and disconnect cables as described below when installing moving or opening covers on this product or attached devices To Disconnect 1 Turn everything ...

Page 11: ... the outlet is correctly wired and grounded to prevent an electrical shock CAUTION v Do not install a unit in a rack where the internal rack ambient temperatures will exceed the manufacturer s recommended ambient temperature for all your rack mounted devices v Do not install a unit in a rack where the air flow is compromised Ensure that air flow is not blocked or reduced on any side front or back ...

Page 12: ...x DPI C13 PDU DPI C13 3 phase PDU DPI C19 PDU and DPI C19 3 phase PDU Installation and Maintenance Guide ...

Page 13: ...ad groups of the PDU showing which systems are connected to the load groups If documentation updates are available you can download them from the IBM website The PDU might have features that are not described in the documentation that comes with the PDU and the documentation might be updated occasionally to include information about those features or technical updates might be available to provide...

Page 14: ...ing command from the mnt cdrom directory sh runlinux sh Select the PDU from the Product menu The Available Topics list displays all the documents for the PDU Some documents might be in folders A plus sign indicates each folder or document that has additional documents under it Click the plus sign to display the additional documents When you select a document a description of the document is displa...

Page 15: ...ation v Danger These statements indicate situations that can be potentially lethal or extremely hazardous to you A danger statement is placed just before the description of a potentially lethal or extremely hazardous procedure step or situation Installation requirements You will need the following tools to install the PDU in a rack cabinet v One Phillips screwdriver v One 10 mm 11 32 in wrench v O...

Page 16: ...or all rack cabinets Note This part does not come with the DPI C13 3 phase PDU v Two short mounting brackets for horizontal mounting for all rack cabinets for vertical mounting in IBM Enterprise rack cabinets only v Two long mounting brackets for horizontal mounting in all rack cabinets Note This part does not come with the DPI C13 3 phase PDU 4 DPI C13 PDU DPI C13 3 phase PDU DPI C19 PDU and DPI ...

Page 17: ...ures of the PDU The PDU has the following features v Versatile sensors that are supported through environmental monitoring probe inputs Note This feature requires the environmental monitoring probe which comes with the PDU models except the DPI C13 3 phase PDU For the DPI C13 3 phase PDU you can order the environmental monitoring probe at the time of purchase v Remote monitoring of connected devic...

Page 18: ...DPI C19 3 Phase PDU Note The DPI C19 3 Phase PDU comes with an attached power cord 5 6 3 4 LAN 1 2 RS 232 serial connector LED Circuit breakers RJ 45 LAN connector RJ 45 console connector Operation mode DIP switch Power outlets Input power connector Reset button RS 232 serial connector Use the RS 232 serial connector to update the PDU firmware Reset button Use this button to reset the PDU for comm...

Page 19: ...e from the serial connection if the network upgrade is not available 1 Off 2 On Read only mode The device will run normal operational firmware but no parameters of the device can be changed by a user RJ 45 console connector Connect the DB9 to RJ 45 cable that comes with the PDU to this connector and to the serial COM connector on a workstation or notebook computer and use the workstation or notebo...

Page 20: ...d Rear view The following illustration shows the rear of the DPI C13 PDU and the DPI C13 3 phase PDU The following illustration shows the power outlets on the rear of the DPI C19 PDU and the DPI C19 3 Phase PDU 3A 1A 5A C13 outlets Labels indicating associated breakers on the front of the PDU PDU load groups The PDU load groups are described in the following tables Table 1 DPI C13 PDU and DPI C13 ...

Page 21: ...Table 2 DPI C19 PDU and DPI C19 3 phase PDU load groups Circuit breaker number Associated front outlet Associated rear outlet 1 1 1A 2 2 3 3 3A 4 4 5 5 5A 6 6 Chapter 1 Introduction 9 ...

Page 22: ...10 DPI C13 PDU DPI C13 3 phase PDU DPI C19 PDU and DPI C19 3 phase PDU Installation and Maintenance Guide ...

Page 23: ...hat will be attached to this product to properly wired outlets v When possible use one hand only to connect or disconnect signal cables v Never turn on any equipment when there is evidence of fire water or structural damage v Disconnect the attached power cords telecommunications systems networks and modems before you open the device covers unless instructed otherwise in the installation and confi...

Page 24: ...ollowing precautions v Make sure that the room air temperature is below 35 C 95 F v Do not block any air vents usually 15 cm 6 in of air space provides proper airflow v Connect all power cords to properly wired and grounded electrical outlets v Do not overload the power outlet when you install multiple devices in the rack cabinet To install a PDU in the side of a rack cabinet by using the vertical...

Page 25: ...DU and the EIA mounting flanges for the cable management bracket installation Attention You must disconnect the main input power before you connect or disconnect the input power cord from the PDU 3 If the PDU comes with a detached power cord connect the power cord Align the connector on the power cord that comes with the PDU with the connector on the front of the PDU turning as necessary for key a...

Page 26: ...with the PDU 6 Route the power cord toward a dedicated power source Use the provided cable straps to secure the power cord along the way If the power cord must exit the rack cabinet to connect to a power source use the openings in the rack cabinet 7 Connect the power cord to a properly wired and grounded dedicated power source Then you can connect servers or rack PDUs in the rack cabinet to the po...

Page 27: ...ing the rack doors and side panels might make installation easier See the rack cabinet documentation for more information Review the documentation that comes with your rack cabinet for safety and cabling information When you install the PDU in a rack cabinet observe the following precautions v Make sure that the room air temperature is below 35 C 95 F v Do not block any air vents usually 15 cm 6 i...

Page 28: ...BM Enterprise rack cabinet complete the following steps 1 Align the vertical mounting brackets to the front of the PDU Make sure that you attach the brackets so that the power outlets face the rear of the rack cabinet LAN 3 4 1 2 5 6 2 Attach the brackets to the PDU with two M3 x 5 screws per bracket Use the screws that come with the PDU 16 DPI C13 PDU DPI C13 3 phase PDU DPI C19 PDU and DPI C19 3...

Page 29: ...e main input power before you connect or disconnect the input power cord from the PDU 4 If the PDU comes with a detached power cord connect the power cord Align the connector on the power cord that comes with the PDU with the connector on the front of the PDU turning as necessary for key alignment then turn the twist lock on the connector clockwise until it locks into place Key alignment Twist loc...

Page 30: ...secure the power cord along the way If the power cord must exit the rack cabinet to connect to a power source use the openings in the rack cabinet 7 Connect the power cord to a properly wired and grounded dedicated power source Then you can connect servers or rack PDUs in the rack cabinet to the power outlets on the PDU 8 Route all the other power cords neatly and secure the power cords with cable...

Page 31: ...that the room air temperature is below 35 C 95 F v Do not block any air vents usually 15 cm 6 in of air space provides proper airflow v Plan the device installation starting from the bottom of the rack cabinet v Install the heaviest device in the bottom of the rack cabinet v Do not extend more than one device out of the rack cabinet at the same time v Connect all power cords to properly wired and ...

Page 32: ... evidence of fire water or structural damage v Disconnect the attached power cords telecommunications systems networks and modems before you open the device covers unless instructed otherwise in the installation and configuration procedures v Connect and disconnect cables as described below when installing moving or opening covers on this product or attached devices To Disconnect 1 Turn everything...

Page 33: ... the long mounting brackets with the holes in the rear of the PDU and attach the brackets to the PDU with two M3 pan head screws with captive lock washers per bracket Use the screws that come with the rack mounting kit LAN 3 4 1 2 5 6 Long mounting bracket 3 Hold the PDU at a slight angle and carefully insert it into the 1 U mounting space in the rack cabinet Pushing in slightly on both of the lon...

Page 34: ...acket Use the cage nuts or clip nuts and the screws that come with the rack mounting kit LAN 3 4 1 2 5 6 5 Secure the long mounting brackets and the 1 U blank filler panel to the rack cabinet Blank filler panel a Adjust the long mounting brackets to fit the depth of the rack cabinet b Make sure that the long mounting brackets are aligned with the inside of the rack flanges 22 DPI C13 PDU DPI C13 3...

Page 35: ... Route the power cord from the PDU toward the rack cabinet side braces then route the power cord along a side brace toward the back of the rack cabinet and secure the power cord with the cable straps that come with the PDU 8 Route the power cord toward a dedicated power source Use the provided cable straps to secure the power cord along the way If the power cord must exit the rack cabinet to conne...

Page 36: ...24 DPI C13 PDU DPI C13 3 phase PDU DPI C19 PDU and DPI C19 3 phase PDU Installation and Maintenance Guide ...

Page 37: ...or more information see Using the IBM DPI Configuration Utility on page 27 Connecting to a LAN You can monitor the PDU power outlets and digital outputs over a network through the web interface using a LAN connection Connect a router or switch to the RJ 45 LAN connector on the PDU using an Ethernet cable You can then monitor the PDU from a workstation or notebook computer that is connected to the ...

Page 38: ... that comes with the PDU has a built in temperature and humidity sensor and enables you to remotely monitor the temperature and humidity of the environment that the PDU is operating in Connect the environmental monitoring probe to the RJ 45 console connector on the PDU as shown in the following illustration LAN Ethernet cable RJ 45 console connector RJ 45 connector PDU Environmental monitoring pro...

Page 39: ... the IBM DPI Configuration Utility to configure the PDU settings such as the IP address network parameters access control table and trap receivers table You can configure the PDU by using a workstation or notebook computer that is connected to the PDU Connect the DB9 to RJ 45 cable that comes with the PDU to the RJ 45 console connector on the PDU and to a RS 232 serial COM connector on a workstati...

Page 40: ...ograms Accessories Communications HyperTerminal The Connection Description window opens 2 In the Name field type the name for the connection and select an icon for the connection Click OK The Connect To window opens 28 DPI C13 PDU DPI C13 3 phase PDU DPI C19 PDU and DPI C19 3 phase PDU Installation and Maintenance Guide ...

Page 41: ...ted to the PDU Click OK The Properties window opens 4 Click Restore Defaults to use the default settings Make sure that 9600 is selected in the Bits per second list and that None is selected in the Flow control list Click OK Chapter 5 Monitoring the power status 29 ...

Page 42: ...0rd all lowercase letters with a zero not O and press Enter The IBM DPI Configuration Utility main window opens See Configuration Utility menu choices on page 31 for descriptions of the choices in this window 30 DPI C13 PDU DPI C13 3 phase PDU DPI C19 PDU and DPI C19 3 phase PDU Installation and Maintenance Guide ...

Page 43: ...ice to set up a list of users who can access and control the PDU Set Trap Receivers Select this choice to configure remote network management system NMS servers to receive traps SNMPv3 USM Table Select this choice to set the SNMPv3 USM Table to configure the PDU using SNMPv3 tools Set Date and Time Select this choice to adjust the date and time information for the PDU Set Superuser Name and Passwo...

Page 44: ...settings to their factory default values v Restart HD PDU Select this choice to restart the PDU Setting the IP address Note You must set the IP address before you can use the web interface To set the IP address of the PDU in the Configuration Utility main menu select IBM DPI Settings and then select Set the IP Address Gateway Address and MIB System Group You must set the IP address before you can ...

Page 45: ...ame field type USERID all uppercase letters In the Password field type passw0rd all lowercase letters with a zero not O 3 Click OK The main status page opens The main page shows a graphical representation of the PDU power outlets and input status v The left pane shows the menus and submenus for the PDU Click a menu to display the menu choices expand the menu items and modify the menu choices as re...

Page 46: ...ring probe on page 45 Viewing the status On the Status of Environment Sensor page you can view the environment status temperature and humidity To view the status of an environmental monitoring probe that is connected to the PDU click Status under Environment The Status of Environment Sensor page opens and the temperature and humidity of the environment sensor are displayed 34 DPI C13 PDU DPI C13 3...

Page 47: ...he system configuration of the environment sensor To configure the environmental monitoring probe that is connected to the PDU click Configuration under Environment You can set the sensor names high and low set points and the calibration offsets of the sensors Chapter 5 Monitoring the power status 35 ...

Page 48: ...iguration page you can set the user name and password of the administrator who will use a web browser to configure the PDU To change the superuser name and password complete the following steps 1 From the main status page in the left navigation pane click System 2 Click Configuration to view and modify the system configuration and superuser user name and password 36 DPI C13 PDU DPI C13 3 phase PDU...

Page 49: ...and Web SNMP card information To view the power management information of the PDU and Web SNMP card complete the following steps 1 From the main status page in the left navigation pane click System 2 Click Identification to view the PDU and Web SNMP card information Chapter 5 Monitoring the power status 37 ...

Page 50: ...ccess and control the PDU complete the following steps 1 From the main status page in the left navigation pane click System 2 Click Multi User You can add users who can only view the PDU status or users who can change the PDU settings 38 DPI C13 PDU DPI C13 3 phase PDU DPI C19 PDU and DPI C19 3 phase PDU Installation and Maintenance Guide ...

Page 51: ... e mail traps and logs To change the date and time complete the following steps 1 From the main status page in the left navigation pane click System 2 Click Date and Time to view and modify the system date and time You can set the date and time manually synchronize it with the computer time or synchronize it with an NTP server Chapter 5 Monitoring the power status 39 ...

Page 52: ...us page in the left navigation pane click System 2 Click Trap Receivers to create a list of users or workstations who will be alerted with an SNMP trap message You can specify the IP addresses of up to eight trap receivers the community information type of trap severity of trap and description of the events that cause the traps 40 DPI C13 PDU DPI C13 3 phase PDU DPI C19 PDU and DPI C19 3 phase PDU...

Page 53: ...who will be alerted with an e mail Use this menu to specify the mail server user account DNS and other information that is necessary to set up a mail server for sending mail alerts Use the Email Receivers Table to add the e mail addresses Chapter 5 Monitoring the power status 41 ...

Page 54: ...ck Configuration You can set the PDU IP address gateway address subnet mask and Domain Name System DNS address Click Control under Network to configure TCP IP settings Click Access Control under Network to set access control to prevent unauthorized users from accessing the PDU Click SNMPv3 USM Table to configure SNMPv3 settings 42 DPI C13 PDU DPI C13 3 phase PDU DPI C19 PDU and DPI C19 3 phase PDU...

Page 55: ...nmental monitoring probe To view the history of the PDU under Logs click History Each log file shows a record of the input power output power of each outlet and environmental monitoring probe temperature and humidity Viewing the event log On the Event Log page you can view the complete record of the PDU events To view the complete record of the PDU events under Logs click Event Each event log file...

Page 56: ...44 DPI C13 PDU DPI C13 3 phase PDU DPI C19 PDU and DPI C19 3 phase PDU Installation and Maintenance Guide ...

Page 57: ...tal monitoring probe Features The environmental monitoring probe has the following features v The hot swap feature simplifies installation by enabling you to install the probe safely without turning off power to the PDU or to the loads that are connected to it v It monitors temperature and humidity information of any environment that you want to protect your critical equipment v It measures temper...

Page 58: ...onitoring probe screw terminal pin assignment Pin number Description Normally open normally closed 1 Contact 1 return Normally closed 2 Contact 1 signal input Normally open 3 Contact 2 return Normally closed 4 Contact 2 signal input Normally open 2 Connect the CAT5 network cable that comes with the PDU to the environmental monitoring probe RJ 45 connector and to the RJ 45 console connector on the ...

Page 59: ...ee Using the web interface on page 33 The web interface main status page opens Click Environment and then click Status The Status of Environment Sensor page opens The temperature and humidity status is automatically displayed Chapter 6 Using the environmental monitoring probe 47 ...

Page 60: ...Configuration The Configuration of Environment Sensor page opens You can configure and enable both contacts and set upper and lower ranges of temperature and humidity that will generate SNMP traps and e mail notification if the PDU is configured to do so 48 DPI C13 PDU DPI C13 3 phase PDU DPI C19 PDU and DPI C19 3 phase PDU Installation and Maintenance Guide ...

Page 61: ...U with IEC 309 2P N Gnd connector 40K9637 39M5428 DPI 60 amp 208 V 1 phase Enterprise C13 PDU with IEC 309 2P Gnd connector 40K9637 39M5431 DPI 63 amp 250 V 1 phase Enterprise C13 PDU with IEC 309 2P N Gnd connector 40K9637 39M5429 DPI 32 amp 250 V 3 phase Enterprise C13 PDU with IEC 309 3P N Gnd connector 40K9637 39M5427 DPI 30 amp 208 V 1 phase Enterprise C13 PDU with Nema L6 30P connector 40K96...

Page 62: ...50 DPI C13 PDU DPI C13 3 phase PDU DPI C19 PDU and DPI C19 3 phase PDU Installation and Maintenance Guide ...

Page 63: ...th IEC 309 3P Gnd connector 7 DPI 60 amp 208 V 1 phase Enterprise C19 PDU with IEC 309 2P Gnd connector 8 DPI 63 amp 250 V 1 phase Enterprise C19 PDU with IEC 309 2P N Gnd connector 9 DPI 32 amp 250 V 3 phase Enterprise C19 PDU with IEC 309 3P N Gnd connector 10 DPI 60 amp 208 V 3 phase Enterprise C19 PDU with IEC 309 3P Gnd connector Height 43 9 mm 1 73 in Width 447 mm 17 6 in Depth 350 mm 13 78 ...

Page 64: ...h rated circuit breakers rated at 20 amps Power cord 1 One IEC 309 2P N Gnd connector rated at 32 amps 2 One IEC 309 2P Gnd connector rated at 60 amps 3 One IEC 309 2P N Gnd connector rated at 63 amps 4 One IEC 309 3P N Gnd connector rated at 32 amps 5 One Nema L6 30P connector rated at 30 amps 6 One IEC 309 3P Gnd connector rated at 60 amps 7 One IEC 309 2P Gnd connector rated at 60 amps 8 One IE...

Page 65: ...ps 250 V ac IEC 309 P N Gnd v DPI 63 amp 250 V 1 phase Enterprise C13 PDU with IEC 309 2P N Gnd connector v DPI 63 amp 250 V 1 phase Enterprise C19 PDU with IEC 309 2P N Gnd connector N L G N L G 63 amps 250 V ac IEC 309 3P N Gnd v DPI 30 amp 208 V 1 phase Enterprise C13 PDU with Nema L6 30P connector G X Y G X Y 30 amps 250 V ac NEMA L6 30 v DPI 60 amp 208 V 1 phase Enterprise C13 PDU with IEC 30...

Page 66: ...54 DPI C13 PDU DPI C13 3 phase PDU DPI C19 PDU and DPI C19 3 phase PDU Installation and Maintenance Guide ...

Page 67: ...proven compat us to make sure that the hardware and software is supported by your IBM product v Go to http www ibm com supportportal to check for information to help you solve the problem v Gather the following information to provide to IBM Support This data will help IBM Support quickly provide a solution to your problem and ensure that you receive the level of service for which you might have co...

Page 68: ...ttp www ibm com systems bladecenter The address for IBM IntelliStation information is http www ibm com systems intellistation How to send Dynamic System Analysis data to IBM Use the IBM Enhanced Customer Data Repository to send diagnostic data to IBM Before you send diagnostic data to IBM read the terms of use at http www ibm com de support ecurep terms html You can use any of the following method...

Page 69: ...ttp www ibm com partnerworld and click Find Business Partners on the right side of the page For IBM support telephone numbers see http www ibm com planetwide In the U S and Canada call 1 800 IBM SERV 1 800 426 7378 In the U S and Canada hardware service and support is available 24 hours a day 7 days a week In the U K these services are available Monday through Friday from 9 a m to 6 p m IBM Taiwan...

Page 70: ...58 DPI C13 PDU DPI C13 3 phase PDU DPI C19 PDU and DPI C19 3 phase PDU Installation and Maintenance Guide ...

Page 71: ... FOR A PARTICULAR PURPOSE Some states do not allow disclaimer of express or implied warranties in certain transactions therefore this statement may not apply to you This information could include technical inaccuracies or typographical errors Changes are periodically made to the information herein these changes will be incorporated in new editions of the publication IBM may make improvements and o...

Page 72: ...ications volume MB stands for 1 000 000 bytes and GB stands for 1 000 000 000 bytes Total user accessible capacity can vary depending on operating environments Maximum internal hard disk drive capacities assume the replacement of any standard hard disk drives and population of all hard disk drive bays with the largest currently supported drives that are available from IBM Maximum memory might requ...

Page 73: ...ntation of appropriate remedial measures to mitigate such environmental contamination Implementation of such remedial measures is a customer responsibility Table 4 Limits for particulates and gases Contaminant Limits Particulate v The room air must be continuously filtered with 40 atmospheric dust spot efficiency MERV 9 according to ASHRAE Standard 52 21 v Air that enters a data center must be fil...

Page 74: ... a commercial environment This equipment generates uses and can radiate radio frequency energy and if not installed and used in accordance with the instruction manual may cause harmful interference to radio communications Operation of this equipment in a residential area is likely to cause harmful interference in which case the user will be required to correct the interference at his own expense P...

Page 75: ...Department M372 IBM Allee 1 71139 Ehningen Germany Telephone 49 7032 15 2941 Email lugi de ibm com Germany Class A statement Deutschsprachiger EU Hinweis Hinweis für Geräte der Klasse A EU Richtlinie zur Elektromagnetischen Verträglichkeit Dieses Produkt entspricht den Schutzanforderungen der EU Richtlinie 2004 108 EG zur Angleichung der Rechtsvorschriften über die elektromagnetische Verträglichke...

Page 76: ...erantwortliche Ansprechpartner des Herstellers in der EU ist IBM Deutschland GmbH Technical Regulations Abteilung M372 IBM Allee 1 71139 Ehningen Germany Telephone 49 7032 15 2941 Email lugi de ibm com Generelle Informationen Das Gerät erfüllt die Schutzanforderungen nach EN 55024 und EN 55022 Klasse A VCCI Class A statement This is a Class A product based on the standard of the Voluntary Control ...

Page 77: ...uipment for business Type A Sellers and users need to pay attention to it This is for any areas other than home Russia Electromagnetic Interference EMI Class A statement People s Republic of China Class A electronic emission statement Taiwan Class A compliance statement Appendix B Notices 65 ...

Page 78: ...66 DPI C13 PDU DPI C13 3 phase PDU DPI C19 PDU and DPI C19 3 phase PDU Installation and Maintenance Guide ...

Page 79: ... 55 I IBM Support Line 56 important notices 3 installation requirements 3 L LED green 6 load groups PDU 8 M monitoring power status 27 N notes 3 notes important 60 notices 59 electronic emission 62 FCC Class A 62 notices and statements 3 O option package contents 4 P particulate contamination 61 parts that come with PDU 4 PDU connecting an environmental monitoring probe 26 connecting output device...

Page 80: ...ic emission Class A notice 62 United States FCC Class A notice 62 W web interface Environment page changing configuration 35 viewing status 34 History page viewing history log 43 Network page changing network configuration 42 starting 33 System page adding users 38 changing date and time 39 changing event alerts 40 changing superuser name and password 36 viewing power management information 37 web...

Page 81: ......

Page 82: ... Part Number 00D2430 Printed in USA 1P P N 00D2430 ...

Reviews: