background image

16

TECHNICAL INFORMATION

TECHNICAL DATA

Height:

850 mm

Width:

595 mm

Depth:

745 mm

Weight (net):

62 kg

Cylinder volume:

145 l

Max. drying capacity:

8 kg 

Speed:

50-55 rpm

Sound pressure level:

The sound pressure level is below 66 dB (A)

Rated power:

See type plate.

Drum material:

Stainless steel

Outer casing material:

Powder-coated and hot-galvanized sheet steel or stainless steel

Setup:

Stacking or freestanding

Test method for noise measurement: IEC 60 704-2-6.

This product contains fluorinated greenhouse gases.

Type of refrigerant: 

R134a

Quantity of refrigerant: 

0,48 kg

Total GWP: 

1430

CO

2

 equivalent: 

0,686 t

Hermetically sealed.

Summary of Contents for ES80PEHP

Page 1: ... to the family of Imesa customers We hope that you will have many years of use from your new machine The machine has many features To make the most of its functions we recommend that you read the operating instructions before using the machine The operating instructions include information on how you can help protect the environment ...

Page 2: ... 11 You can carry out the following settings 11 How to choose the settings 11 Audible volume 11 Language 11 Child safe 11 CARE AND CLEANING 12 Cleaning the lint filter 12 Emptying the condensed water container 13 Cleaning the evaporator filter and evaporator 13 Cleaning the outside of the machine 14 TROUBLESHOOTING 15 The machine will not start 15 The machine loses all power during a programme 15 ...

Page 3: ...is Deutsch Italiano Espanol Русский Nederlands 2 Press Stop to save the setting LAUNDRY LABELS Certain materials are not suitable for tumble drying Always check and follow the instructions on each item s laundry label You can find more information in the Advice and tips before you tumble dry chapter NOTE When starting the tumble dryer for the first time or after a long period without use you may n...

Page 4: ...remover turpentine wax and wax remover should be washed in hot water with extra detergent before they go in the tumbler dryer Items such as foam rubber latex plastic waterproof textiles rubber coated items and clothes and foam rubber filled cushions must not be dried in the tumbler dryer Fabric softener or similar products should be used as per the recommendations of the detergent manufacturer Thi...

Page 5: ...less all items are quickly removed from the machine and spread out so that the heat is led away INSTALLATION See the section Installation WARNING Do not start the machine until it has been in position for 24 hours If for some reason the tumble dryer needs to be laid down for transport or service it must be laid on its left side viewed from the front TRANSPORT WINTER STORAGE If you need to move you...

Page 6: ...urn off the machine using the main power switch 2 Press the Stop button and switch on the machine with the main power switch Then press the Stop button 5 times within 10 seconds 3 Select the setting you want to change by turning the programme selector 4 Press the Stop button once 5 Change and save the setting as described below 6 Press the Start button to return to the programme menu You can activ...

Page 7: ...7 DESCRIPTION OF THE TUMBLE DRYER 1 Main power switch 2 Condensed water container 3 Panel 4 Type plate 5 Lint filter 6 Outer door 7 Heat pump and filter 1 7 2 3 4 5 6 ...

Page 8: ...symbol means that the material is not suitable for tumble drying Certain materials may melt or become a fire hazard if exposed to heat and others can lose their shape or shrink And do not tumble dry materials labelled Do not dry near heat garments that have been dry cleaned at home plastic foam fibre glass material wool must not be tumble dried because of the risk of felting STATIC ELECTRICITY To ...

Page 9: ...mal These programmes shut off the heat once the load is dry but before it is bone dry The Auto dry programme shuts off the heat slightly later than Auto normal dry Use trial and error to find out what works best Auto normal dry Temperature normal These programmes shut off the heat once the load is dry but before it is bone dry The Auto dry programme shuts off the heat slightly later than Auto norm...

Page 10: ...ing fan continues to run after the programme finishes but stops automatically or when any button knob is activated Backlighting Two minutes after the drying programme finishes the backlighting on the display and options buttons enters energy saving mode Turn the programme selector if you want to activate the machine Condensed water The condensed water container must be emptied after each load Remo...

Page 11: ...uld audibly indicate that the programme is finished or that an error has occurred 2 Press the Stop button once to save the setting LANGUAGE You will be prompted to select the display language when you have connected your machine and start it for the first time Do as follows 1 Turn the programme selector and choose from US English EU English Svenska Dansk Norsk Suomi Français Deutsch Italiano Espan...

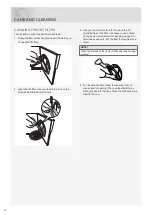
Page 12: ...3 Use your hand or a soft cloth to remove the lint from all sides of the filter If necessary use a damp sponge and a small amount of washing up liquid to remove any deposits Dry the filter thoroughly with a towel NOTE Clean the surface of the lint fluf filter after each drying program 4 To close the lint filter follow the reverse order of steps used for opening Then replace the filter by sliding i...

Page 13: ...rate drain see the installation instructions in the set of documents NOTE Empty the condensate tank after each drying cycle NOTE The dryer must not be used without the condenser unit in place CLEANING THE EVAPORATOR FILTER AND EVAPORATOR Clean the evaporator and the evaporator filter at the intervals shown on the machine s display or more often 1 Turn off the Main power switch and open the outer d...

Page 14: ... the filter at the intervals shown on the machine s display or more often 1 Pull the condensed water container out and up 2 Unscrew and remove the auto filter Sealing 3 Rinse the auto filter clean with water 4 Screw the autofilter back into place Check that the seal is properly seated NOTE Clean the filters after each drying Do not replace the filters if they are damp or wet Damp or wet filters co...

Page 15: ...hapter Empty the condensed water container Clean the evaporator filter net filter foam filter evaporator lint filter and autofilter see chapter Care and cleaning ERROR MESSAGES If Over Flow appears on the display the condensed water container is full or the evaporator filter is blocked Empty the container clean the filter and restart the machine See the Care and cleaning chapter Read Drying takes ...

Page 16: ... is below 66 dB A Rated power See type plate Drum material Stainless steel Outer casing material Powder coated and hot galvanized sheet steel or stainless steel Setup Stacking or freestanding Test method for noise measurement IEC 60 704 2 6 This product contains fluorinated greenhouse gases Type of refrigerant R134a Quantity of refrigerant 0 48 kg Total GWP 1430 CO2 equivalent 0 686 t Hermetically...

Page 17: ... can be found on the first page of the operating instructions and on the machine panel The type designation 2 and serial number 3 can be found on the type plate which is found on the front of the tumble dryer inside the outer door NOTE For repairs and maintenance original spare parts must be used 1 TYPE 3 2 NOTE Repair or any warranty claim resulting from incorrect connection or use of the dryer s...

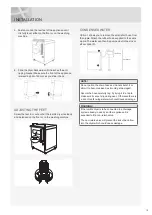
Page 18: ...hose of the tumble dryer The tumble dryer s plinth ventilation must not be blocked by a rug or the like TIP To improve ventilation leave the door to the room where the tumble dryer is located open A FREESTANDING The tumble dryer can be positioned beside the washing machine An air gap of at least 5 mm must be left between the washing machine and the tumble dryer If the customer has a problem with t...

Page 19: ...the small short hose from the nipple Attach the rubber hose supplied to the same nipple The water can then be pumped out into a sink or a floor drain 2 NOTE Do not pull on the drain hose and do not stretch it or allow it to become kinked as it could get damaged Secure the hose carefully e g by trying it to a tap to make sure it cannot slip during use Otherwise there is a risk of overflowing water ...

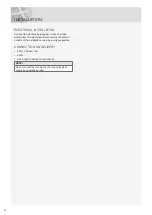
Page 20: ...socket The electrical wall socket must be placed outside of the installation area to be easily accessible CONNECTION ON DELIVERY 230V 1 Phase 10A 50Hz Use a type A residual current device NOTE Do not connect the machine to the mains electricity supply by an extension lead INSTALLATION ...

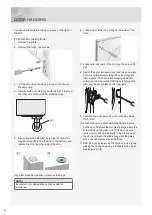
Page 21: ...21 1 Hinge pins top and bottom 2 Cover plate 3 Plastic plugs on the upper and lower edges 4 Locking hook 5 Hinges left right side 6 Plinth DOOR HANGING 2 4 1 3 5 6 ...

Page 22: ...he inside of the door 7 Loosen the inner part of the door pull down and lift out 8 Switch the catch magnetic lock and the cover plate First loosen the screw holding the catch magnetic lock in place Then use a flat bladed screwdriver to remove the cover plate Refit the catch magnetic lock and the cover plate on the other side 9 Reattach the inner part of the door with the screws 13 in total 10 Loos...

Page 23: ...23 NOTES ...
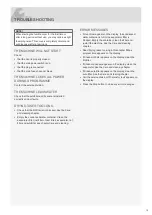
Page 24: ...ECT A PROGRAMME AND ANY OPTIONS Turn the programme selector to the required programme DRYING PROGRAMME FINISHED The text End appears on the display when the programme is finished Clean the lint filter after each load Turn off the main power switch Close the door PRESS THE START BUTTON We reserve the right to make changes ...

Reviews: